In this article, we will use a Fanuc palletizing robot along with ROBOGUIDE software to show how automating palletizing can make operations safer and more profitable.
We'll cover real-life production scenarios and address issues unique to palletizing, such as deviations in the Z direction of boxes or bags.
If there are more changes that need to be made in the unit load, then you will need to adjust the unit load.
Change the Layers
Start by opening up the teach pendant. Click the TP (teach pendant) button on the top menu.
Then we will run the cell by pressing the Play button on the toolbar.
If you do not open the teach pendant prior to starting, you might have to restart the cell and open it again.
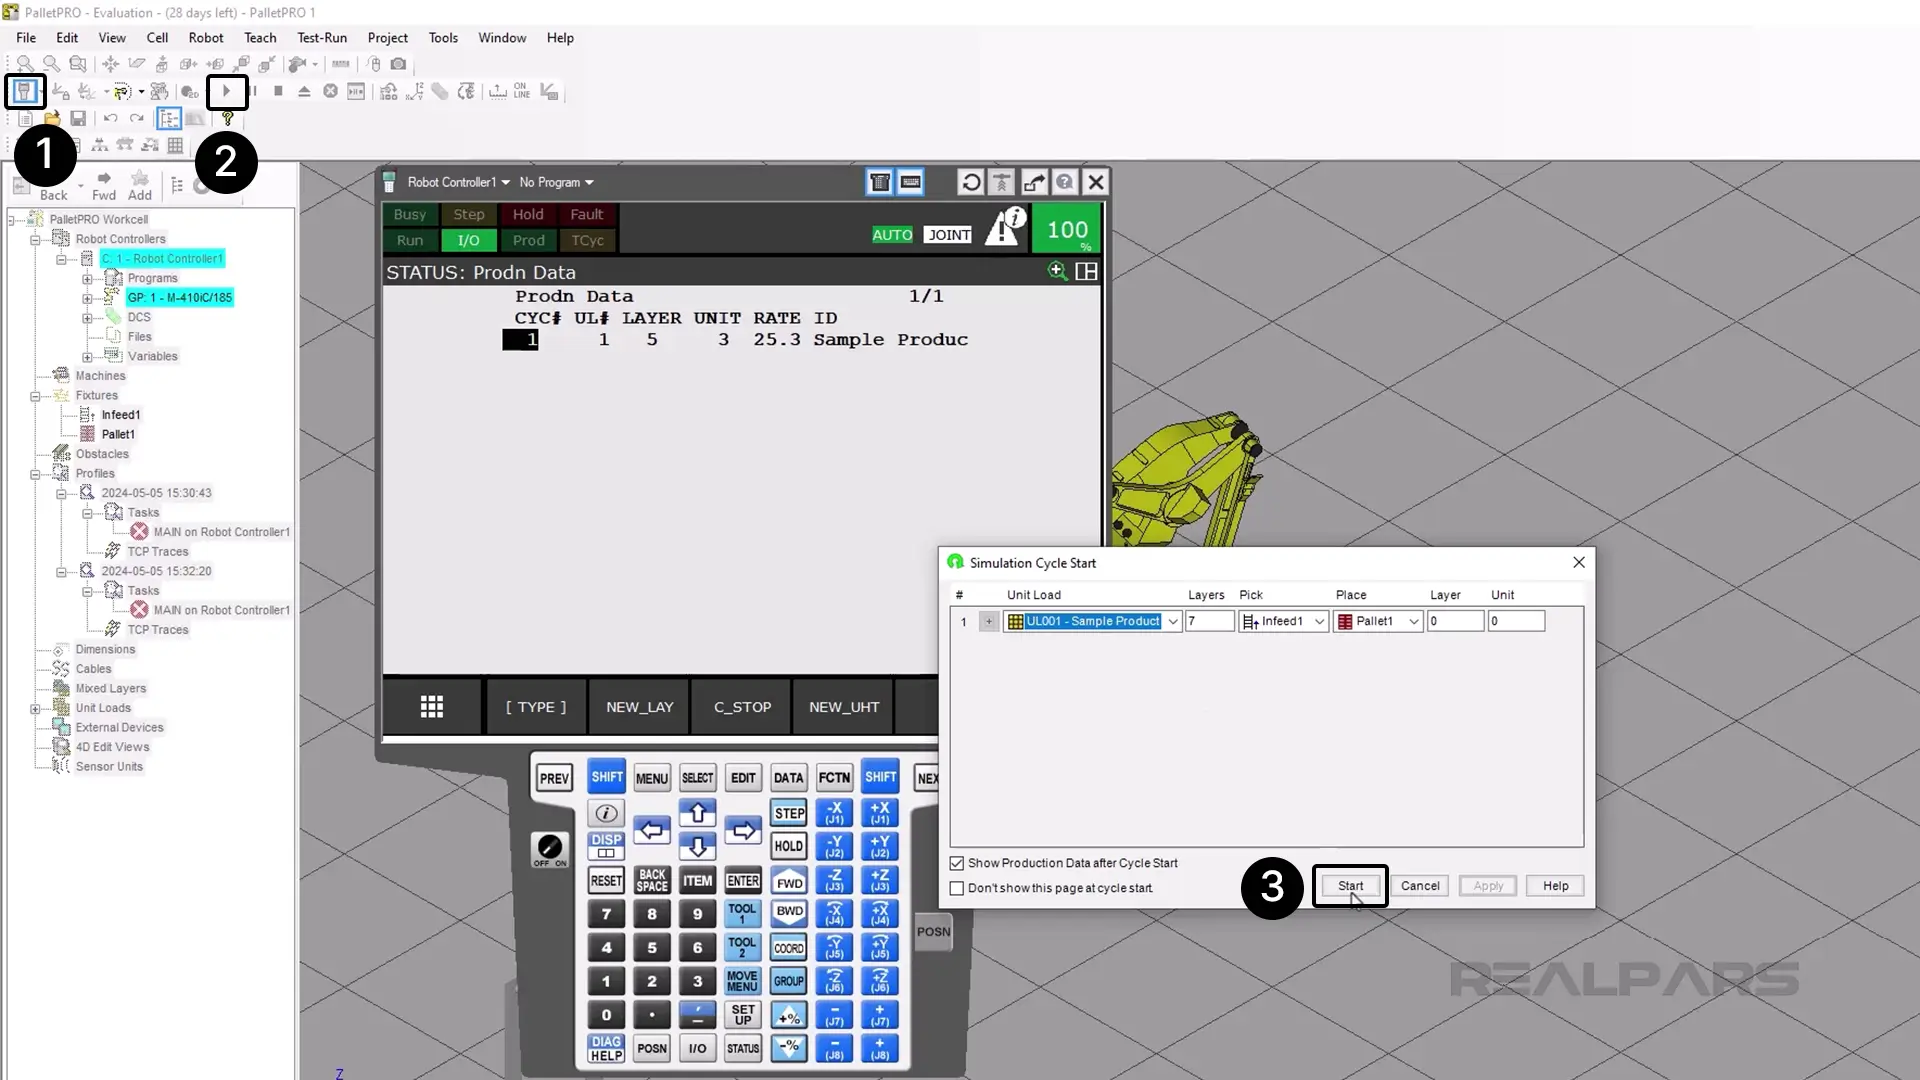
This is the production screen. There are three ways to get to this screen.
Press Status on the bottom of the teach pendant soft keys.
Press MENU, then press 0 for NEXT, then press 4 for Status, and then press 1 for Prod Data.
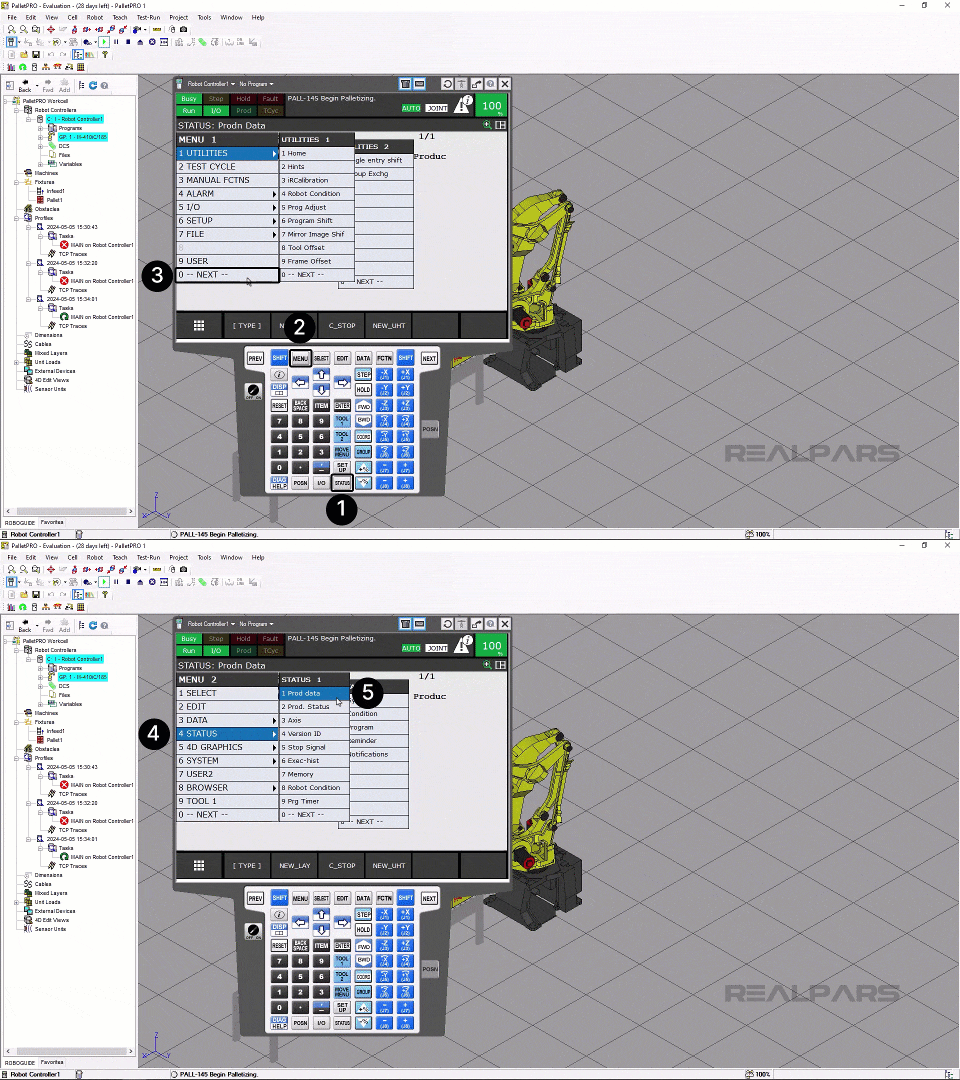
Or, if you are in PalletPro, it will automatically come up when you run the cell.
Now, let’s see what the F key buttons do.
Press F2 for NEW_LAYER.
Notice that you get the following error: PAL-145 Robot must be in production.
This fault means that you need to be running in production. The same applies to the NEW UHT (new unit height) or F4 button.
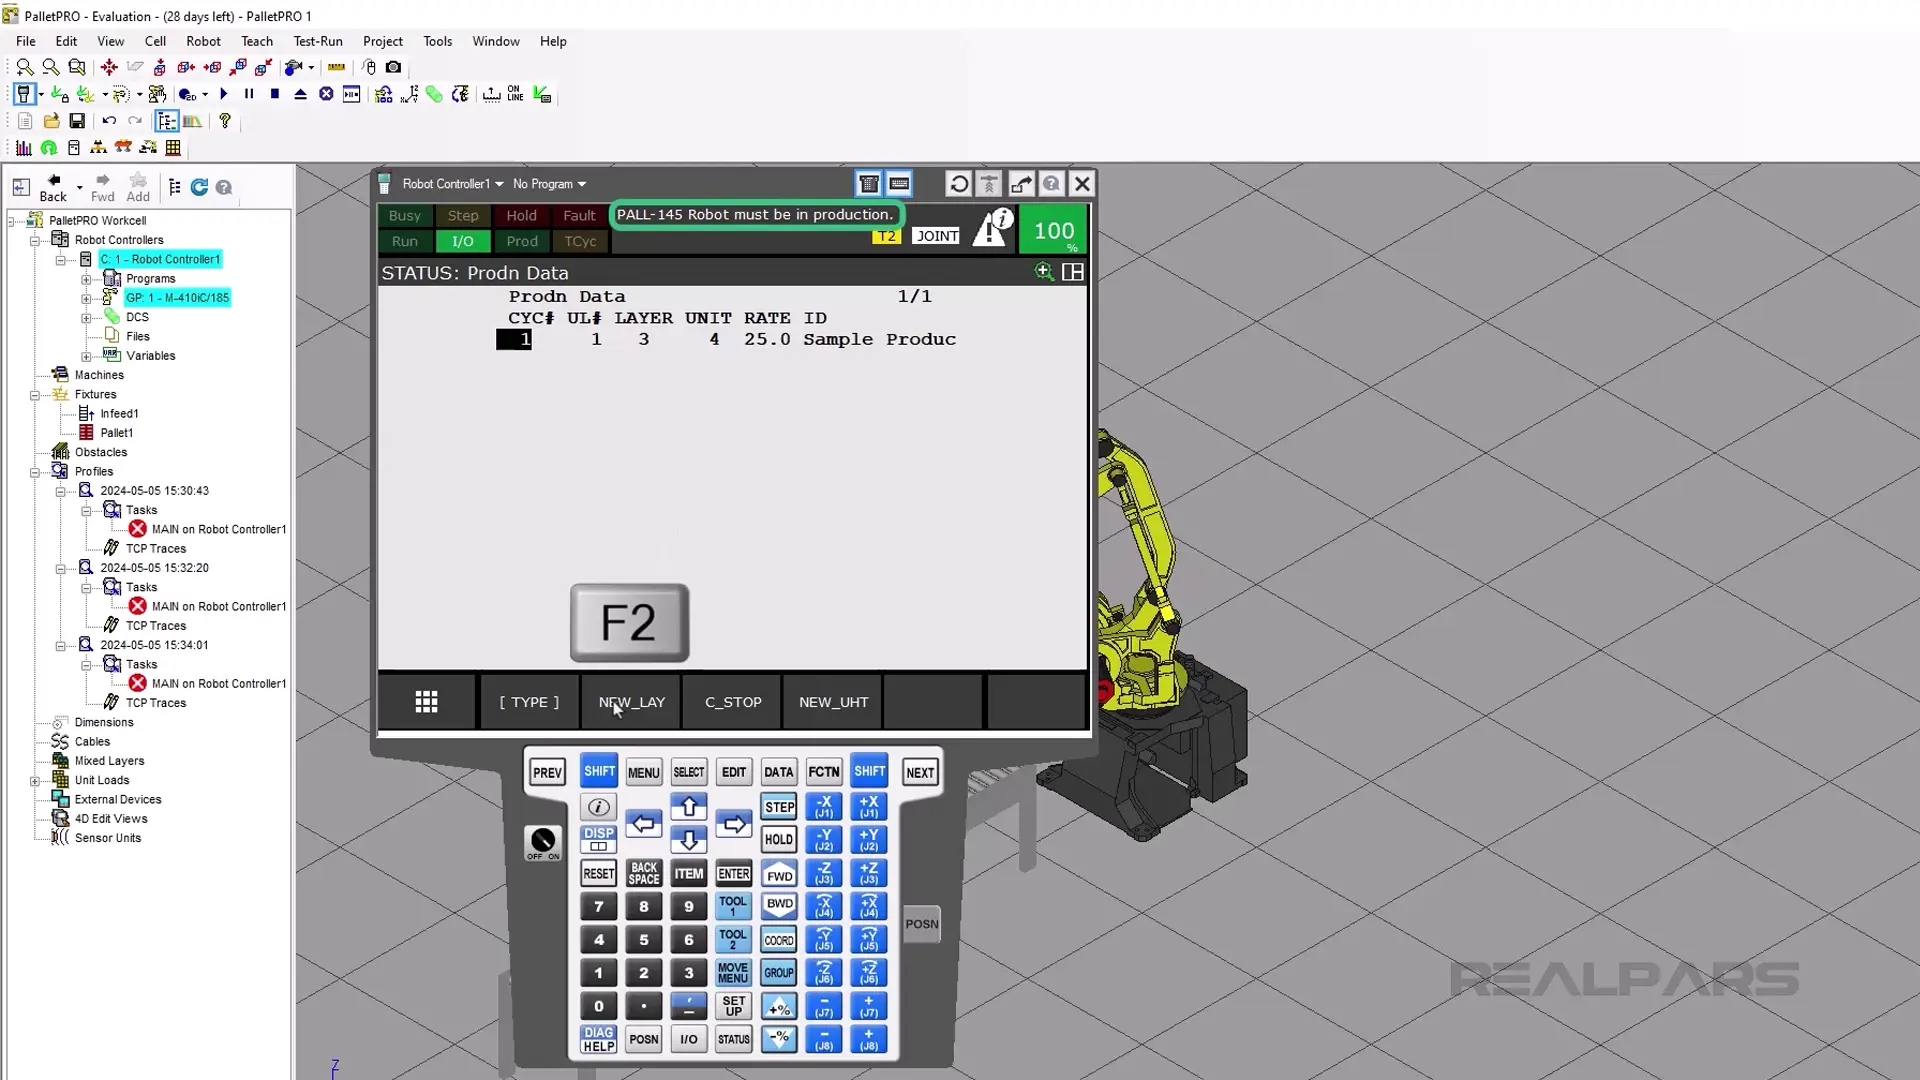
You can press the F3 for C_STOP but this will not do anything due to the robot being stopped already.
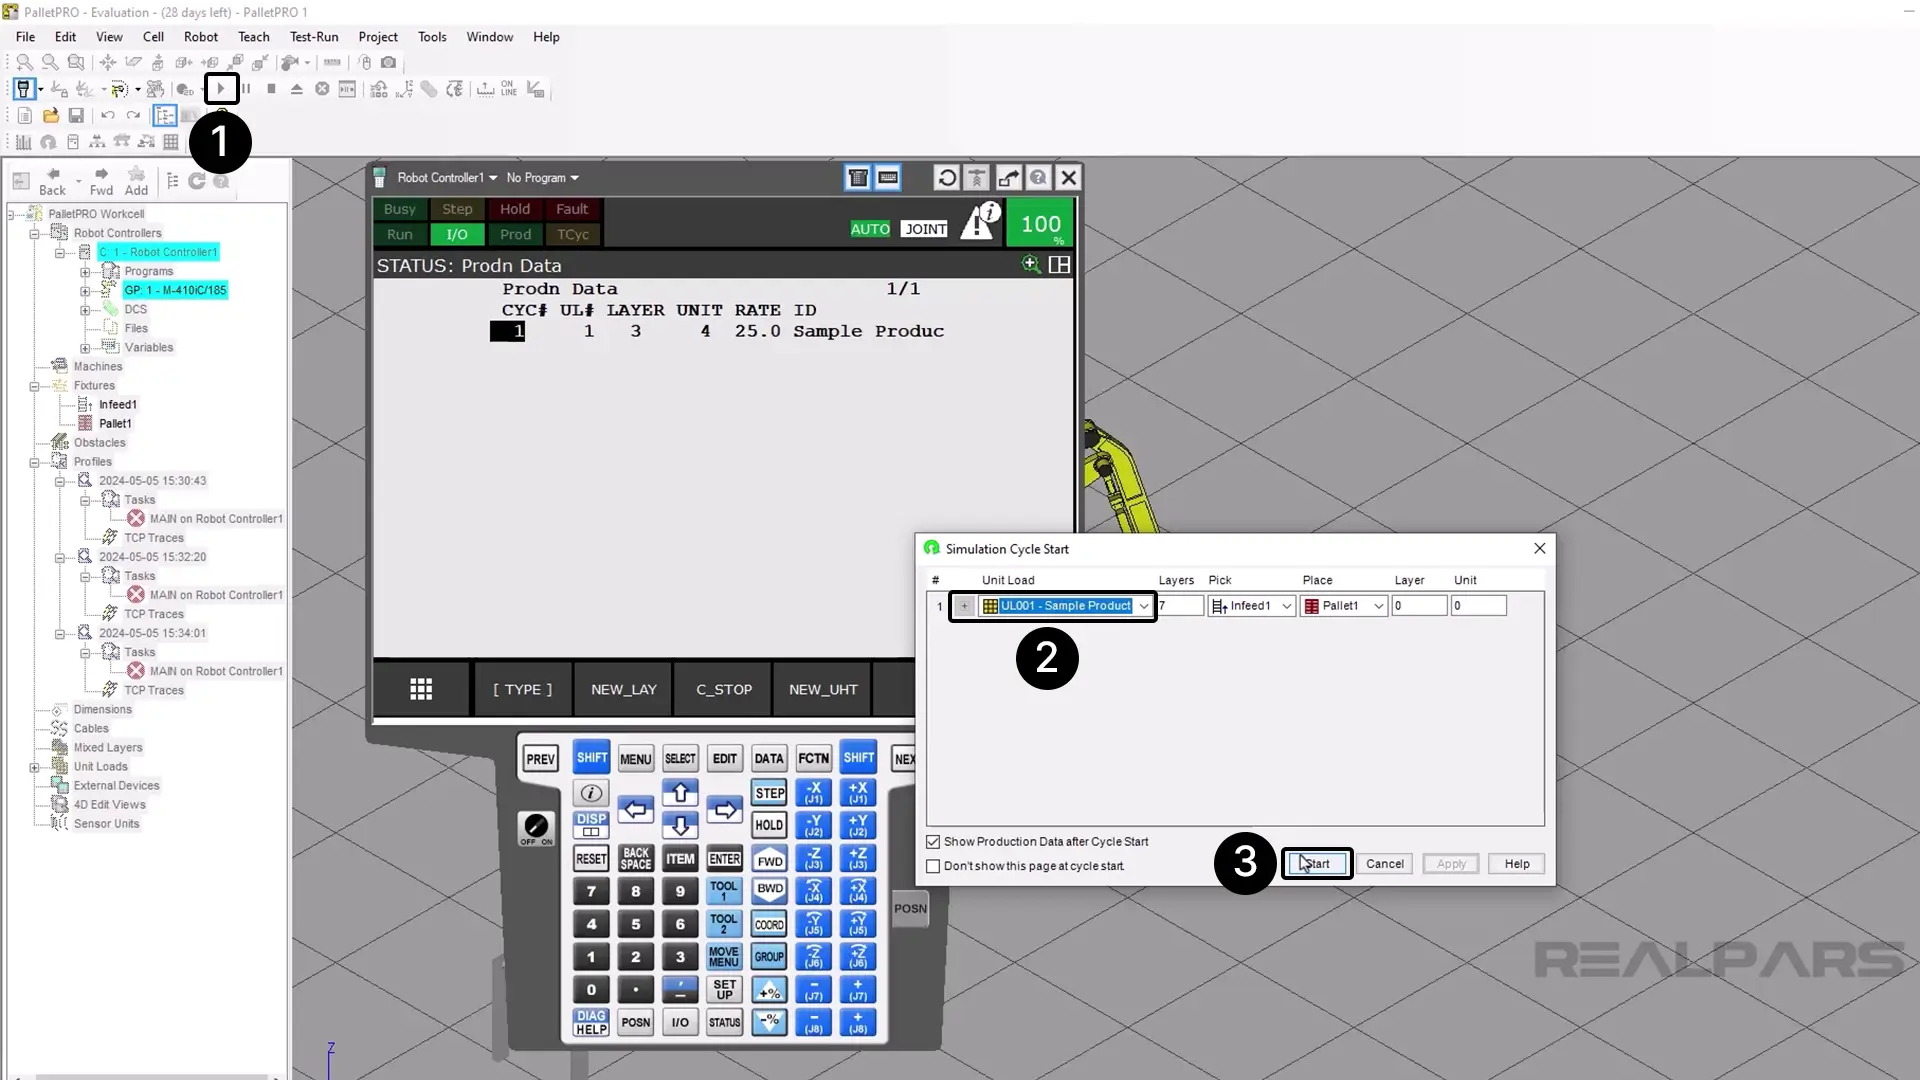
Now let’s start production by playing the cell.
Select the unit load data. Your recipe and infeeds may be different from what I am showing you here. Then press Start.
Press F2 for New Layer.
You will then be prompted to answer the following statement: Enter pallet number.
Enter 1 since we only have one pallet station in the example project. If you have more than one pallet enter the pallet station that you want to change.
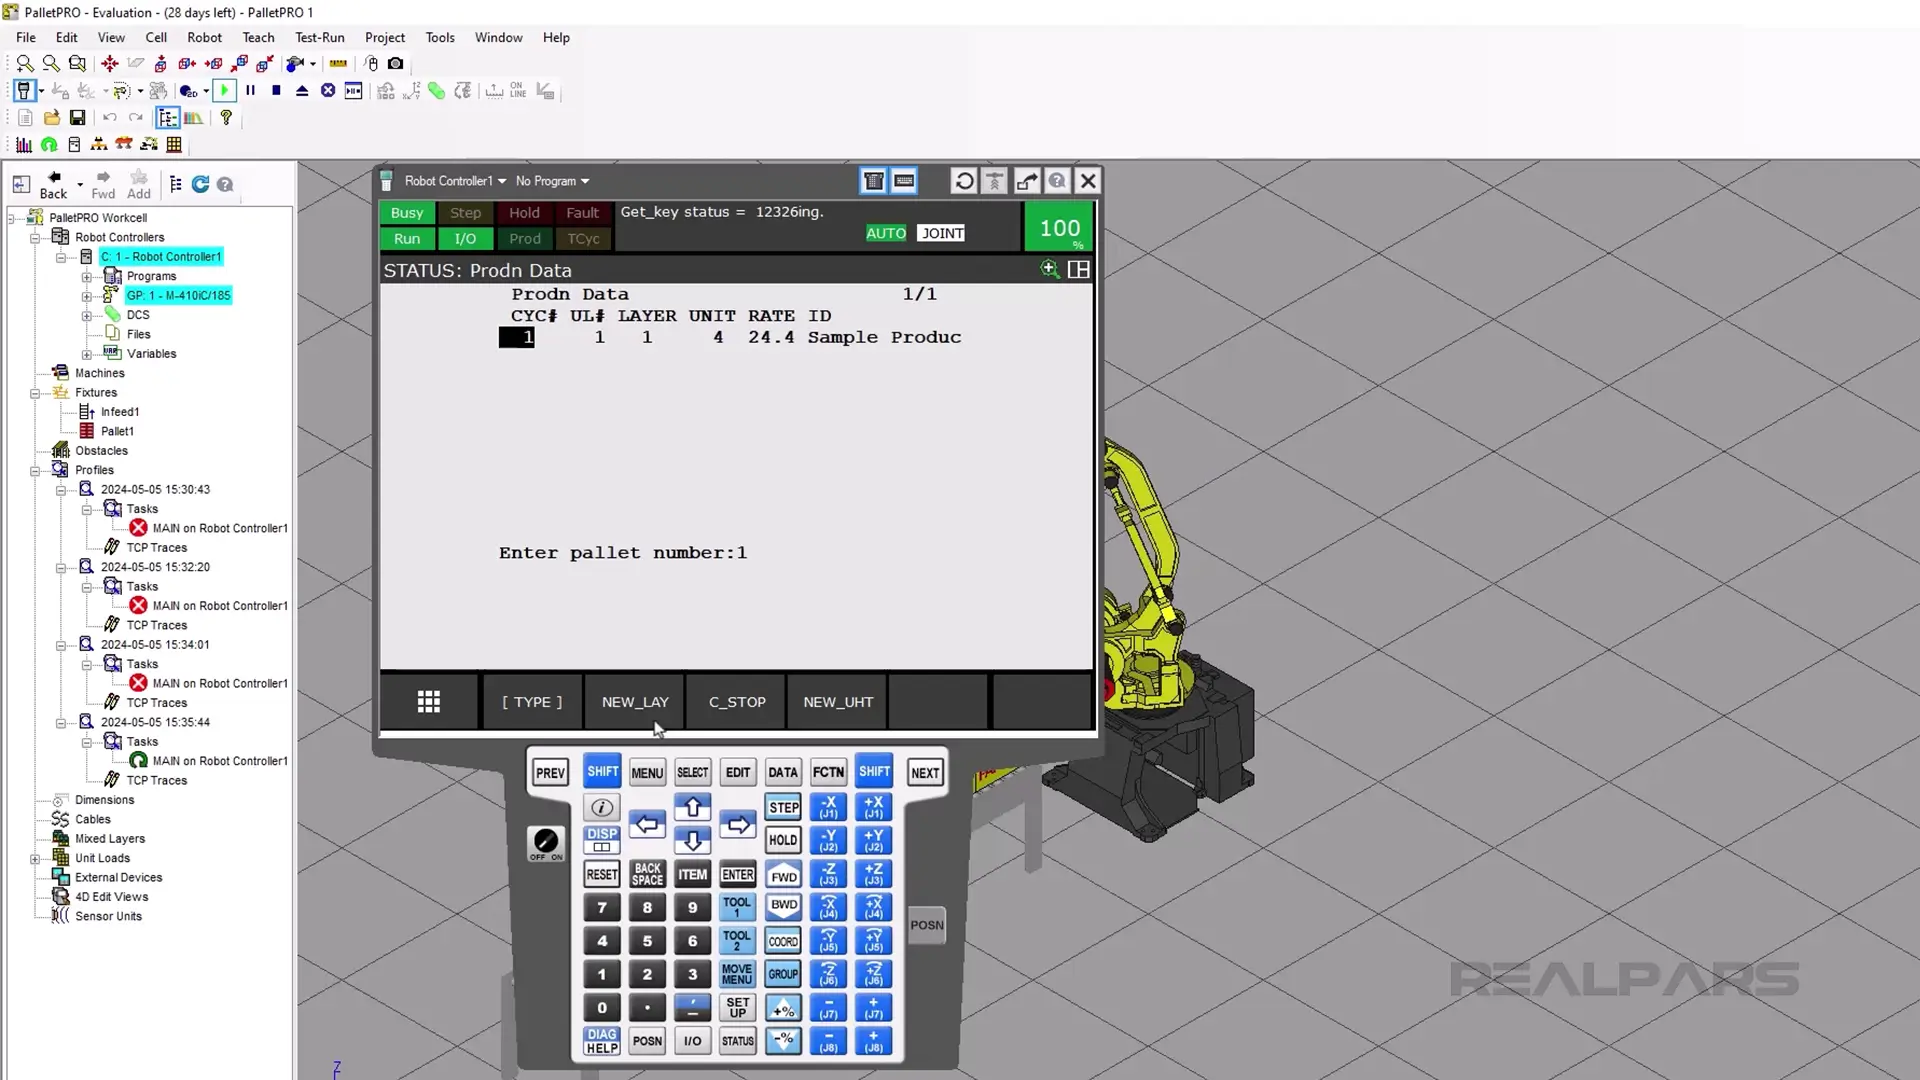
Now, enter the number of layers that you want to change (meaning I want to change the total number of layers on the pallet).
The previous value was 7 layers, but I want to change the number of layers to 3.
Type 3 and press ENTER.
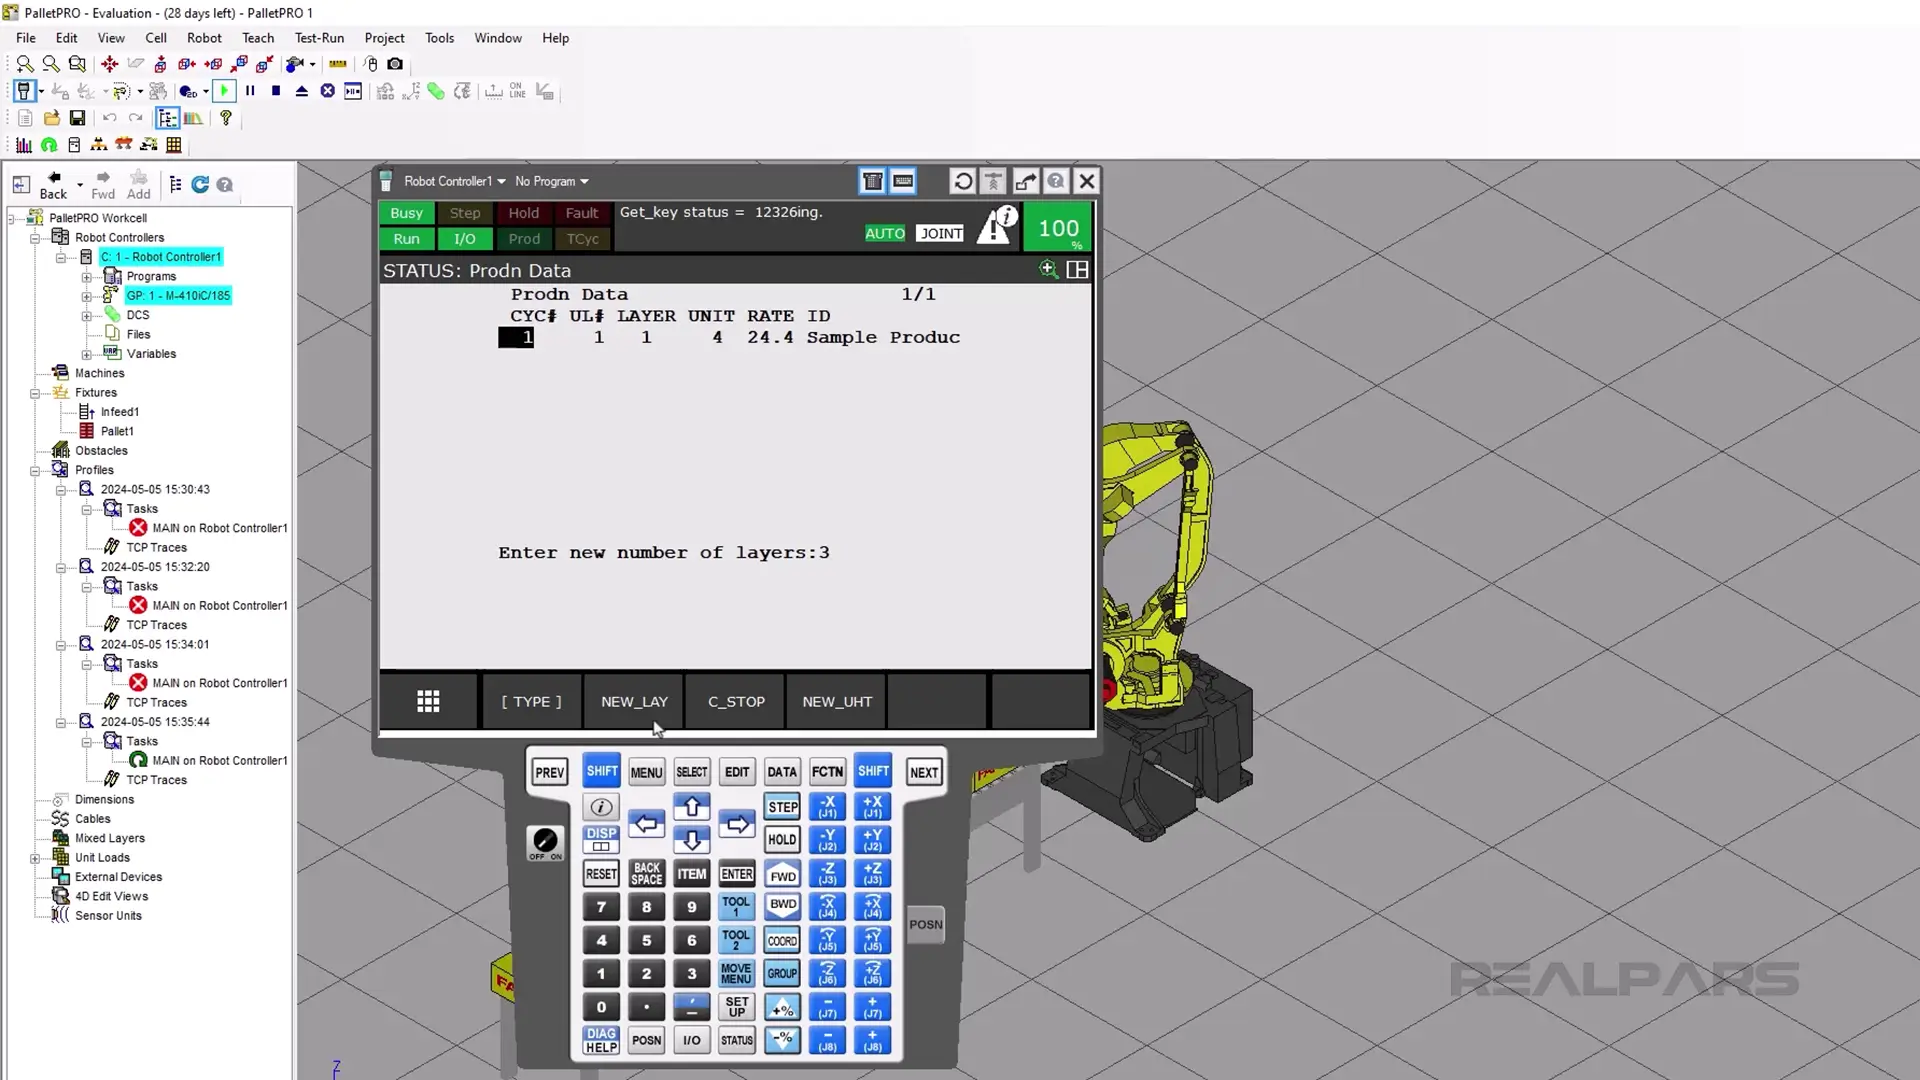
In the error message part of the teach pendant you will see PALL-145 Pallet 1 New Layers:3.
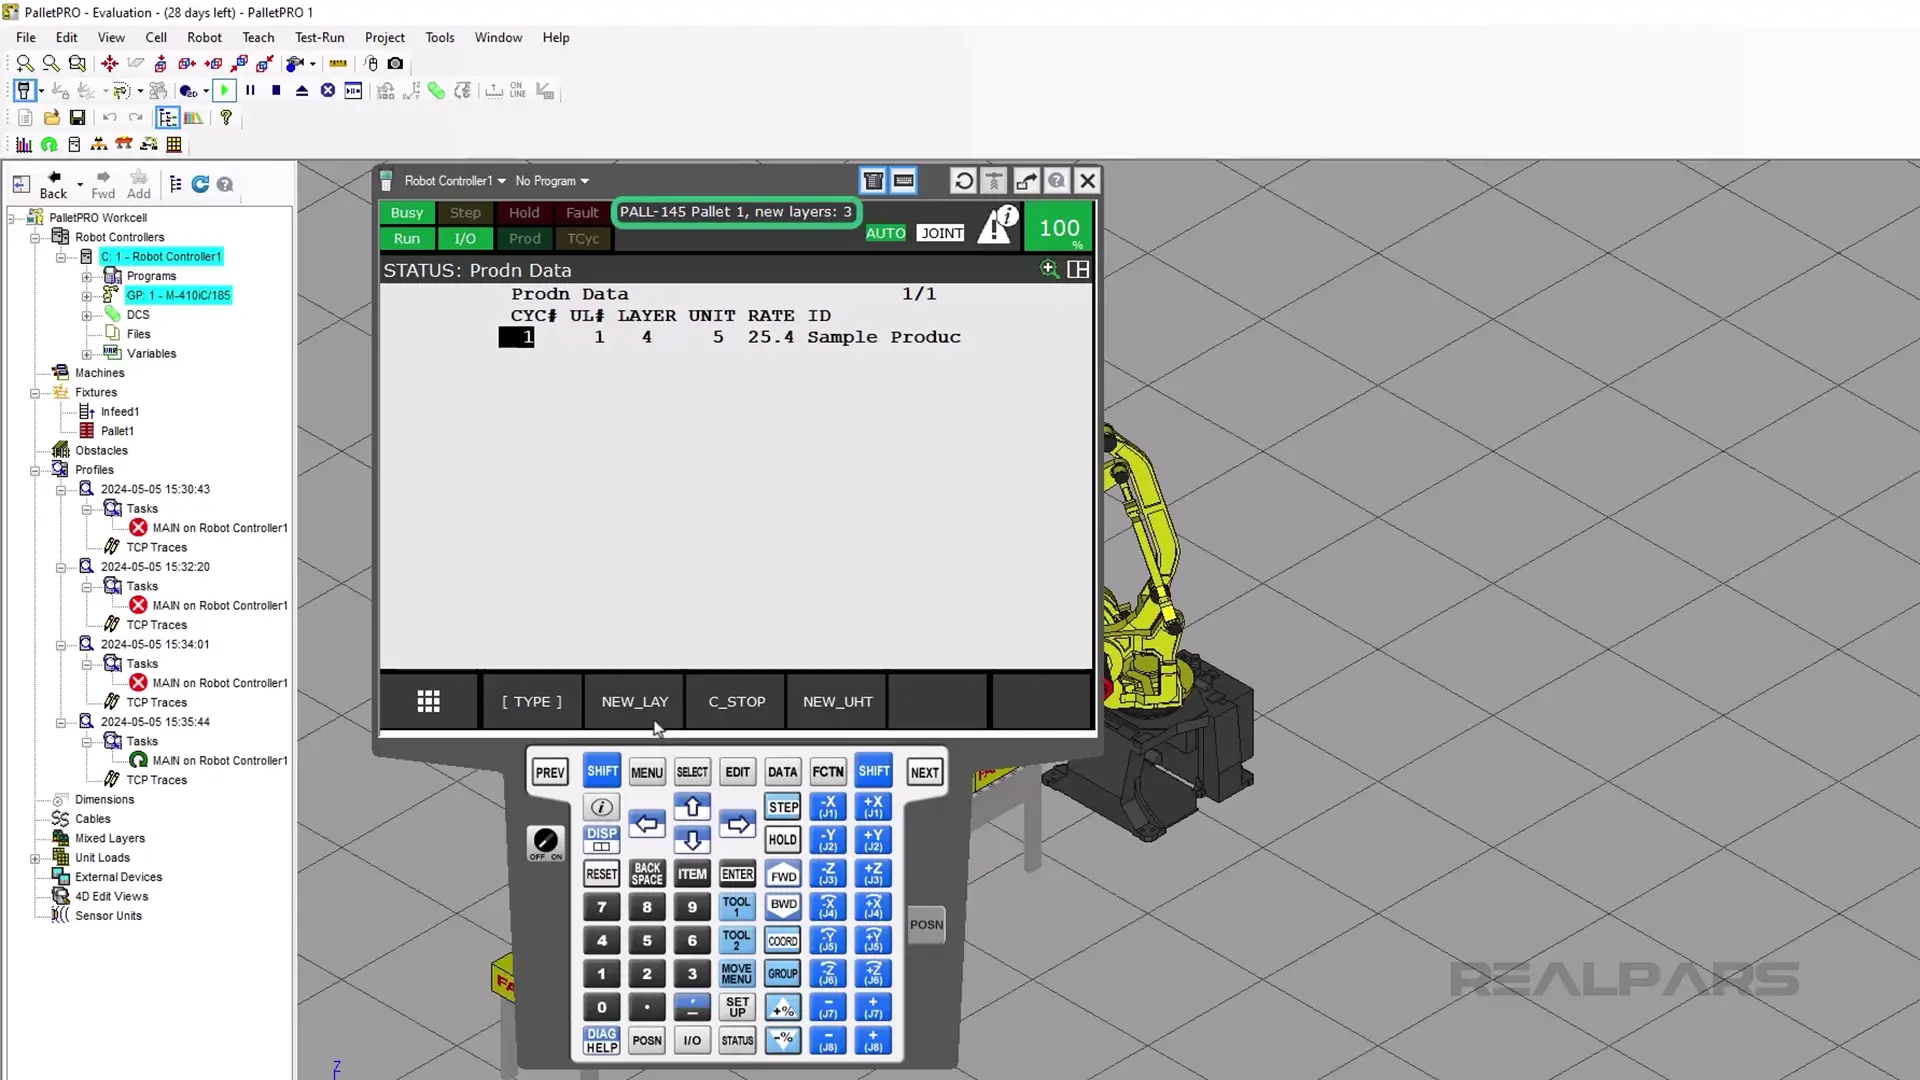
On the last drop, the robot will index the pallet. This is what is meant by New_Lay.
Now we will look at NEW_UHT.
This feature is most helpful for bag palletizing. When the unit height changes consistently, then you should use this feature. Otherwise, there may not be a good use case for this feature.
Press F4 for NEW_UHT. This means a change to the unit height.
Just like before, enter the pallet number.
I will be using pallet 1.
Type 1 and then press ENTER.
Now we will change the height of the conveyor to 206 mm.
Type 206 and then press ENTER.
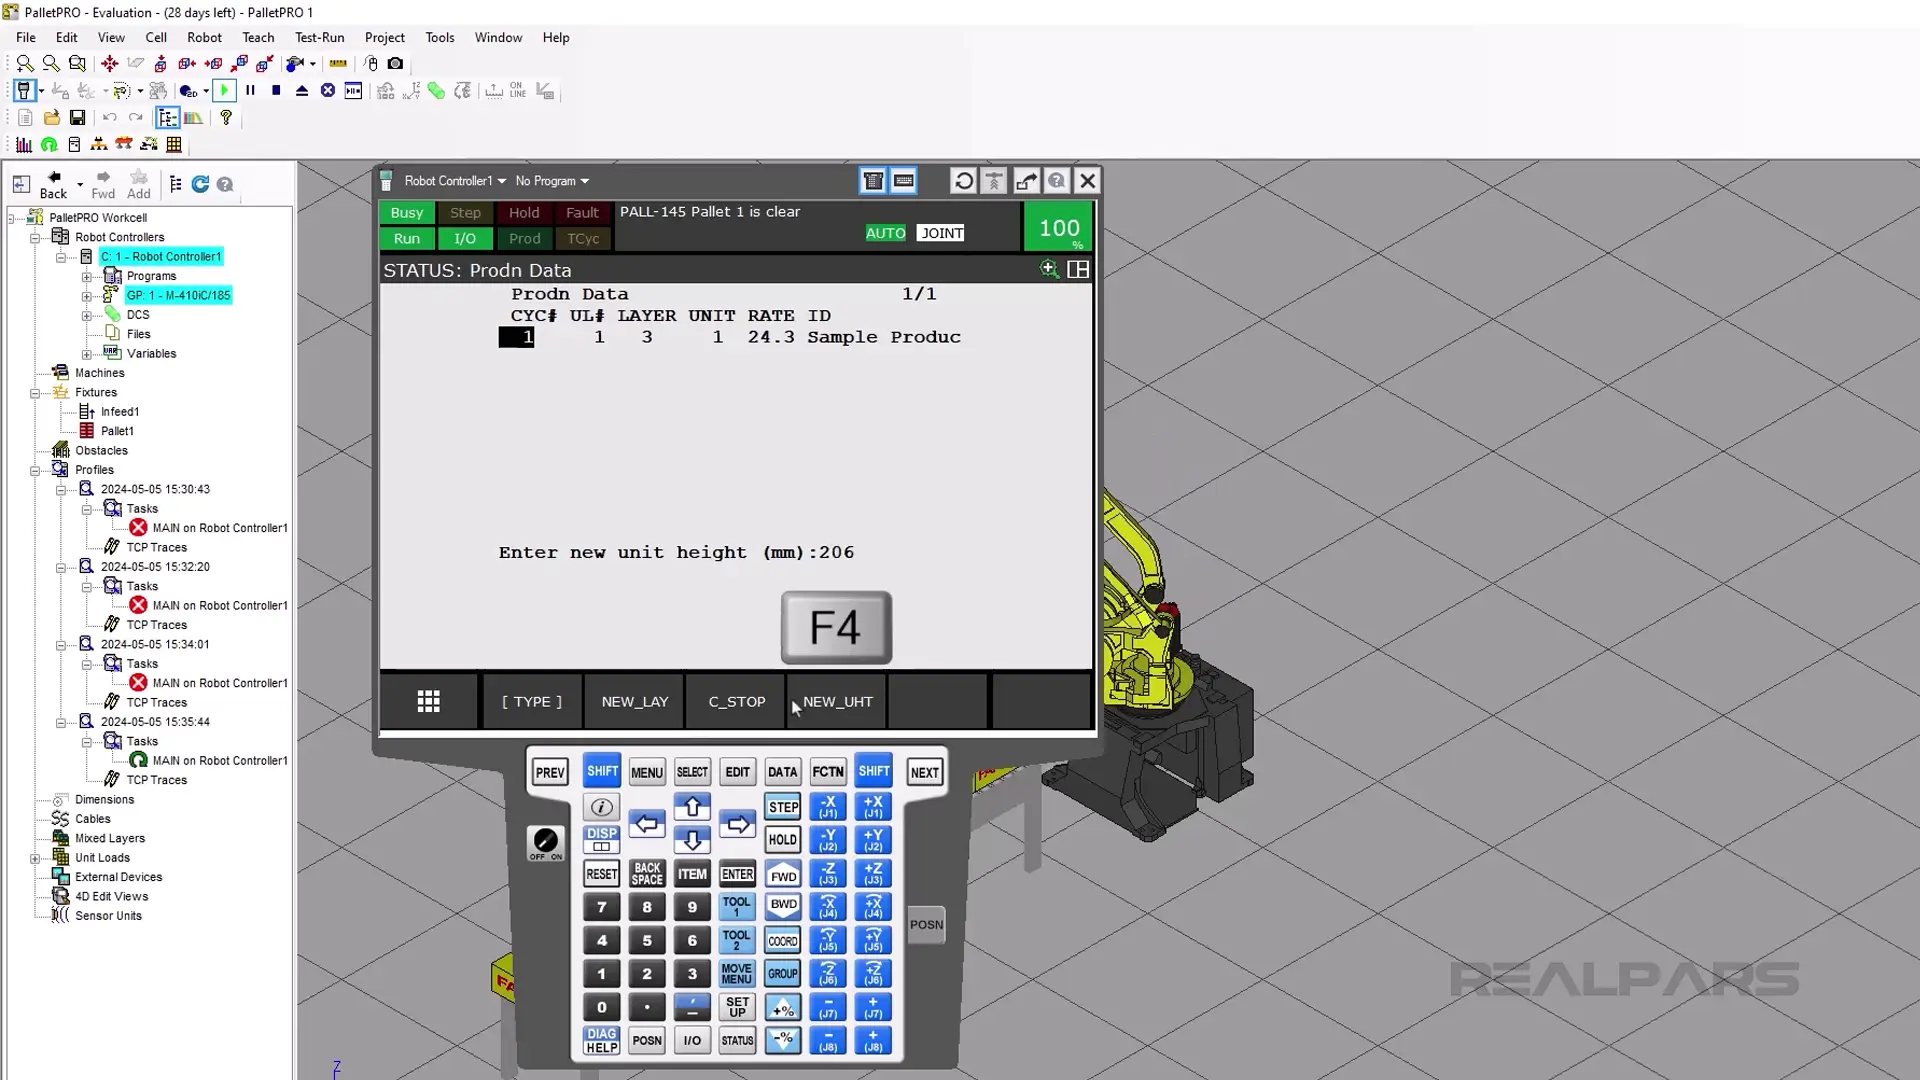
You should see a PALL-145 New Unit Hgt set in the alarm banner.
Introduction to alternate infeed
What is an alternative infeed?
Now we will learn what an alternative infeed is and how to set up an alternative infeed.
This option is only supported by Fanuc if you are using Pallet Tool. However, this will still work in PalletPro using Pallet Tool Turbo II.
If you are, for whatever reason, running a line that is slow but you also have another conveyor line that is running the exact same product, you can add what is called an Alternate Infeed.
This simply means that the robot can pick from the alternate infeed if the primary infeed does not have parts and the alternate infeed does.
Alternative infeed in PalletPro
Let’s open PalletPro. For the purpose of this article, it does not matter what tool you have on the end of the robot. We can do this with a servo gripper or a vacuum gripper. However, a bag tool robot must use the same orientation for teaching the conveyor.
When teaching the infeed with a bag tool you can have a rotated orientation or a normal orientation, however you must use the same orientation for teaching infeeds. You cannot mix and match rotated and normal orientations.
Let’s start by adding an infeed to a PalletTool cell.
Navigate to the cell browser.
Right-click on the Fixture dropdown menu.
Click add Fixture then add Infeed Station.
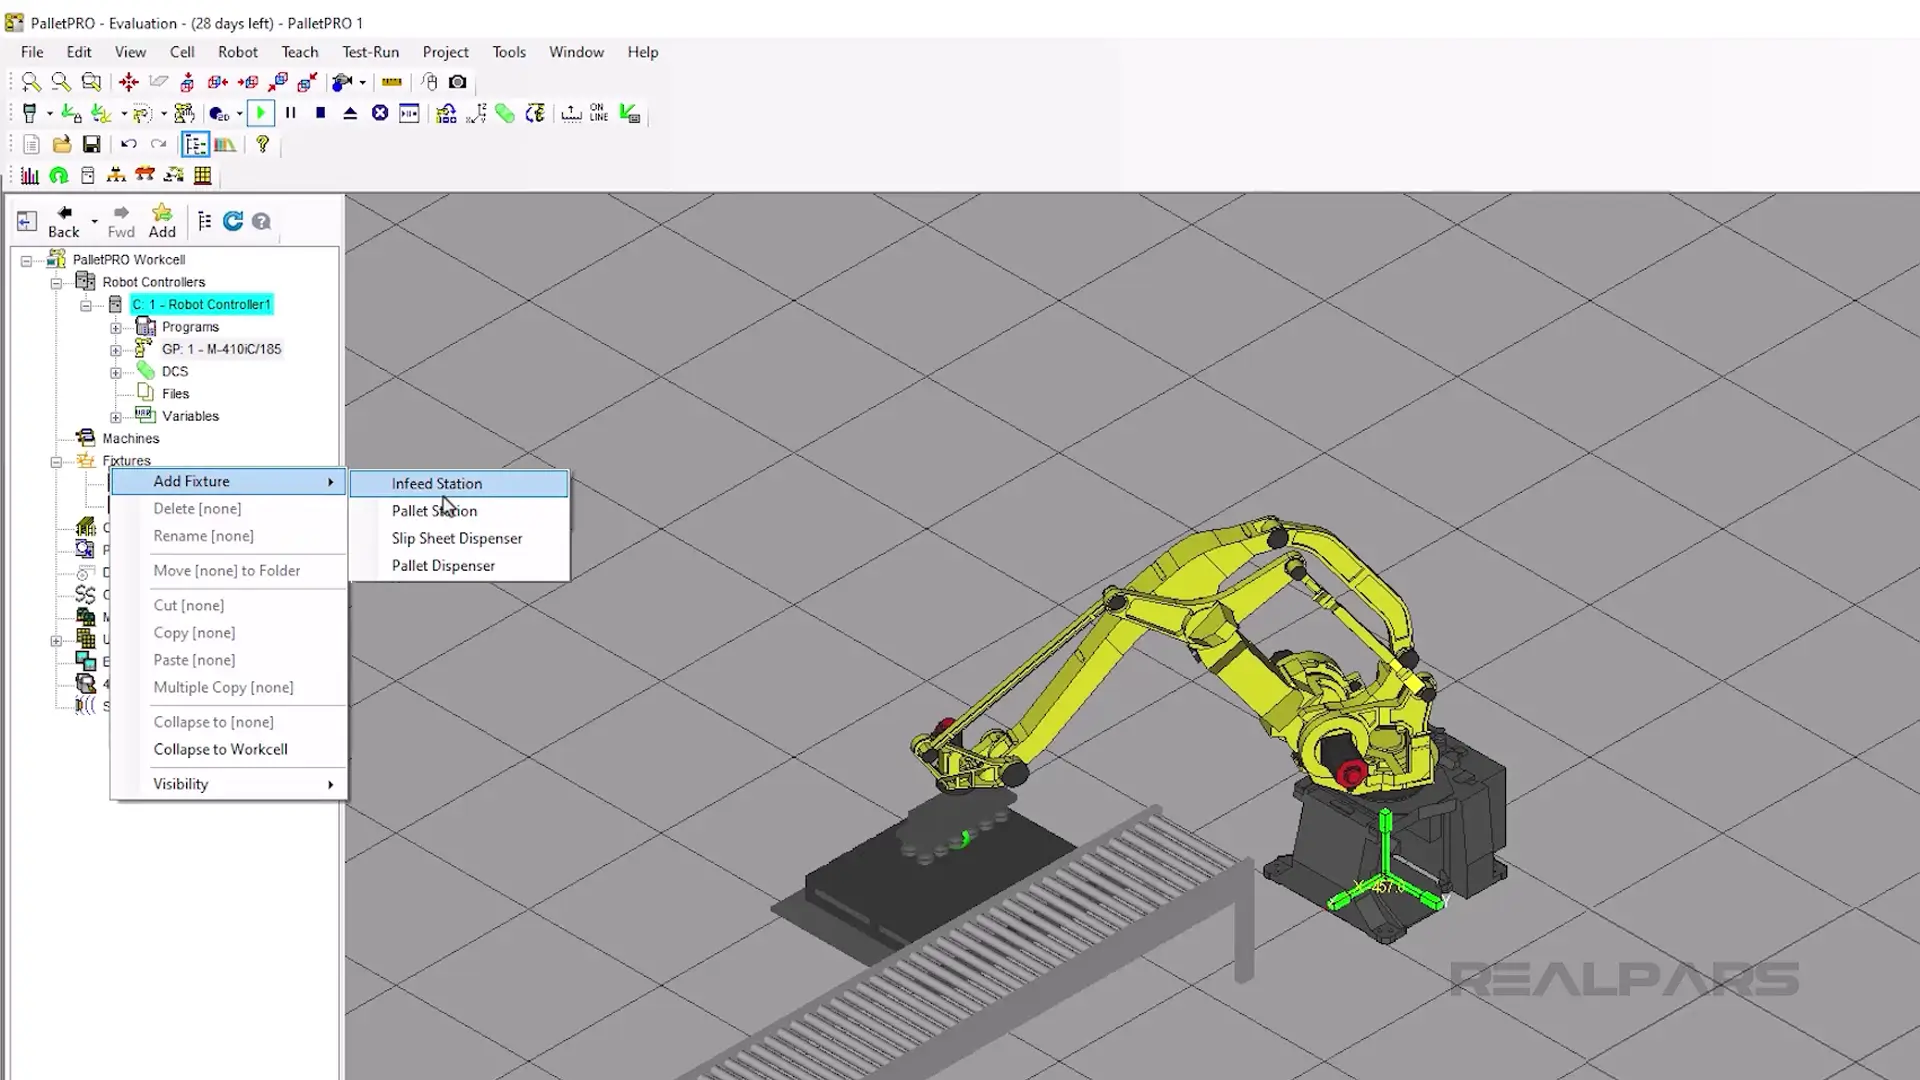
The infeed will be placed at the robot origin position.
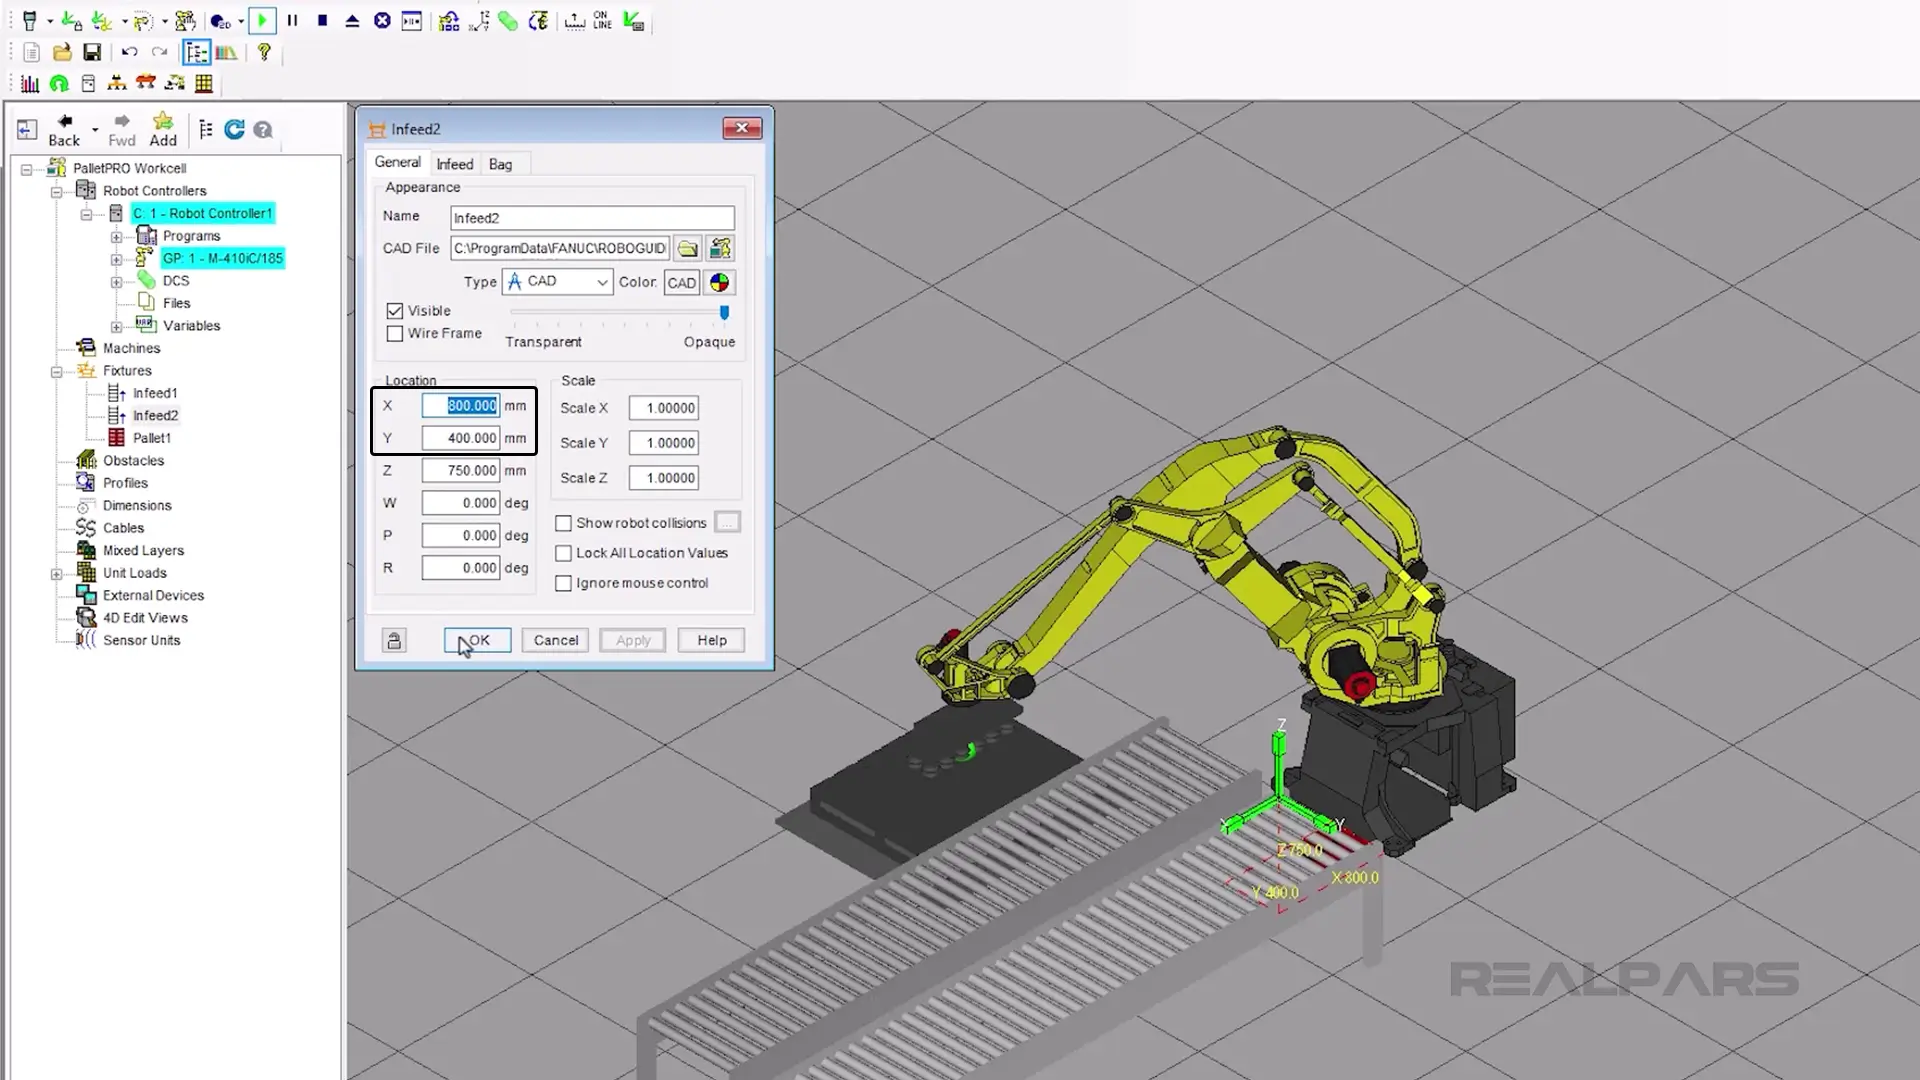
Move the new infeed station to a place where the robot can reach.
I will place the infeed at X=800 and Y=400 from the cell origin. You may place this conveyor wherever your use case dictates.
When you are satisfied with the placement of the infeed, press OK.
Now we will need to run the cell.
Click the Play button.
Notice that there is now a way to change the alternate infeed.
Where the drop-down says none change it to Infeed 2.
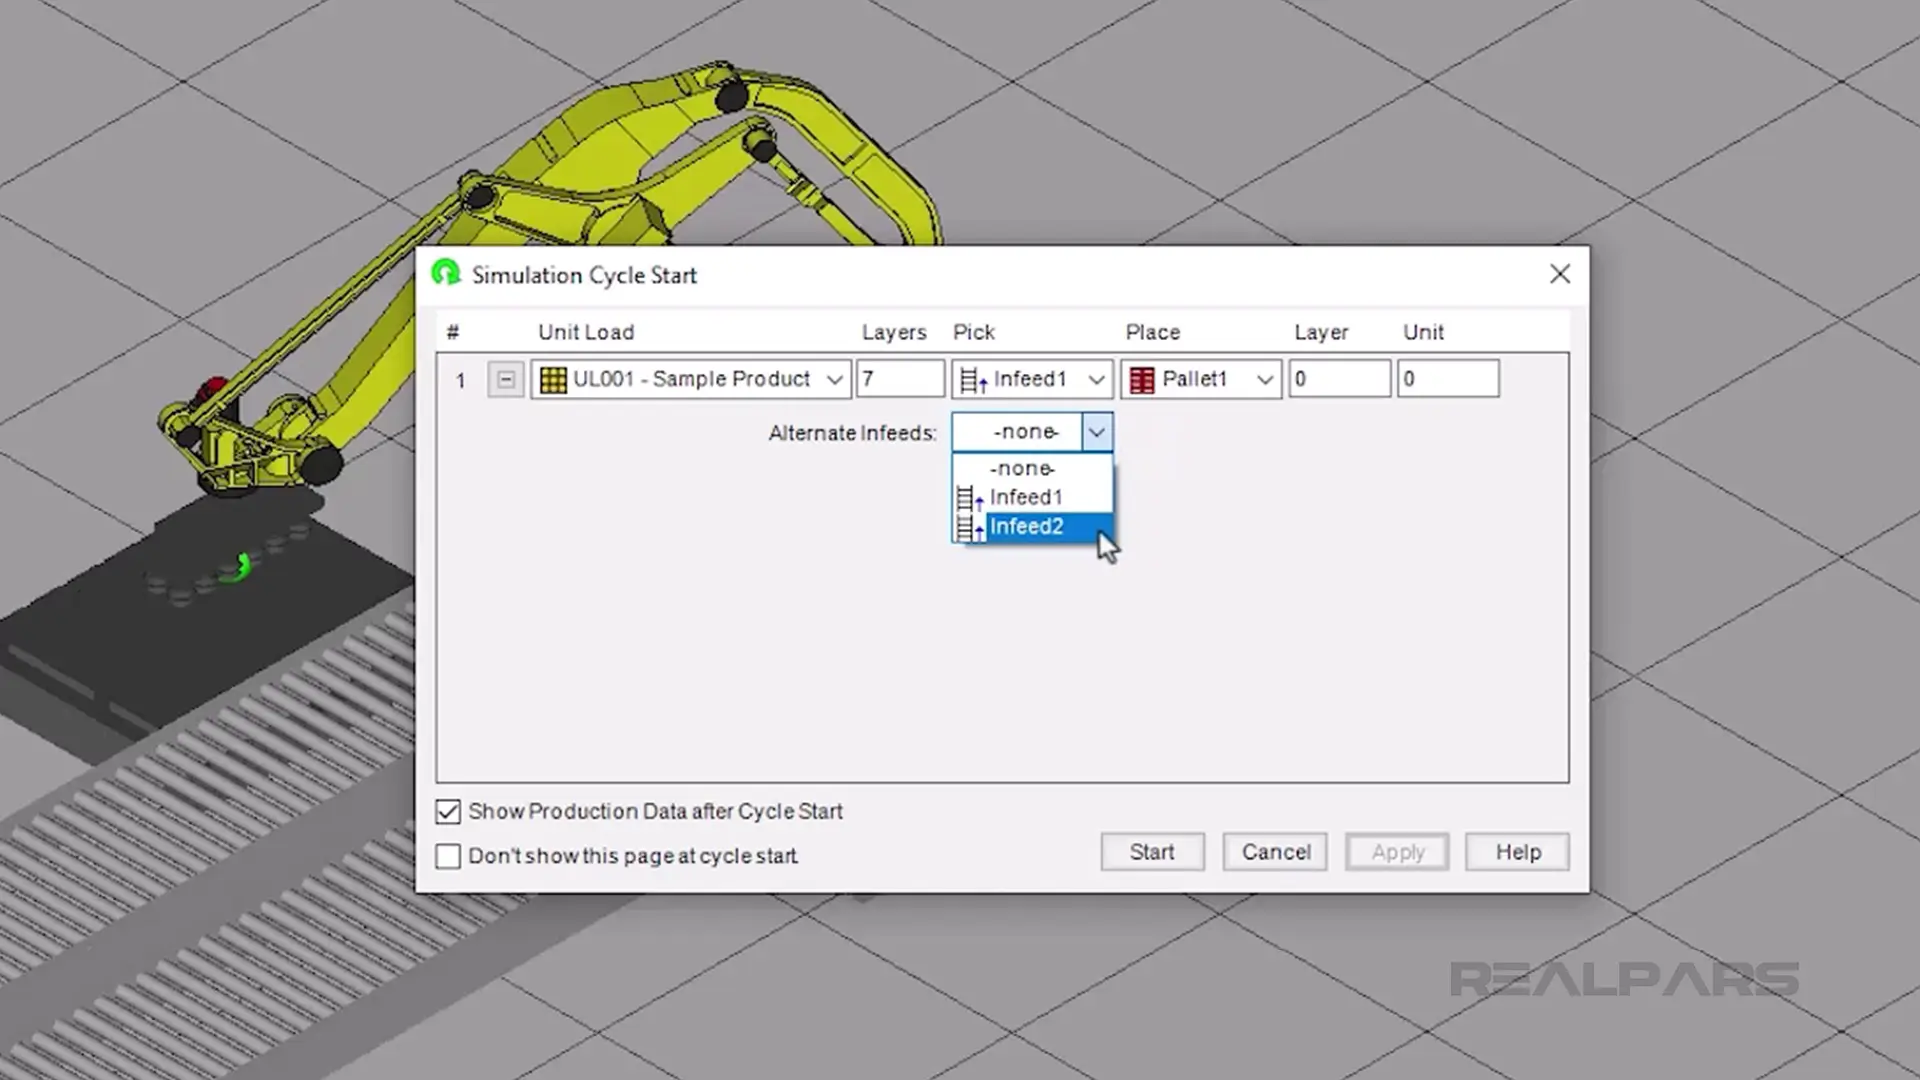
Now click Start.
You may notice that the infeed units get backed up due to the default being 50 units per minute.
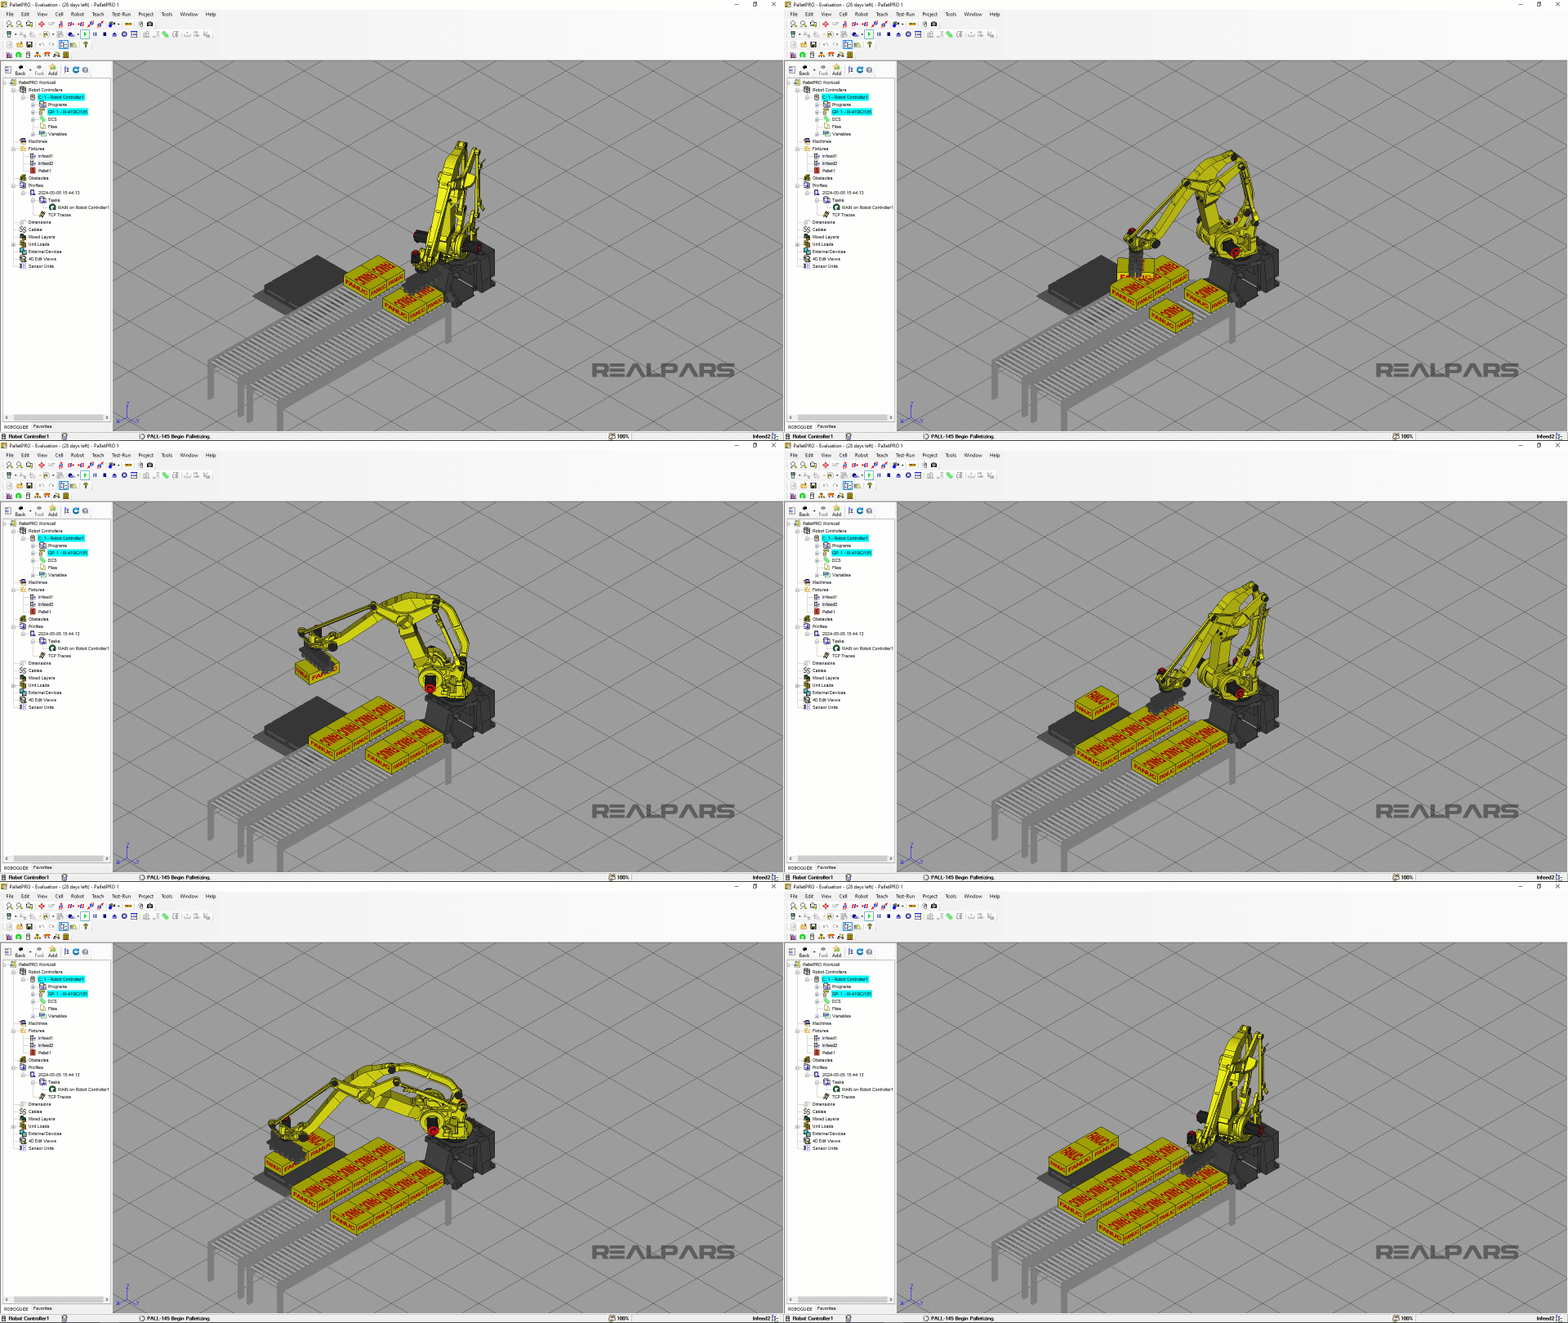
For this article, we will change this to a more realistic rate in order to show the principle.
Stop the cell using the abort button.
Improving palletizing with multiple infeeds
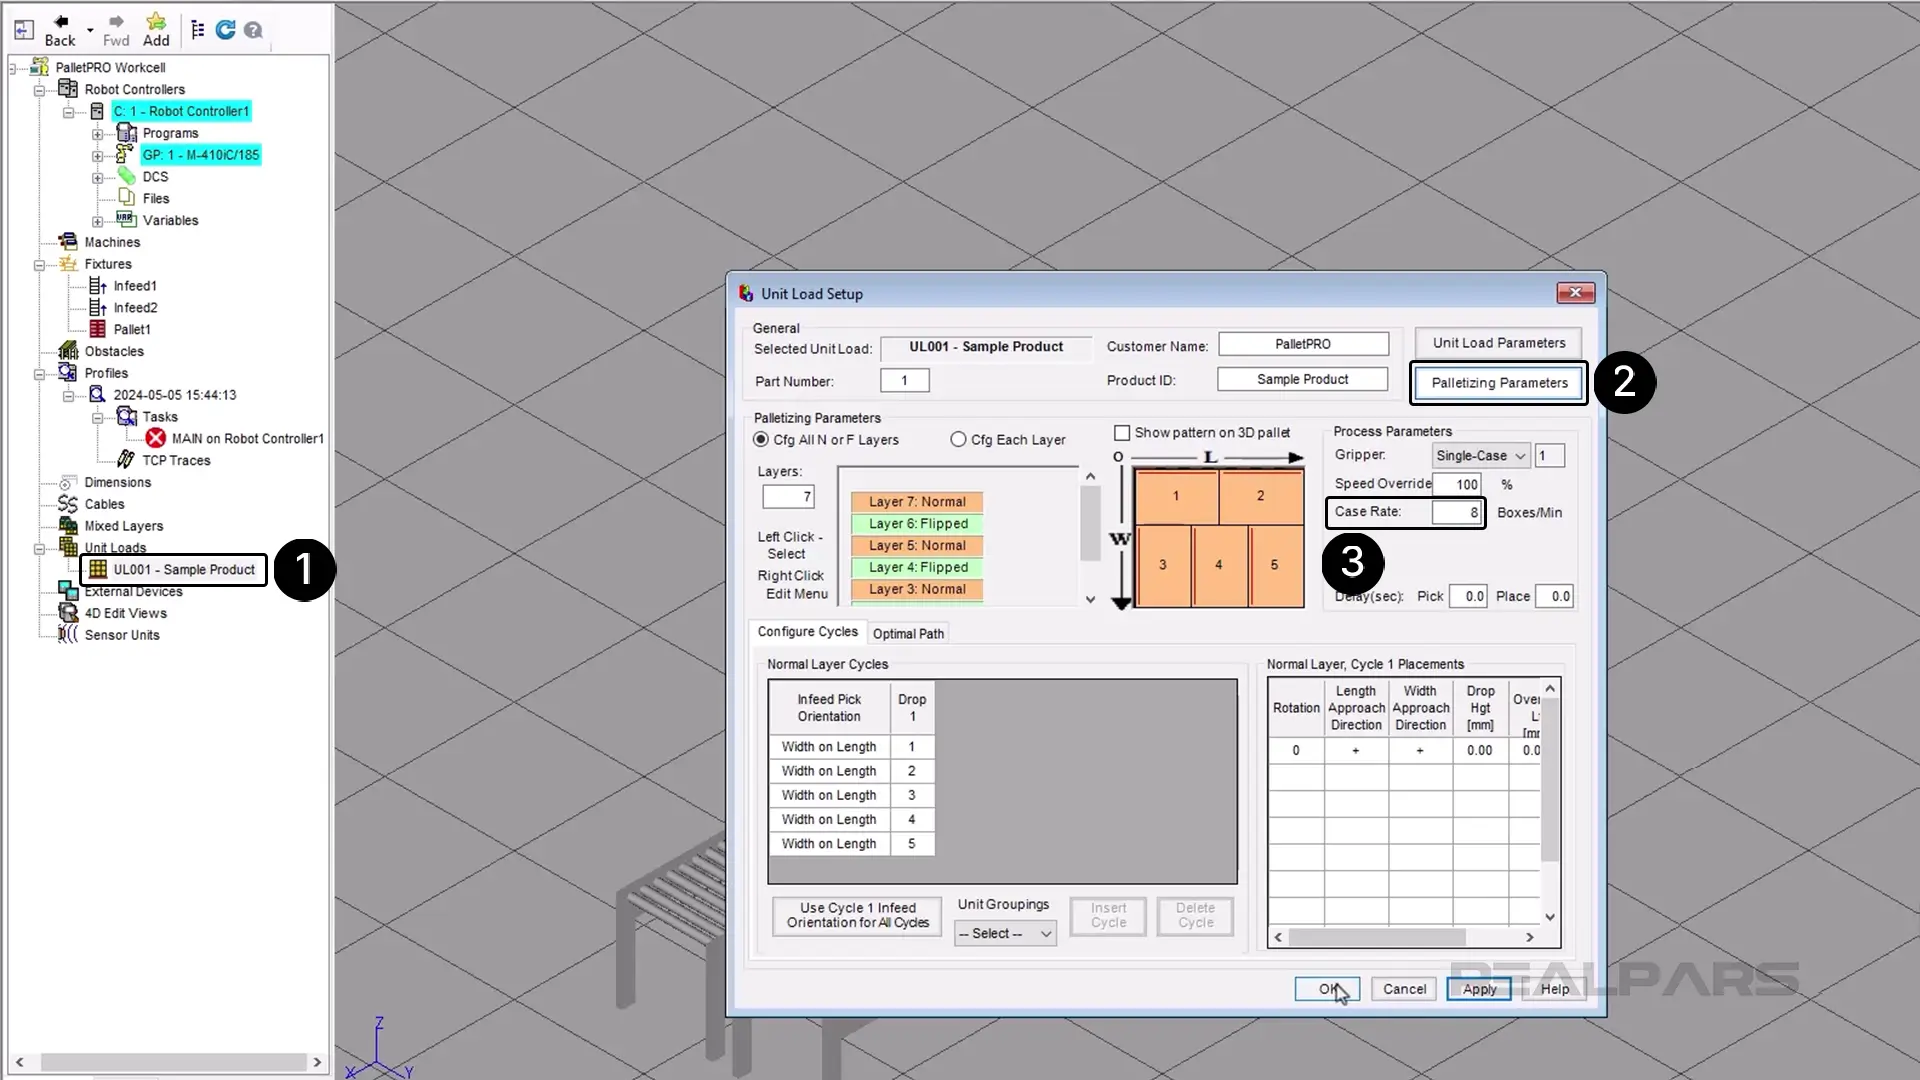
Open up the sample unit load by double-clicking on the unit load.
Go to the Palletizing Parameters tab. The details of this tab are described in detail in the Fanuc Robot Palletizing 6 course.
Now in the Case Rate field, change the value to 8 boxes per minute.
Apply the changes and press OK.
Now let’s run the simulation by pressing the play button once more.
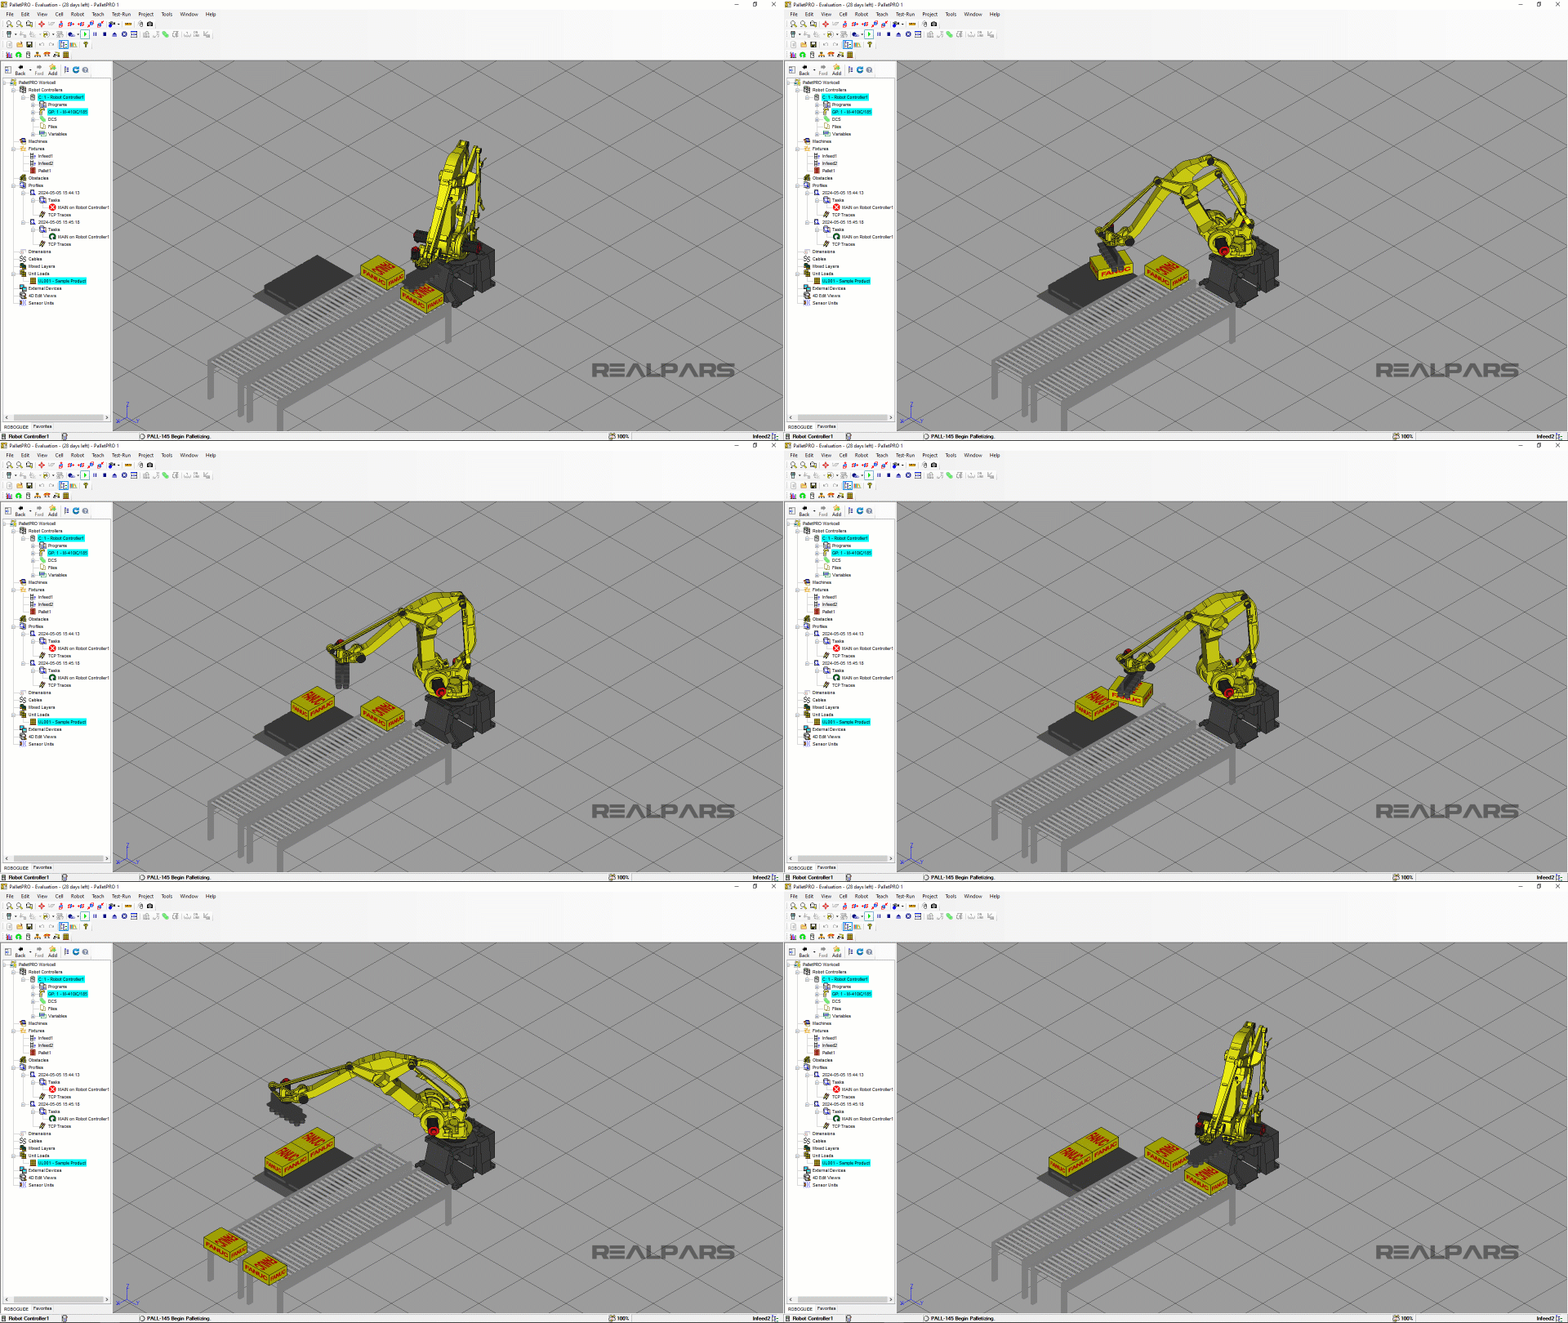
Notice that the robot can keep up with the rate now.
If we only had one infeed conveyor station, we would be wasting a ton of time for only one pick on one infeed.
Since we have two infeeds with the same exact unit load, we can put them on one pallet together. This now doubles the efficiency of the robot.
Keep in mind that this option will not work for different units.
You will have to have a separate pallet station if you have two different products or unit loads.
For simulation purposes that is all that you will need to do. But in the real world, you will need to set up the IO using the SET_IO in the infeed station setup.
Please refer to the Fanuc Robot Palletizing 6 course for more information.
In addition to setting the IO on the infeed station, you will need to perform the teach plate and pointer procedure.
You may want to change when the pallet picks from the alternate infeed. You will need to change the BOXREQ.TP to accommodate this change. We will not be covering this topic at this time.
Something else to be aware of is that you may still use the alternate infeed for mixed loads since mixed loads have the same units on each layer.
Configuring infeeds for limited space
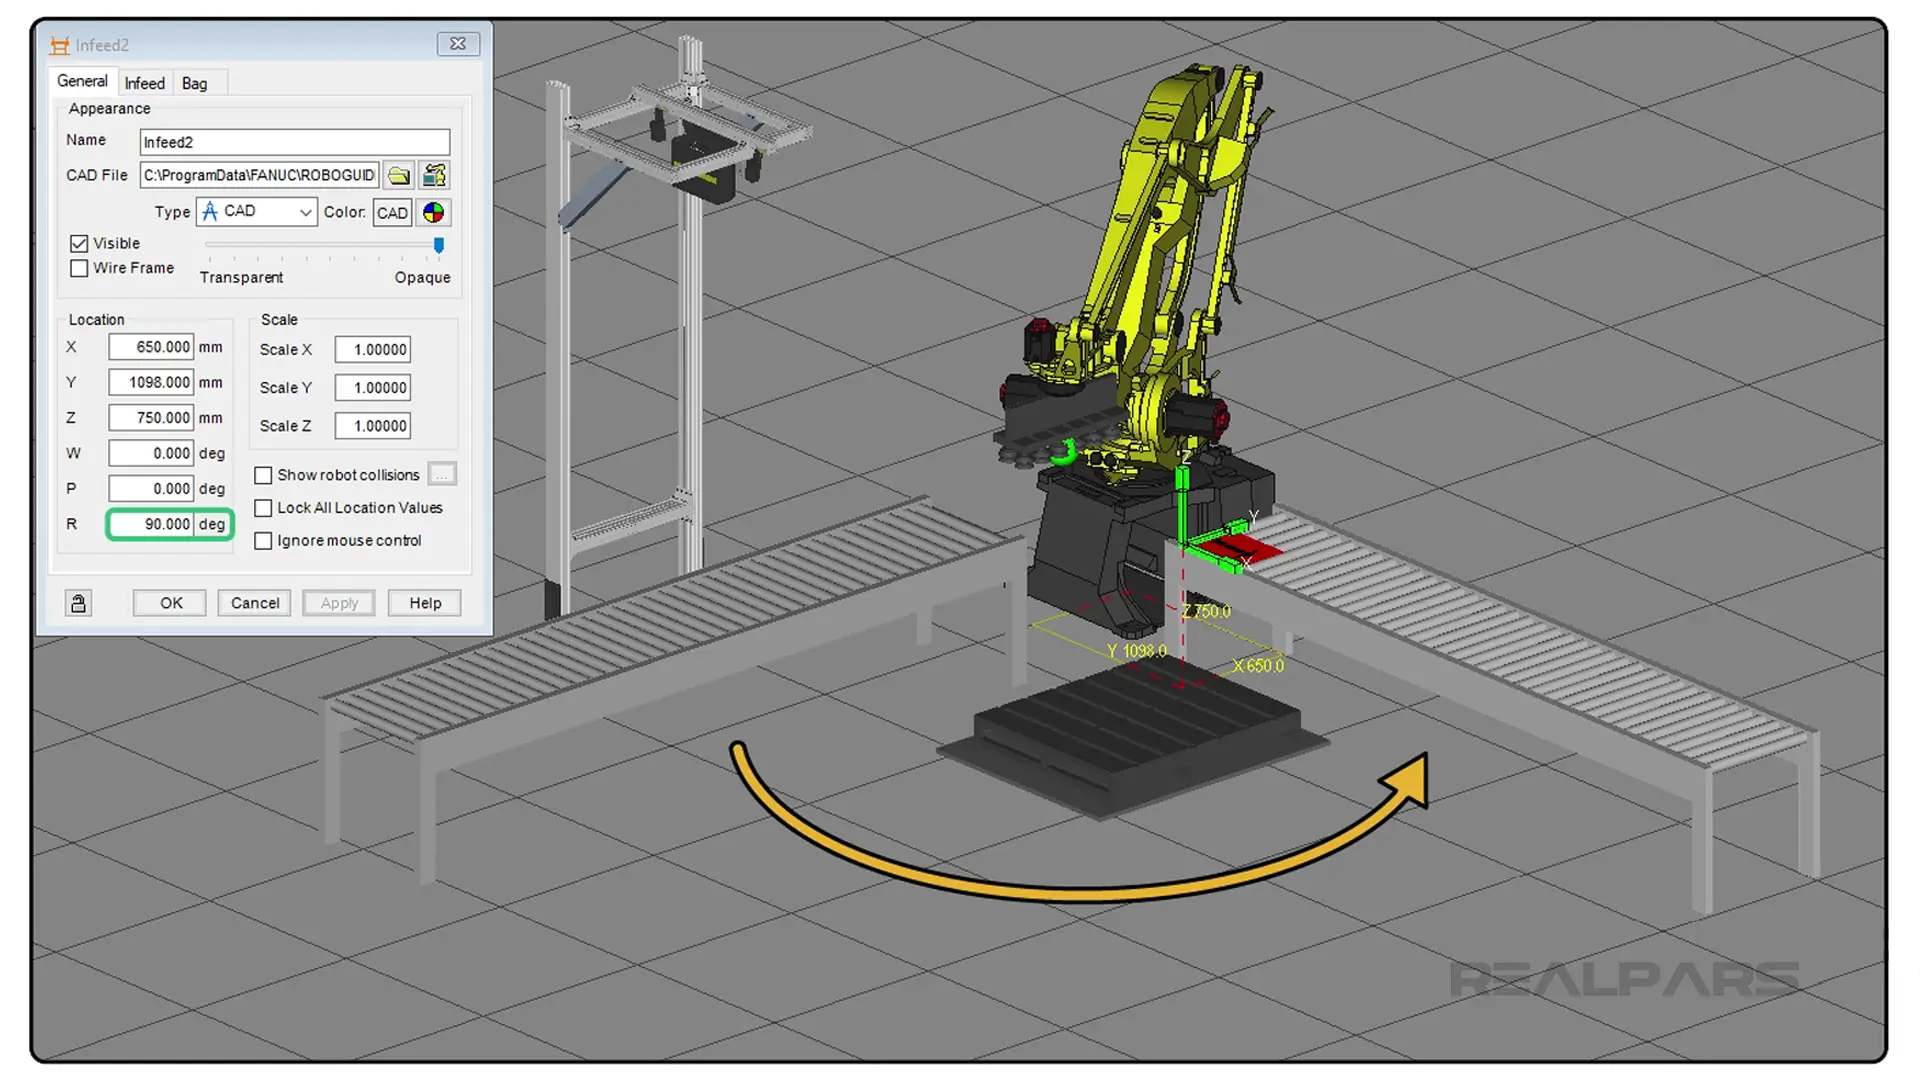
You may not have the space to put the conveyor parallel to the existing conveyor. You can get creative in which ways you can have the alternative infeed connect to the cell.
For example, you can turn the alternative infeed 90 degrees around the Z axis in order to save some room. Sometimes you may be restricted by existing equipment.
Somehow everyone expects the robot programmer to figure out the problem with programming when it’s the equipment that is causing problems. This may be a way that you can use to solve the robot being idle.
You may also have to put the alternative infeed in an abnormal place. Be creative and have fun with it.
Just make sure that the robot can reach and run in Roboguide before installing in real life.
You can also have up to 10 alternate infeeds, which can be configured in the infeed setup screen, which is covered in more depth in another article.
Conclusion
That’s it for this article. We covered real-life production scenarios and solved issues unique to palletizing with ROBOGUIDE software.
If you’re interested in learning more about Fanuc robots and how to use them in different situations, we highly recommend checking out our Fanuc Robot Training course series. Start with the basics and work your way up to the advanced level.

