Why is calibration important? When engineers design modern process plants, they specify sensors to measure important process variables, such as flow, level, pressure, and temperature.
These measurements are used to help the process control system adjust the valves, pumps and other actuators in the plant to maintain the proper values of these quantities and to ensure safe operation.
So how does a plant maintain the operation of these sensors to guarantee that the actual value of the process is sensed and passed to the control system?
In this article, you will learn that the answer to that question is: “Sensor Calibration”.
Sensor calibration is an adjustment or set of adjustments performed on a sensor or instrument to make that instrument function as accurately, or error free, as possible. These are some of the advantages of calibration.
1. Errors in Sensor Measurement
Error is simply the algebraic difference between the indication and the actual value of the measured variable. Errors in sensor measurement can be caused by many factors.
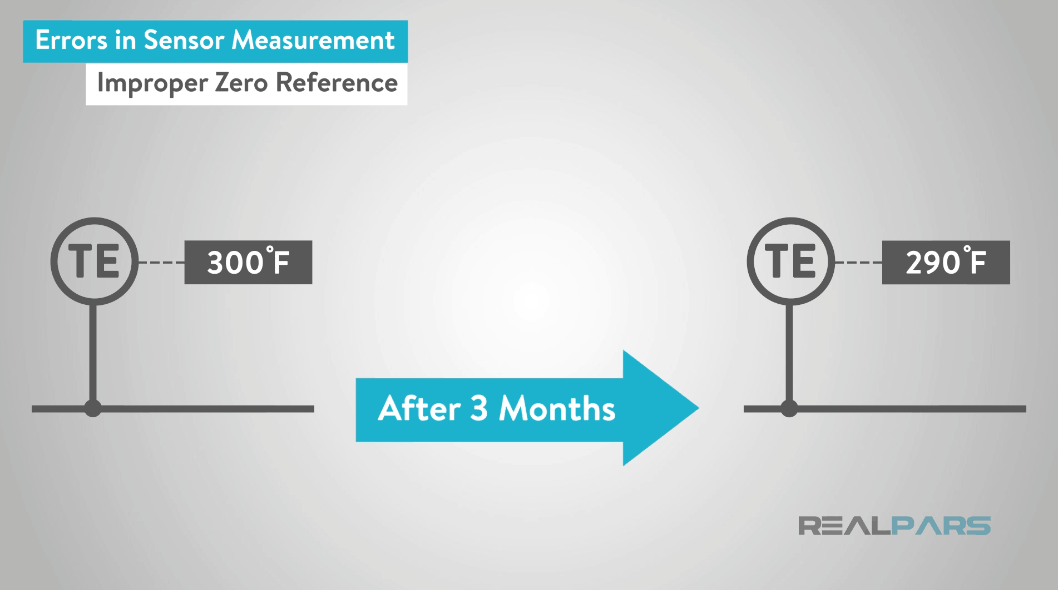
1.1. Error due to Improper Zero Reference
First, the instrument may not have a proper zero reference.
Modern sensors and transmitters are electronic devices, and the reference voltage, or signal, may drift over time due to temperature, pressure, or change in ambient conditions.
1.2. Error due to Shift in Sensor’s Range
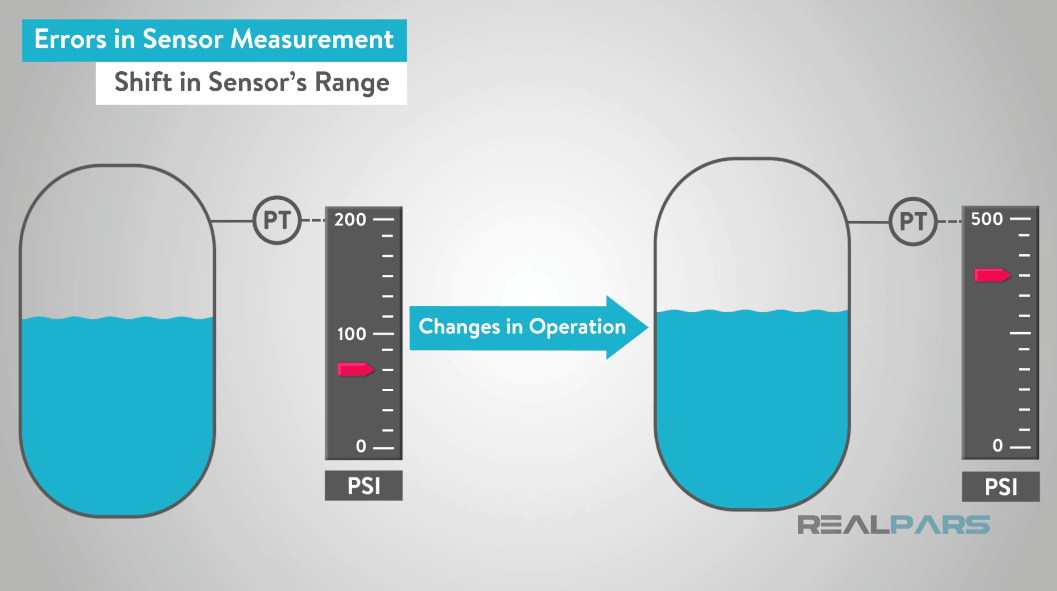
Second, the “sensor’s range” may shift due the same conditions just noted, or perhaps the operating range of the process has changed.
For example, a process may currently operate in the range of 0 to 200 pounds per square inch (PSI), but changes in operation will require it to run in the range of 0 to 500 pounds per square inch (PSI).
1.3. Error due to Mechanical Wear or Damage
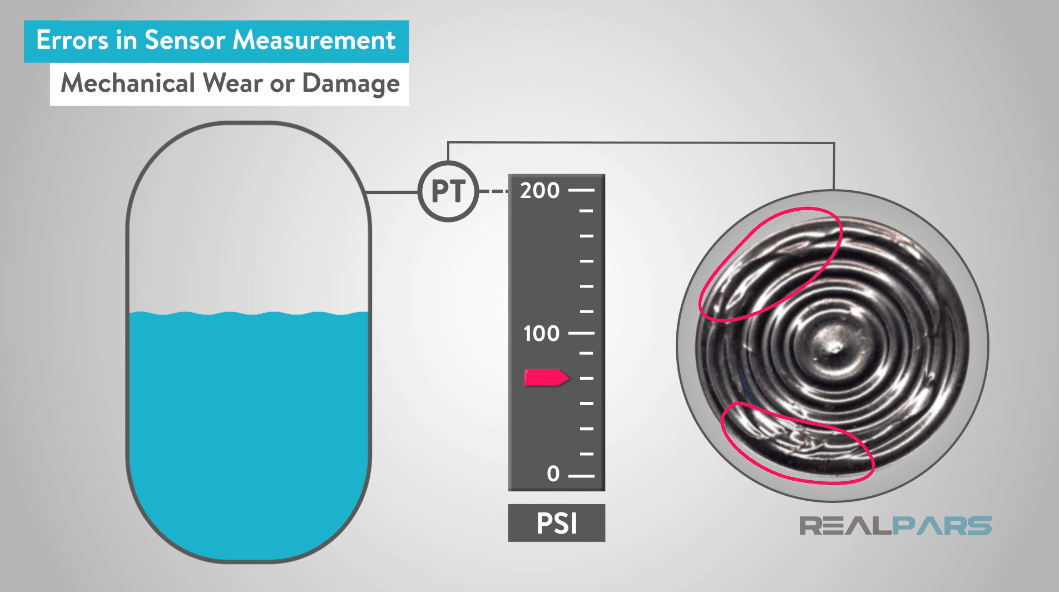
Third, error in sensor measurement may occur because of mechanical wear, or damage. Usually, this type of error will require repair or replacement of the device.
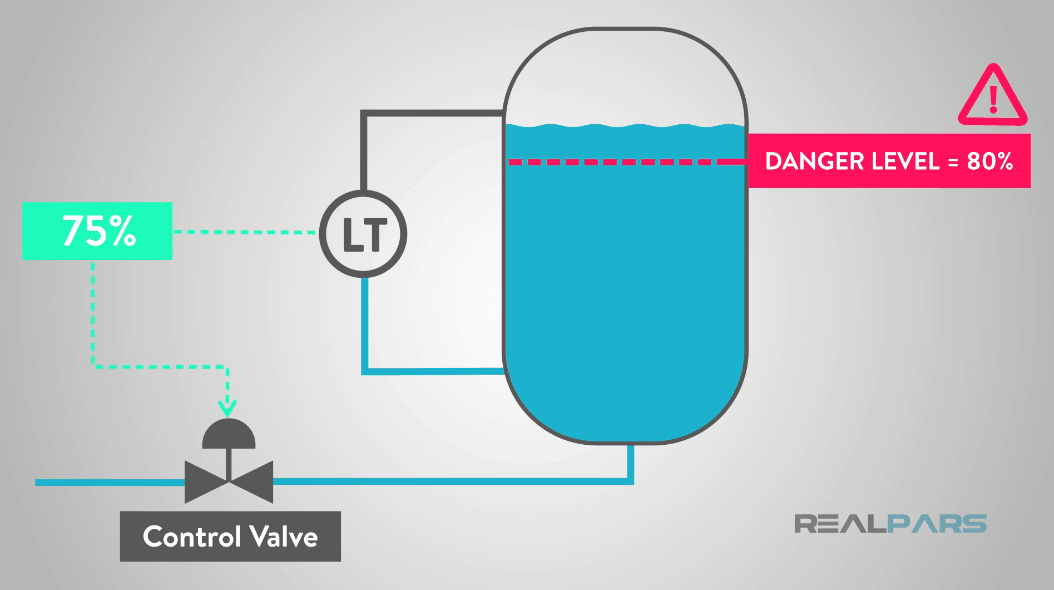
Errors are not desirable, since the control system will not have accurate data from which to make control decisions, such as adjusting the output of a control valve or setting the speed of a feed pump.
If the calibration is too far from the accurate process conditions, process safety may be jeopardized.
If I am an instrument or operations engineer in a plant, I need every instrument to have a proper calibration.
Proper calibration will yield accurate measurements, which in turn, makes good control of the process possible.
When good control is realized, then the process has the best chance of running efficiently and safely.
2. Sensor Calibration
Most modern process plants have sensor calibration programs, which require instruments to be calibrated periodically.
Calibration can take a considerable period of time, especially if the device is hard to reach or requires special tools.
2.1. What is an “As-Found” Check?
In order to minimize the amount of time that it takes to perform a sensor calibration, I would first do an “as found” check on the instrument. This is simply performing a calibration prior to making any adjustments.
If the current instrument calibration is found to be within the stated tolerance for the device, then re-calibration is not required.
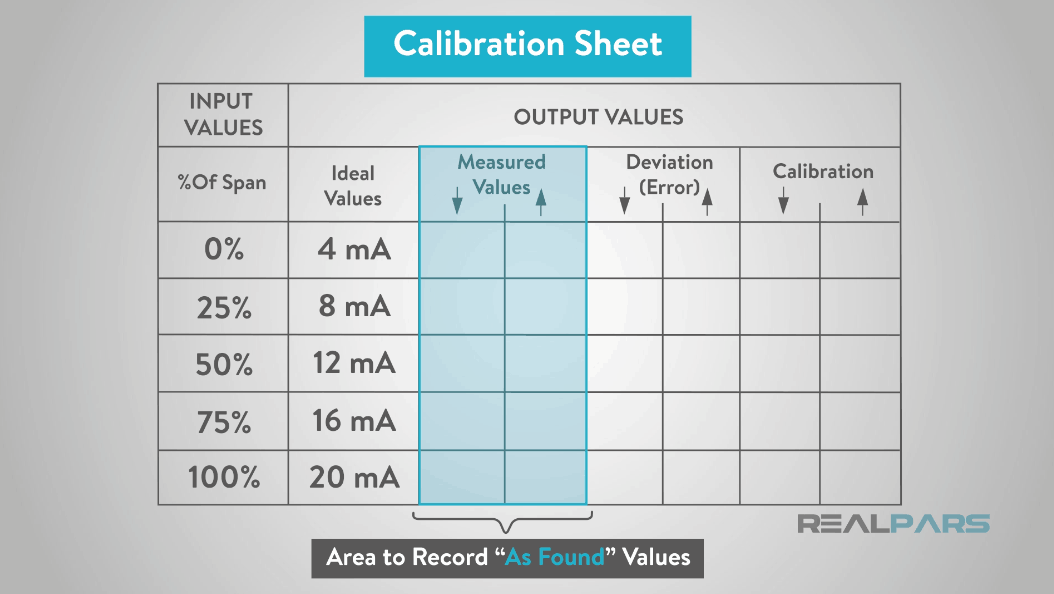
2.2. How to Perfom an “As-Found” or “Five-Point” Check
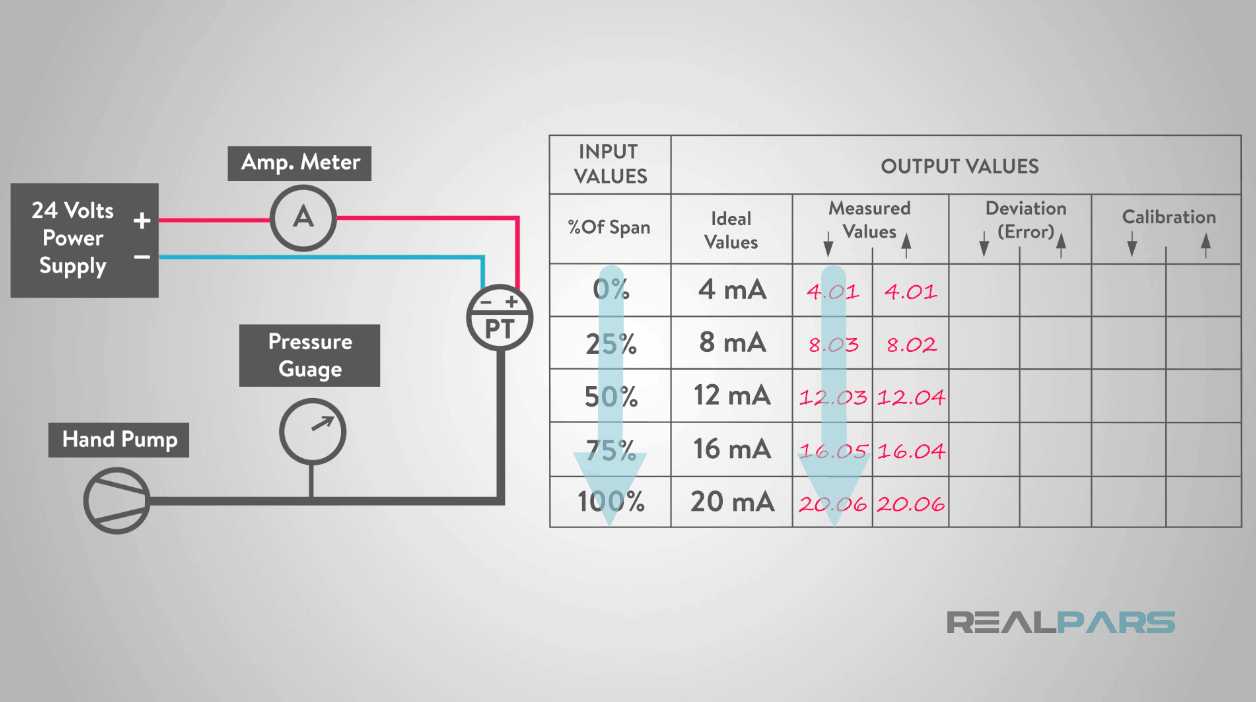
To perform an “as-found” check, an accurate and precise instrument is used to develop process signals corresponding to 0%, 25%, 50%, 75% and 100% of the process range of the transmitter.
The corresponding transmitter output, in milliamps, is observed and recorded. This is called a “Five-point” check.
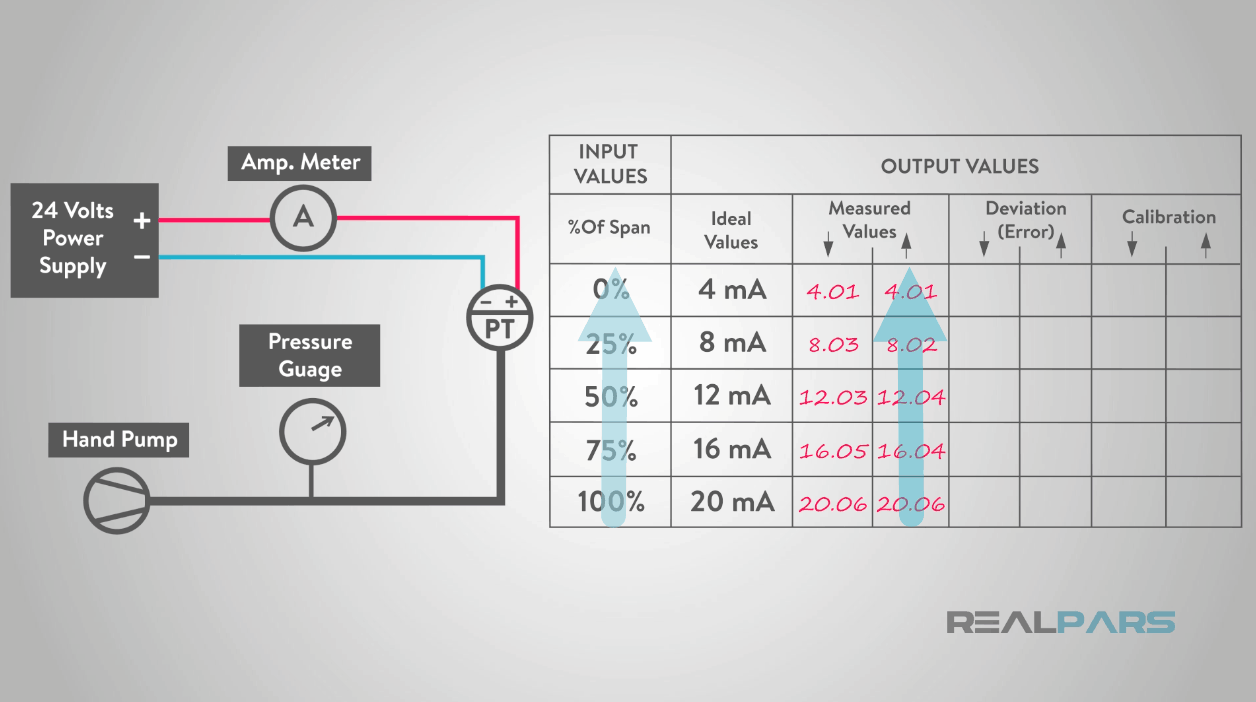
Then, in order to check for hysteresis, a phenomenon whereby the sensor output for a process value is different going ‘downscale’ as it is going ‘upscale’, the output signals corresponding to 100%, 75%, 50%, 25%, and 0% in order are recorded.
2.3. How to Calculate the Deviations (Errors) of a Sensor
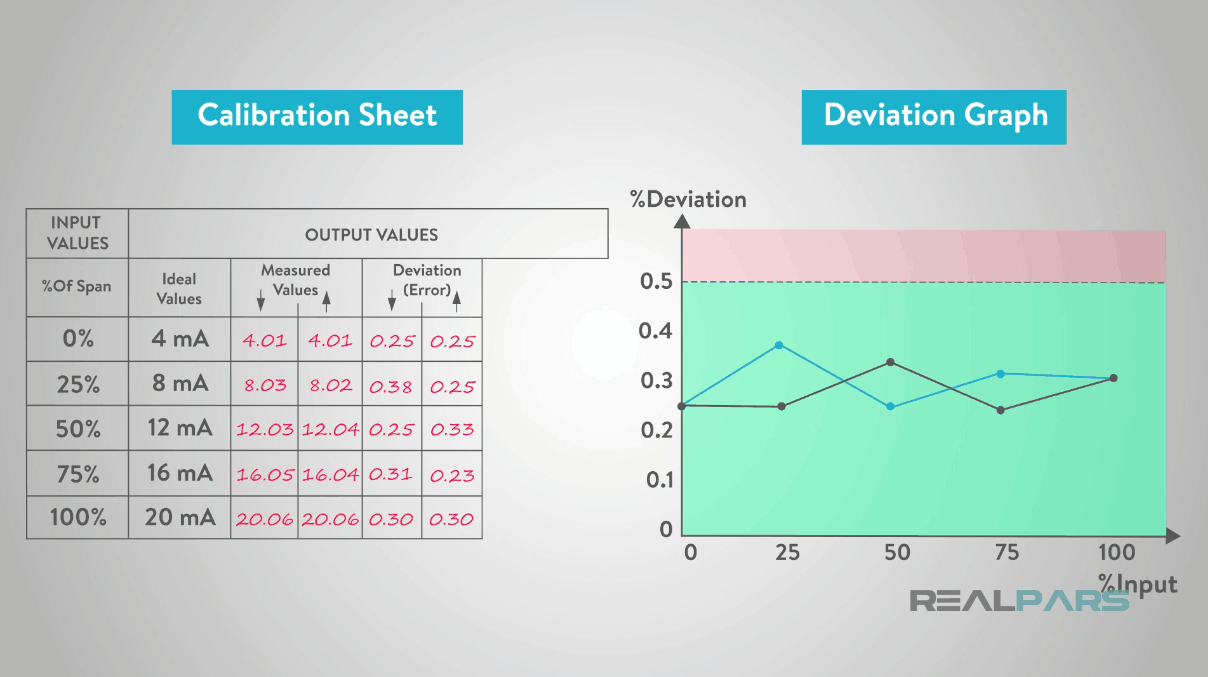
The deviations at each check point are calculated and compared to the deviation maximum allowed for the device.
If the deviation is greater than the maximum allowed, then a full calibration is performed.
If the deviation is less than the maximum allowed, then a sensor calibration is not required.
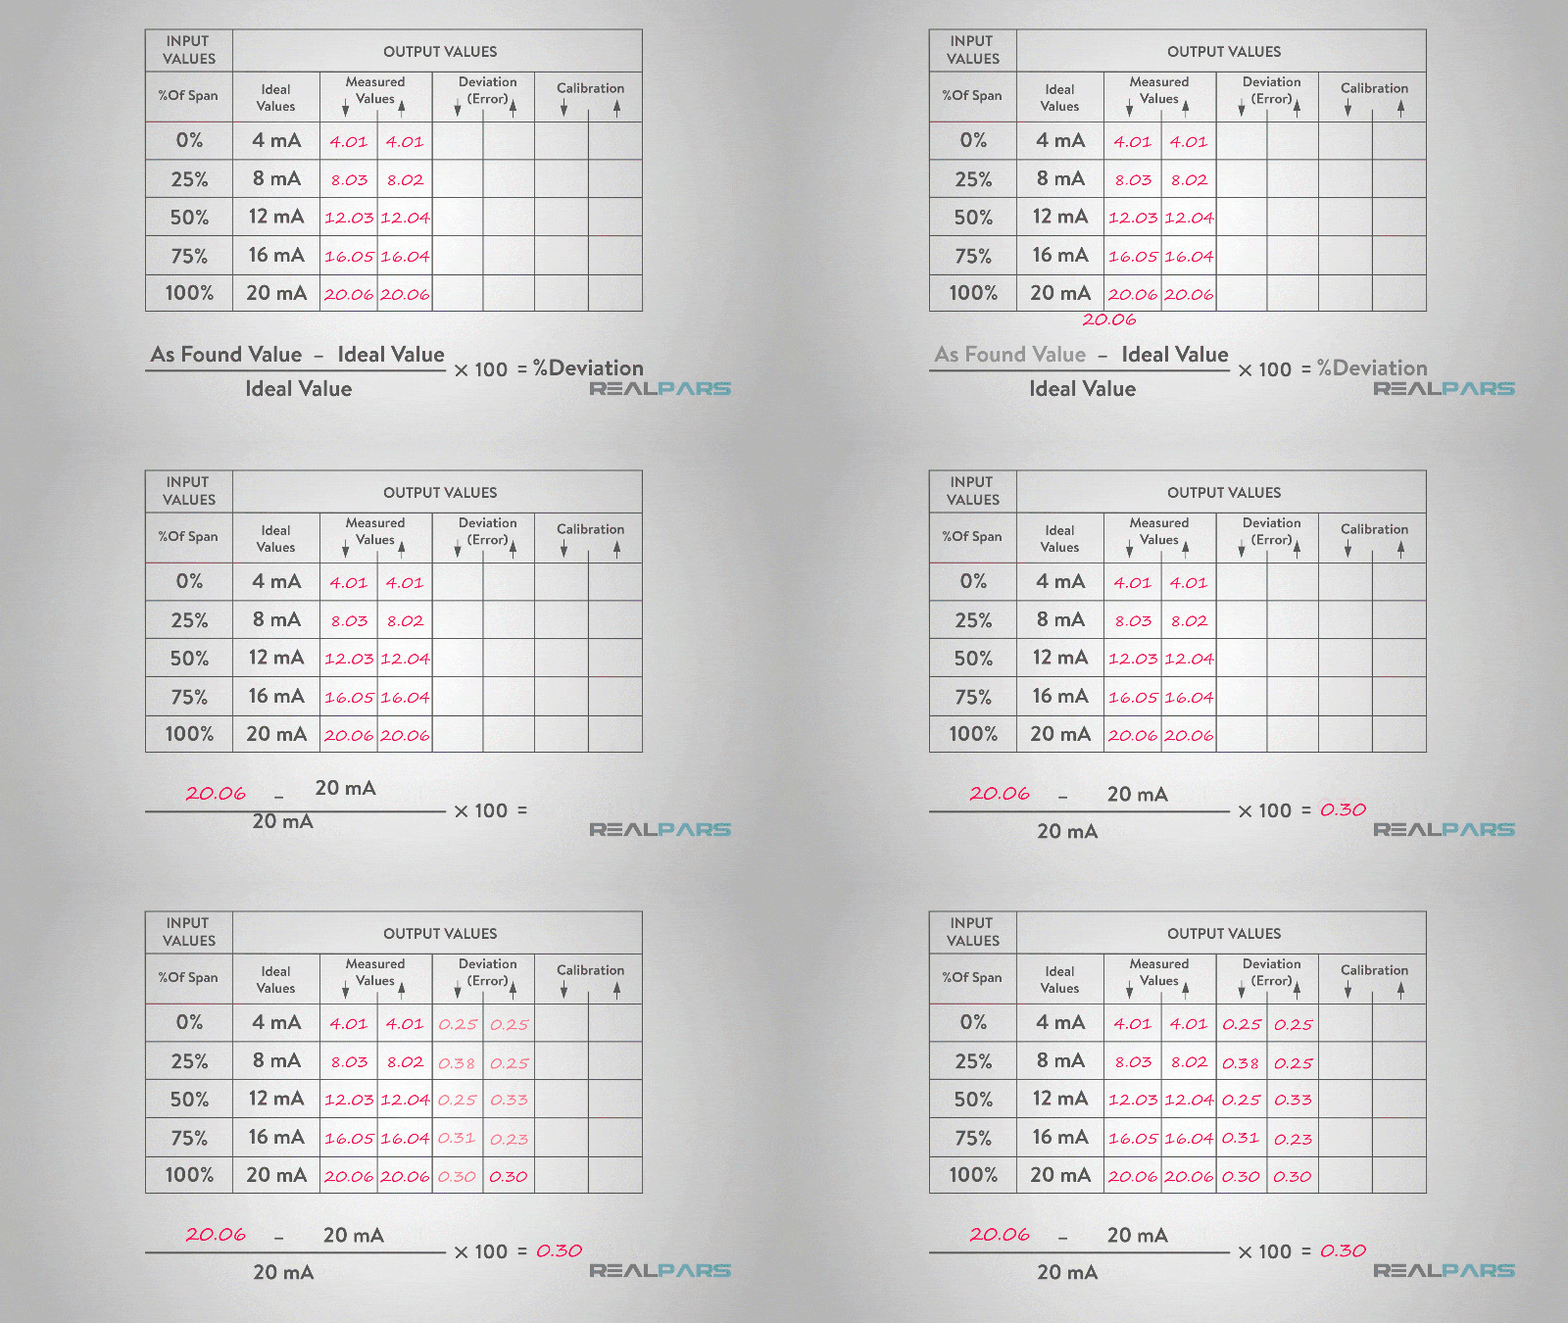
Let’s assume that the maximum deviation tolerance is 0.5%.
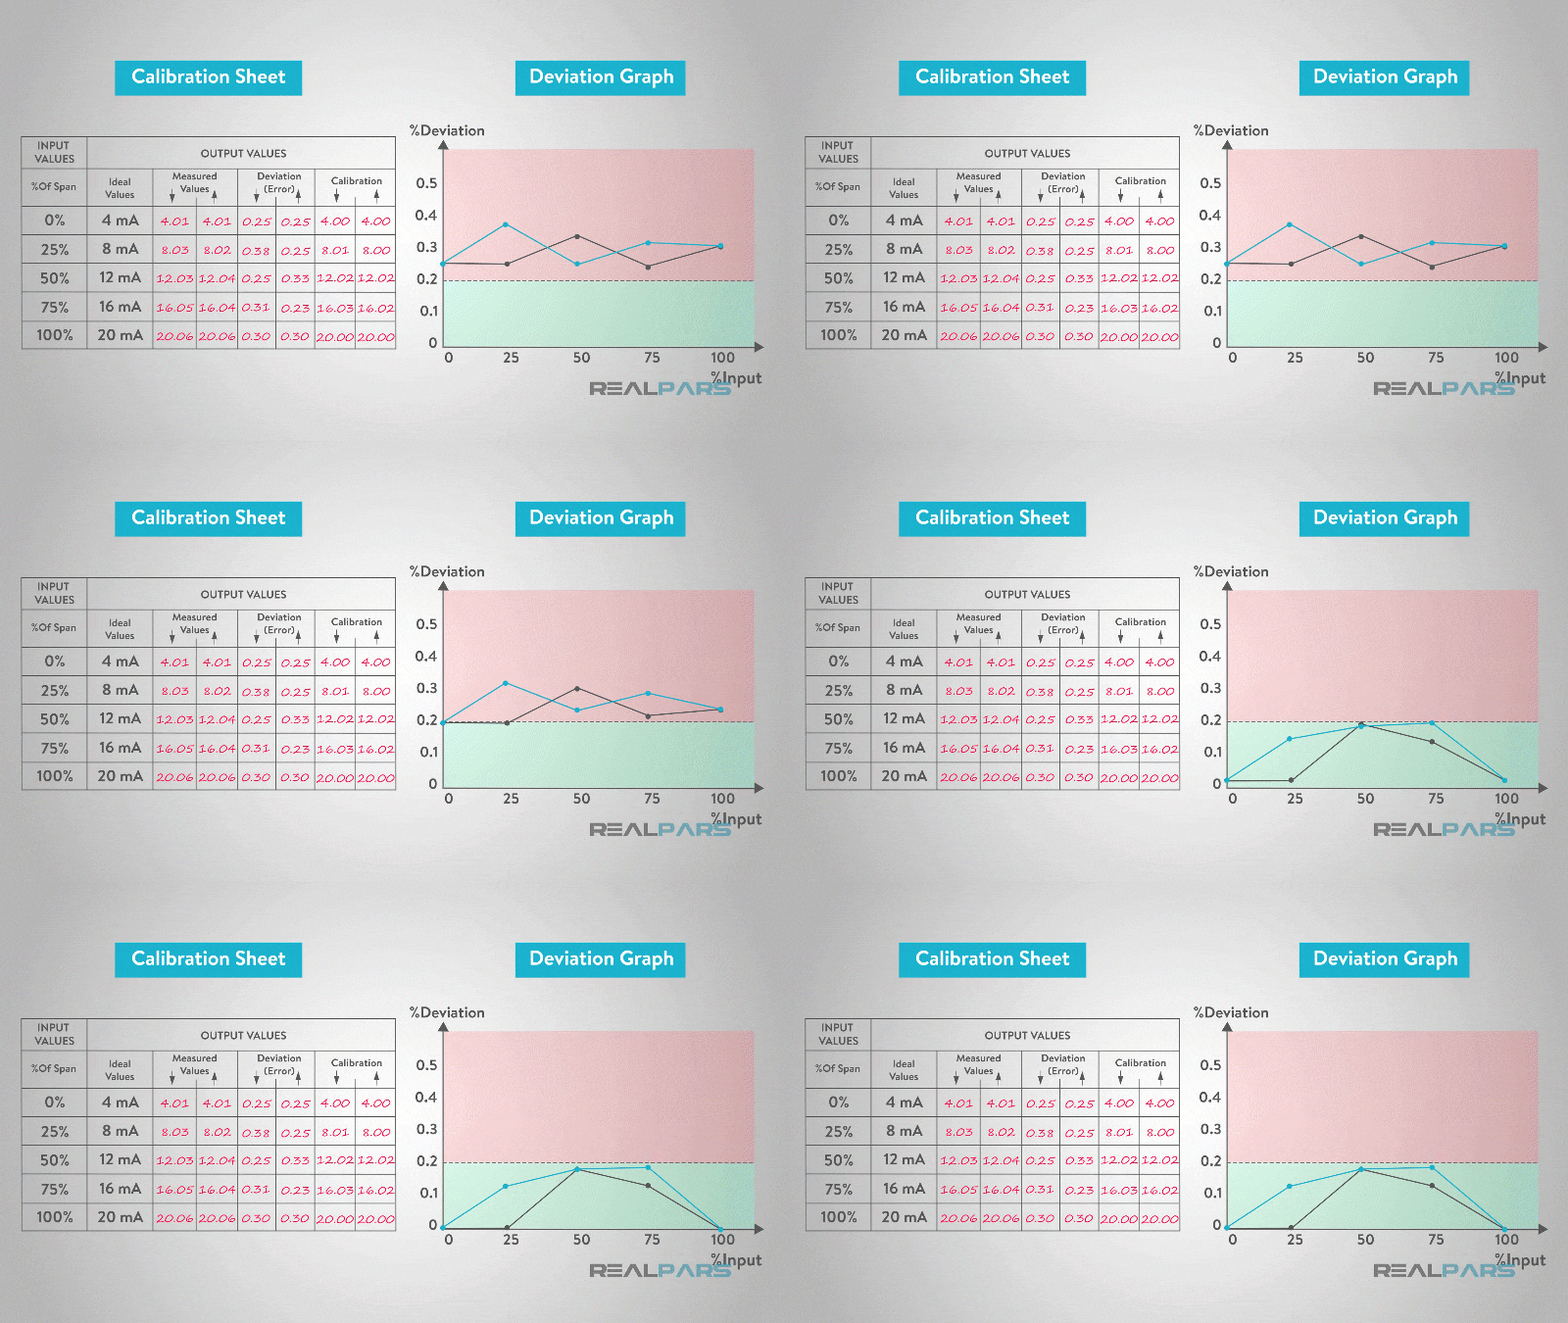
Using the data from the calibration sheet, we see from the graph that the deviations are all less than the maximum deviation allowed of 0.5%.
Therefore, no additional calibration is required.
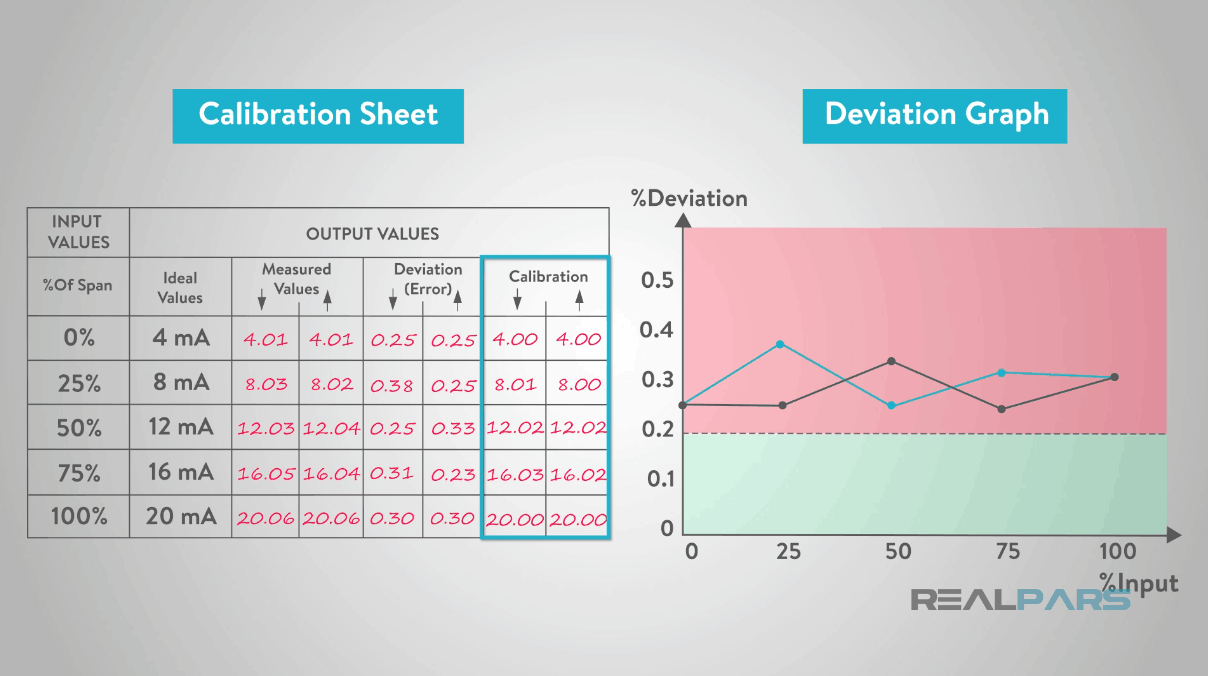
Now let’s assume that the maximum deviation tolerance is 0.20%.
Using the data from the calibration sheet, we see from the graph that some deviations are greater than the maximum deviation allowed of 0.20%.
Therefore, a sensor calibration is required.
2.4. How to Perform a Sensor Calibration
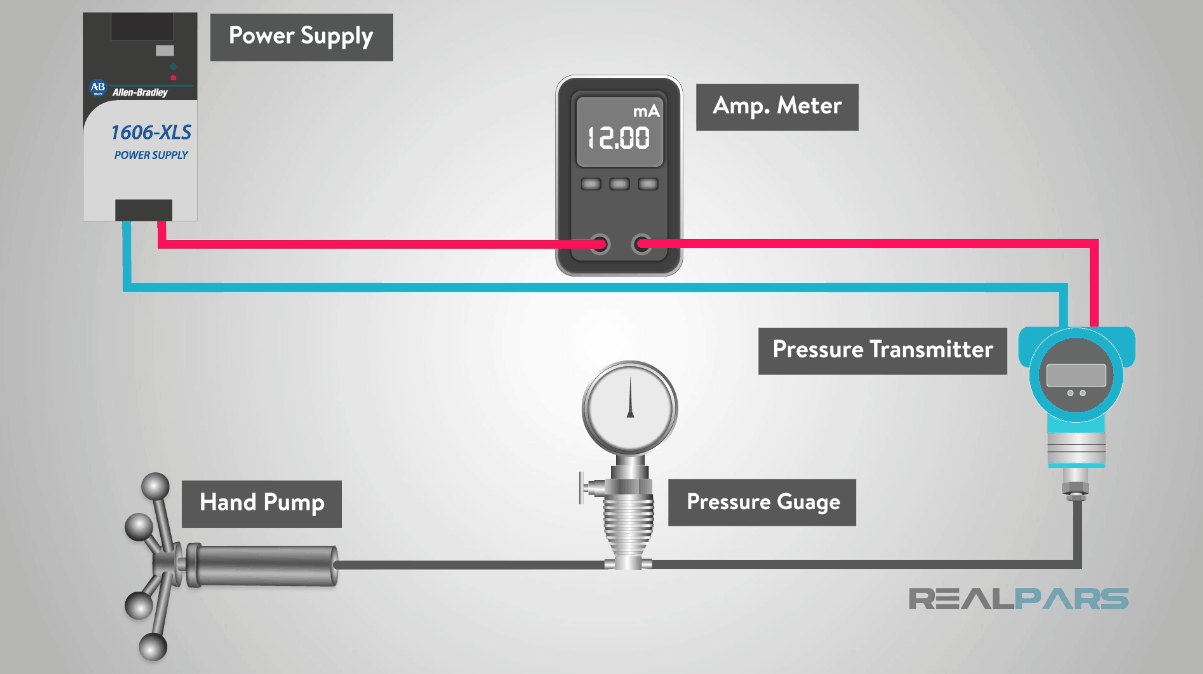
To calibrate, we need a very accurate process simulator, in this case a pressure supply, connected to the process side of the transmitter.
A current meter is attached to the output to measure the transmitter’s 4-20 milliamps output. Ideally, a National Institute for Standards and Testing-calibrated simulator and current meter are used. In practice, we can use very accurate process meters and pressure input modules.
2.4.1. Analog Sensor Calibration (Zero and Span Adjustement)
If we have an analog transmitter, we must adjust zero and span to reduce the measurement error. With an analog transmitter, there is a ZERO and SPAN adjustment on the transmitter itself.
Zero adjustment is made to move the output to exactly 4 milliamps when a 0% process measurement is applied to the transmitter, and the Span adjustment is made to move the output to exactly 20 milliamps when a 100% process measurement is applied.
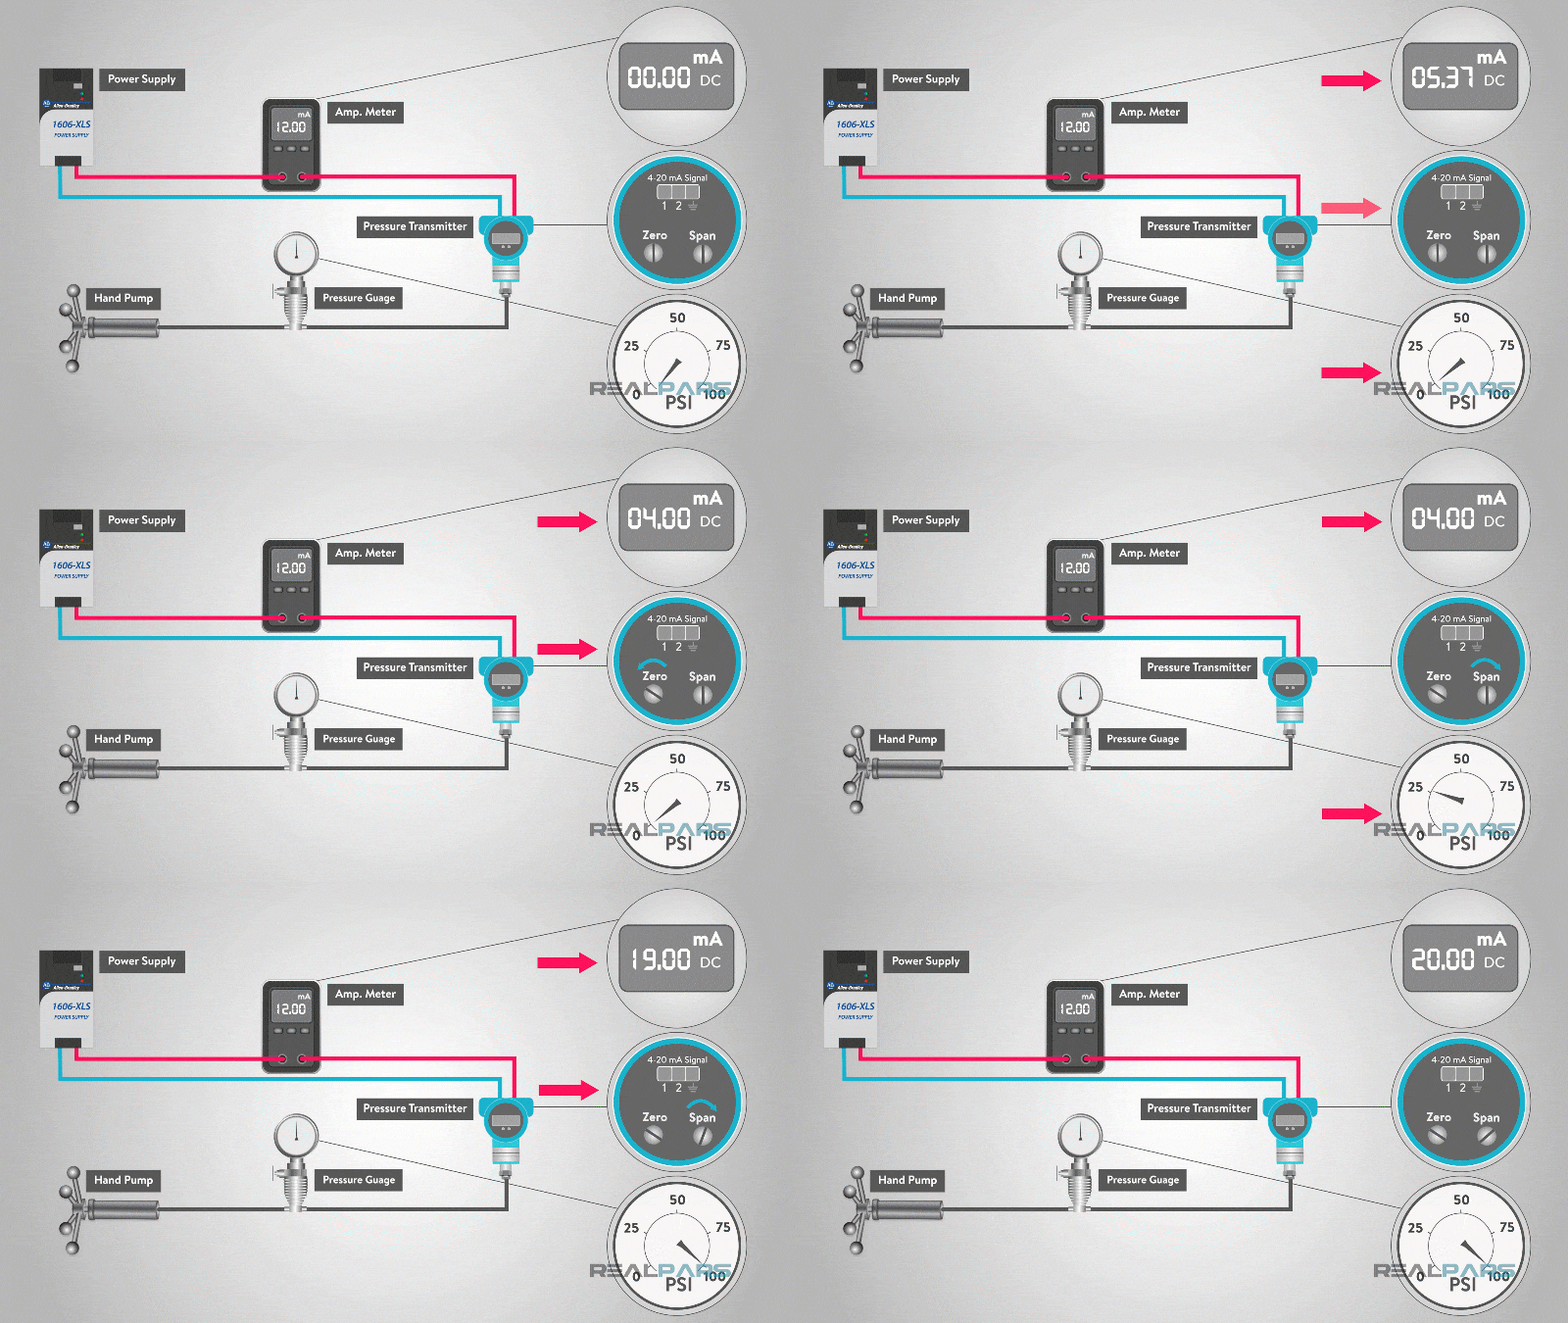
Unfortunately, with analog transmitters, the zero and span adjustments are interactive; that is, adjusting one moves the other. Therefore, the calibration is an iterative process to set zero and span, but only 2 to 3 iterations are usually required.
2.4.2. Digital Sensor Calibration (Sensor and Output Trim)
With a digital transmitter, we can adjust the incoming sensor signal by adjusting the Analog to Digital converter output, which is called “sensor trim”, and/or the input to the Digital to Analog converter in the output circuit, which is called “4-20mA trim” or “output trim”.
2.4.3. After Calibration
After calibration, the errors are graphed once again. As with the “as found” values, there is some degree of hysteresis. However, the maximum deviation has been reduced from 0.38% to 0.18%, well within the tolerance of 0.20%.
In this artcle, you learned the importance of sensor calibration of a measurement signal.
Calibration is an adjustment or set of adjustments performed on a sensor or instrument to make that instrument function as accurately, or error free, as possible.
Proper sensor calibration will yield accurate measurements, which in turn, makes good control of the process possible. When good control is realized, then the process has the best chance of running efficiently and safely.
Got a friend, client or colleague that might find this easy-to-follow article about sensor calibration useful? Share this article. Not only will they thank you for it, but you’ll have one more person to add to your fraud squad.
Happy learning,
The RealPars Team
