From Electrical Design to Automation: Importing EPLAN Electric P8 Into Sysmac Studio

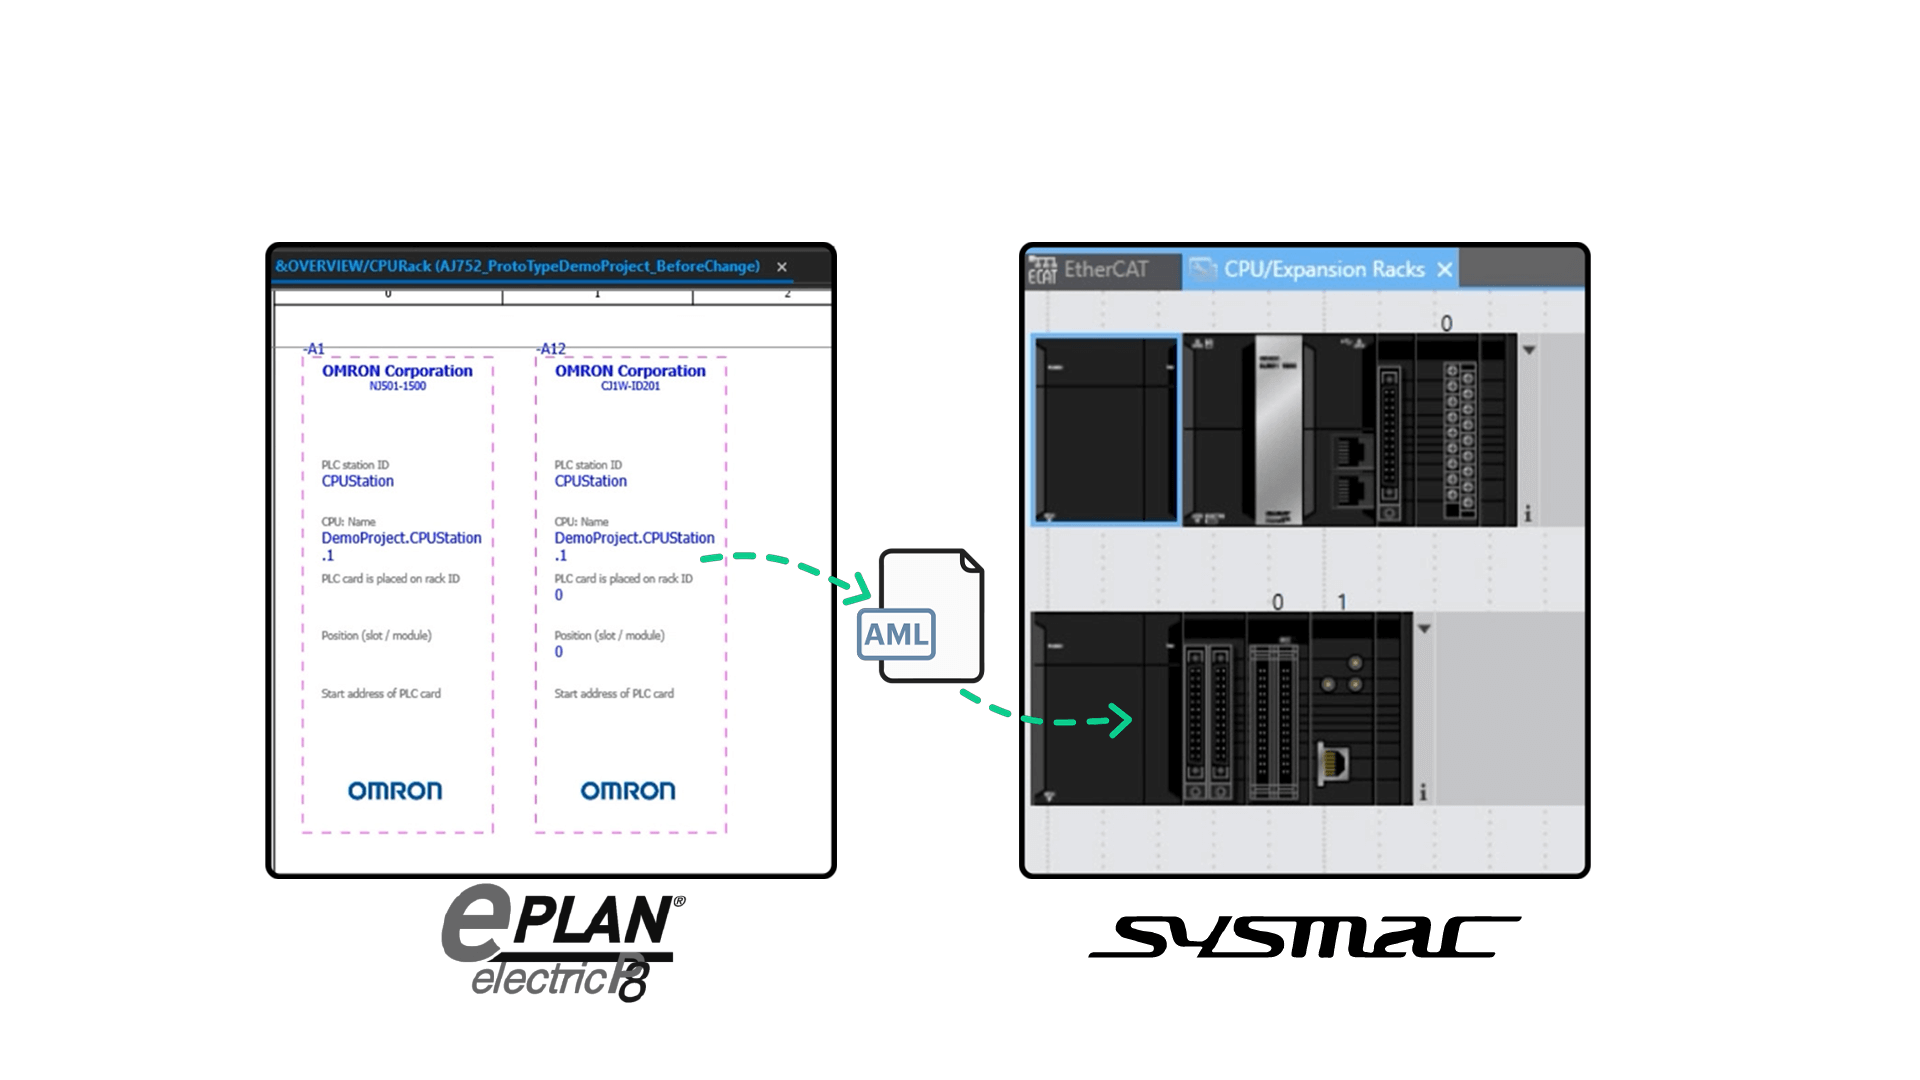
In this article, we are going to show you how EPLAN Electric P8 CAD designs can be imported into OMRON Sysmac Studio.
EPLAN Electric P8 is electrical design software which supports 2D computer-aided engineering for the creation of schematics and circuit diagrams.
Sysmac Studio is the software that provides an integrated development environment for programming, debugging, and simulation for OMRON Machine Automation Controllers and HMIs.
Important data created in Electric P8 can be imported into Sysmac Studio reducing duplicate data entry and eliminating possible errors in the design process.
Typical imported data includes:
– Physical location or placement of PLC modules
– Controller and network configuration, and device variables
EPLAN Electric P8 project overview
OK… Let’s look at how a project created in Electric P8 can be imported and integrated into Sysmac Studio.
We will start with a completed Electric P8 project that has a set of schematics typically found in most electrical project drawings.
There’s a title page.
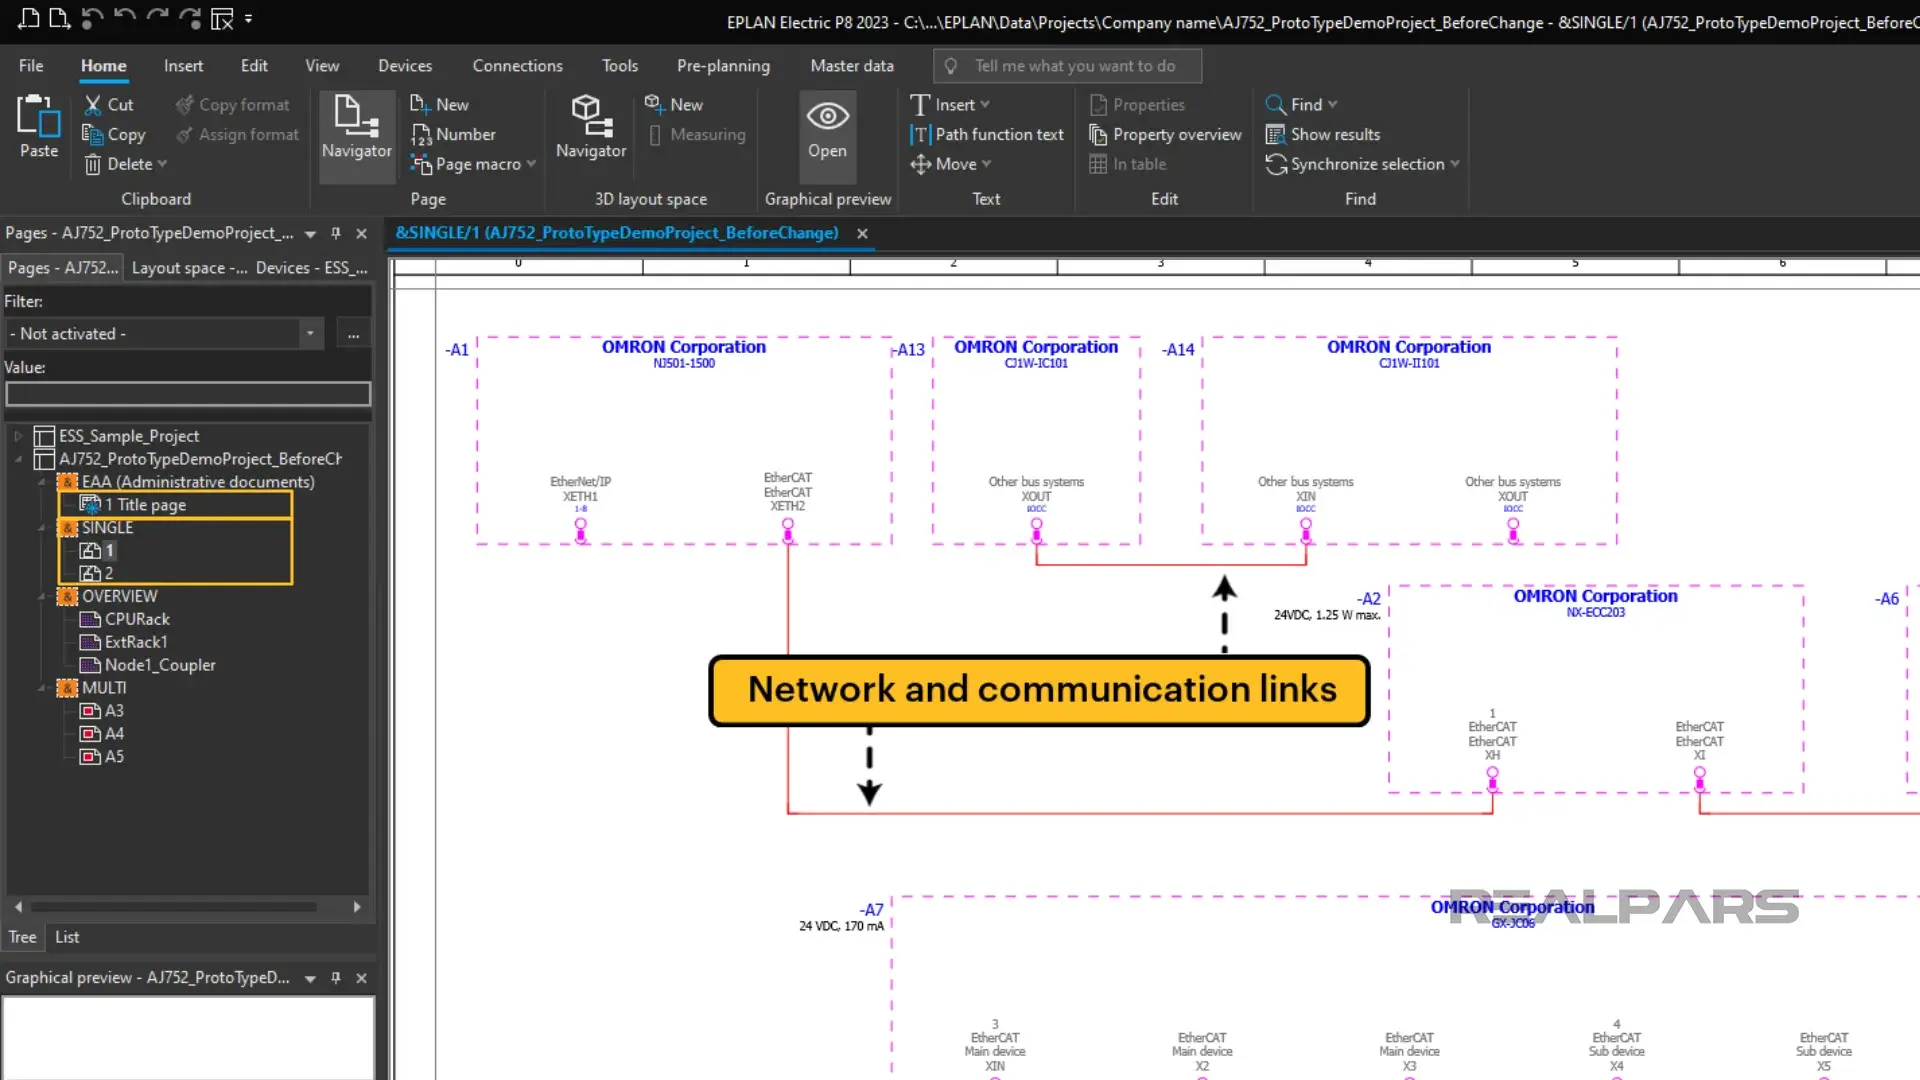
There are single-line pages showing network and communication links.
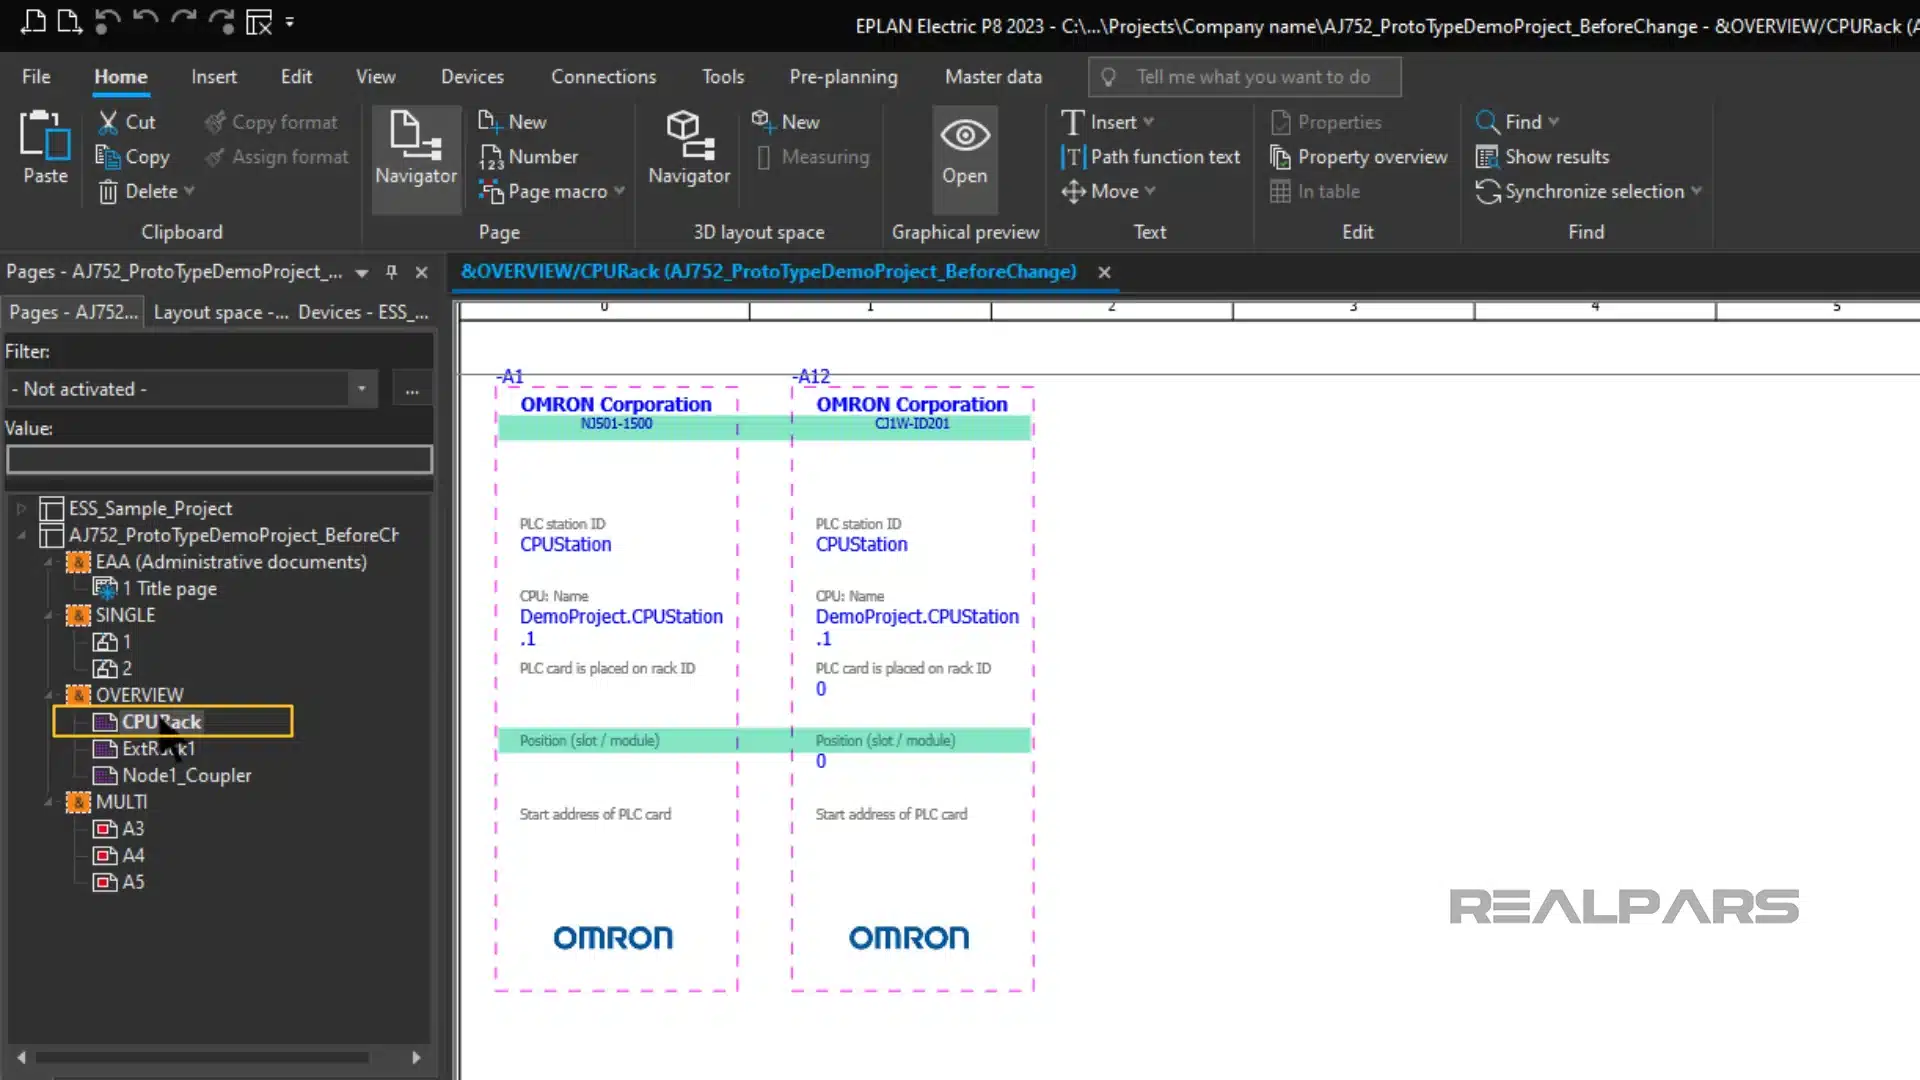
Another page shows the CPU Rack with OMRON part numbers and slot locations of the components in the rack.
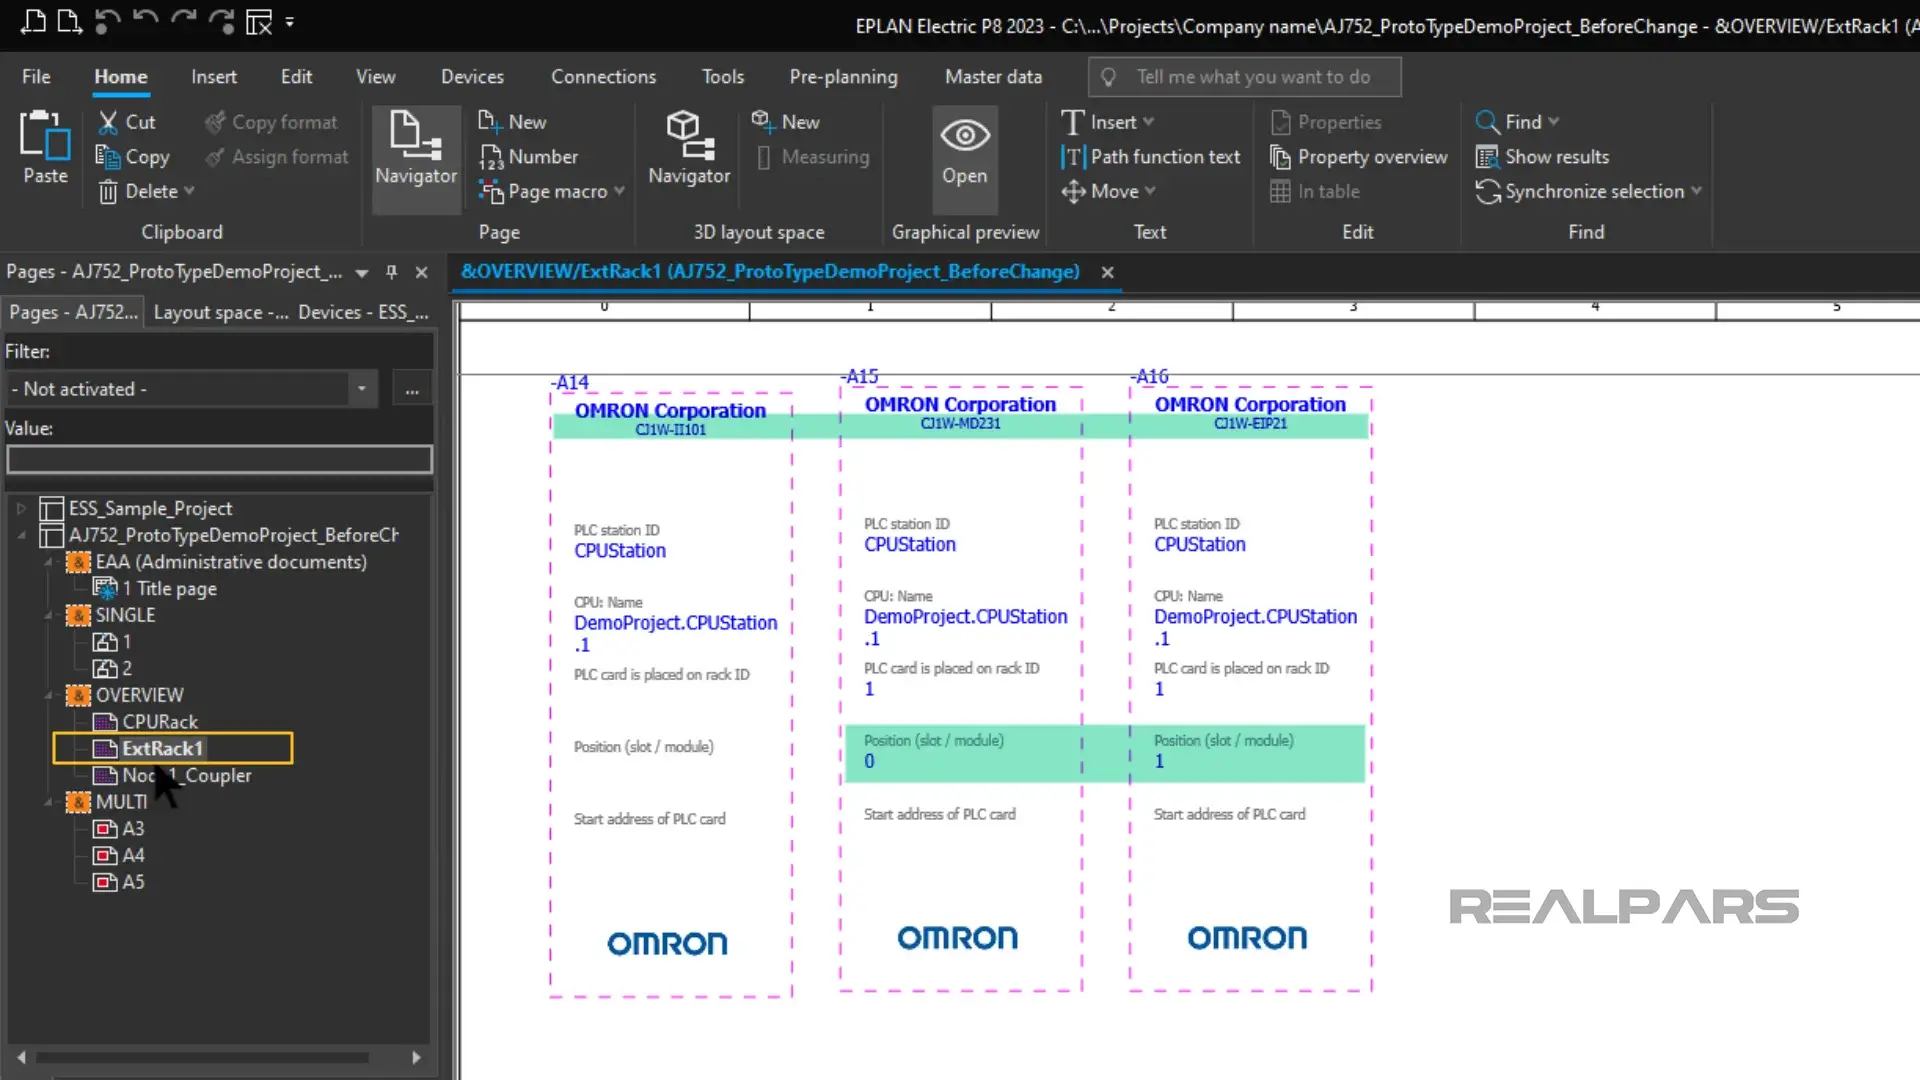
There is a page that shows the Expansion Rack with OMRON part numbers and slot locations of the components in the rack.
There is a page that shows the Node Coupler and the I/O modules connected to the coupler…
Some pages show the individual I/O modules and provide data on the Variable assignments for the inputs and outputs of each module.
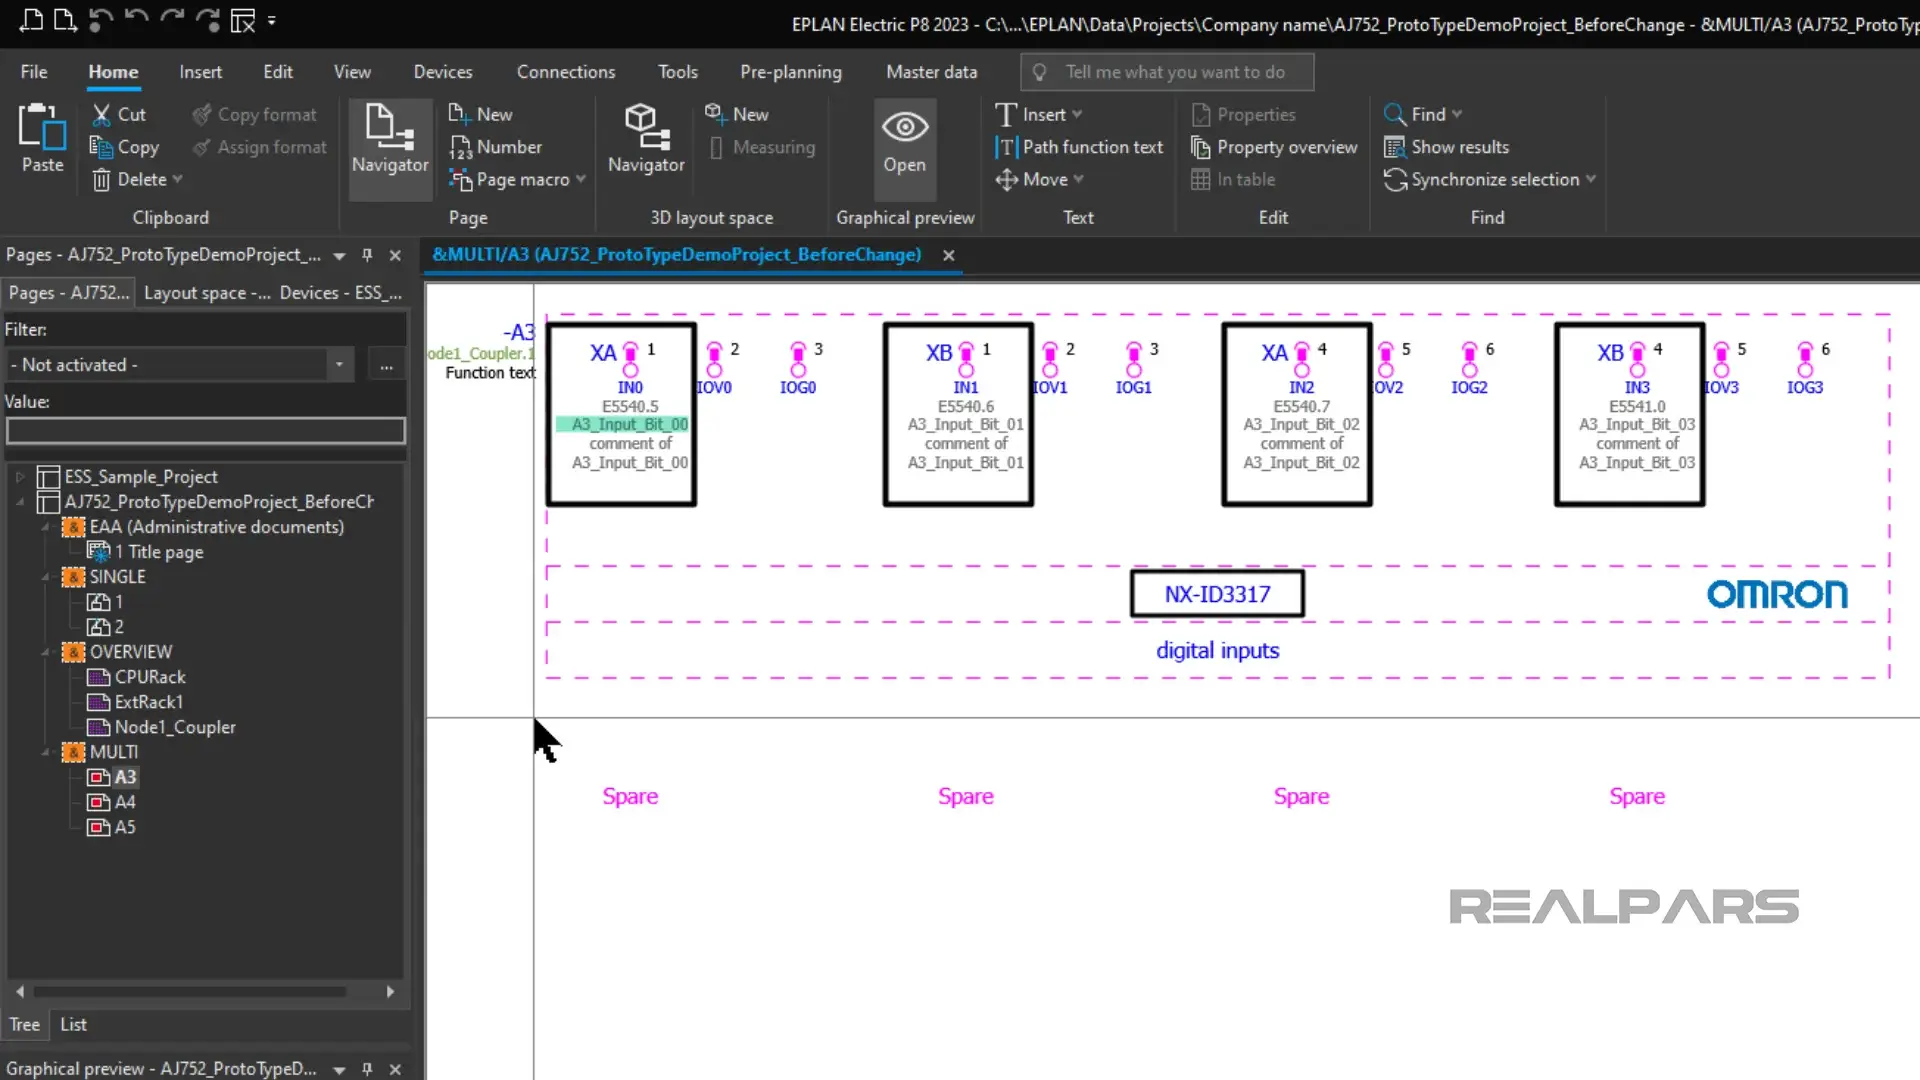
For example, consider the OMRON NX-ID3317 Digital input module in Slot 1. This module has a variable assigned to its Digital Input IN0 called A3_Input_Bit_00.
Importing Electric P8 drawings into Sysmac Studio
OK… Let’s see how Electric P8 interfaces with Sysmac Studio.
Now it is possible to import the Electric P8 electrical drawings into Sysmac Studio via an IEC 62714 Automation ML (AML) file.
Ok…so, what’s an AML file?
An AML file is a data file used to store and exchange plant engineering information. It is based on the .XML format.

Creating the AML file in Electric P8
Let’s go through the steps of creating the .AML file in Electric P8.
There are very few steps and the process is fast and easy.
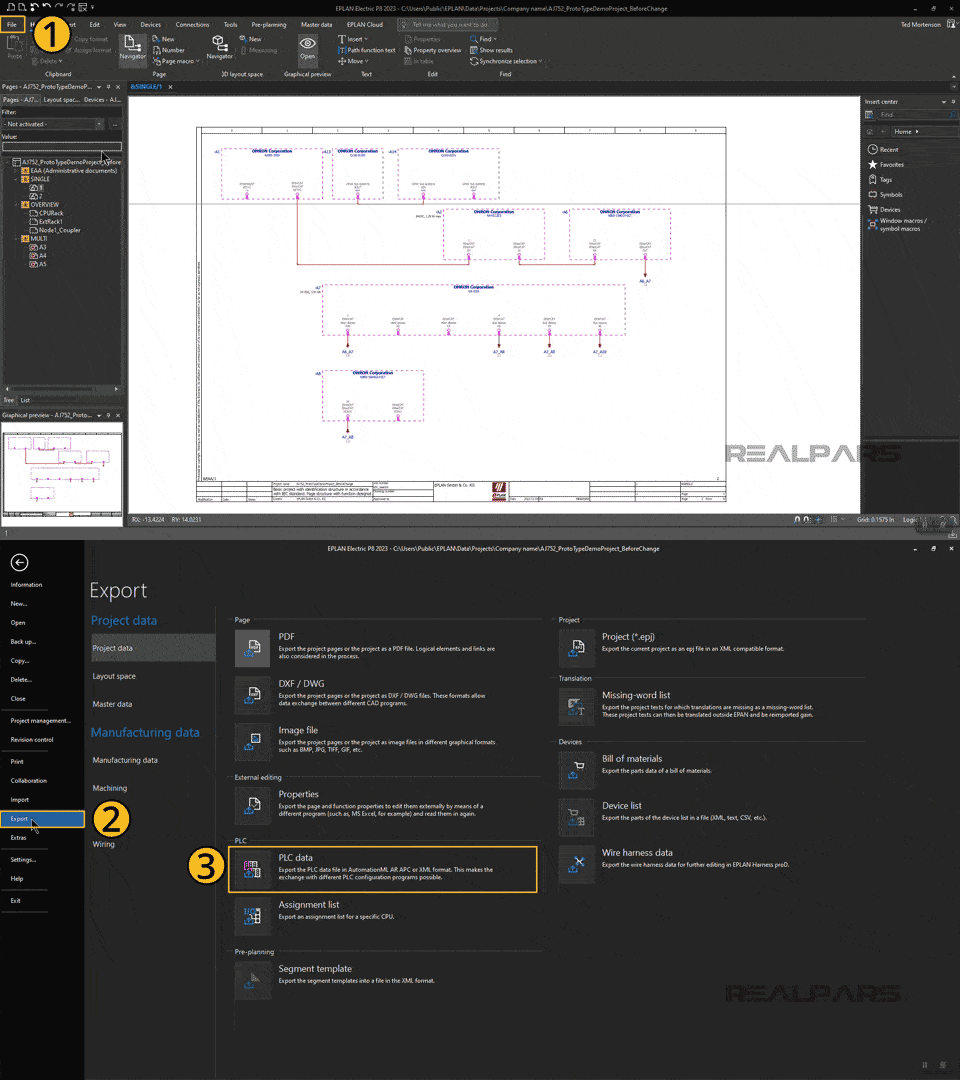
Click on File, Click on Export from the dropdown menu.
Choose PLC data from the options presented.
Enter the destination path and file name for the .AML file.
We’ve chosen the file name Plc.aml and we are storing it on the Desktop.
Clicking on OK presents us with details on the exported PLC objects being exported as part of the Plc.aml file.
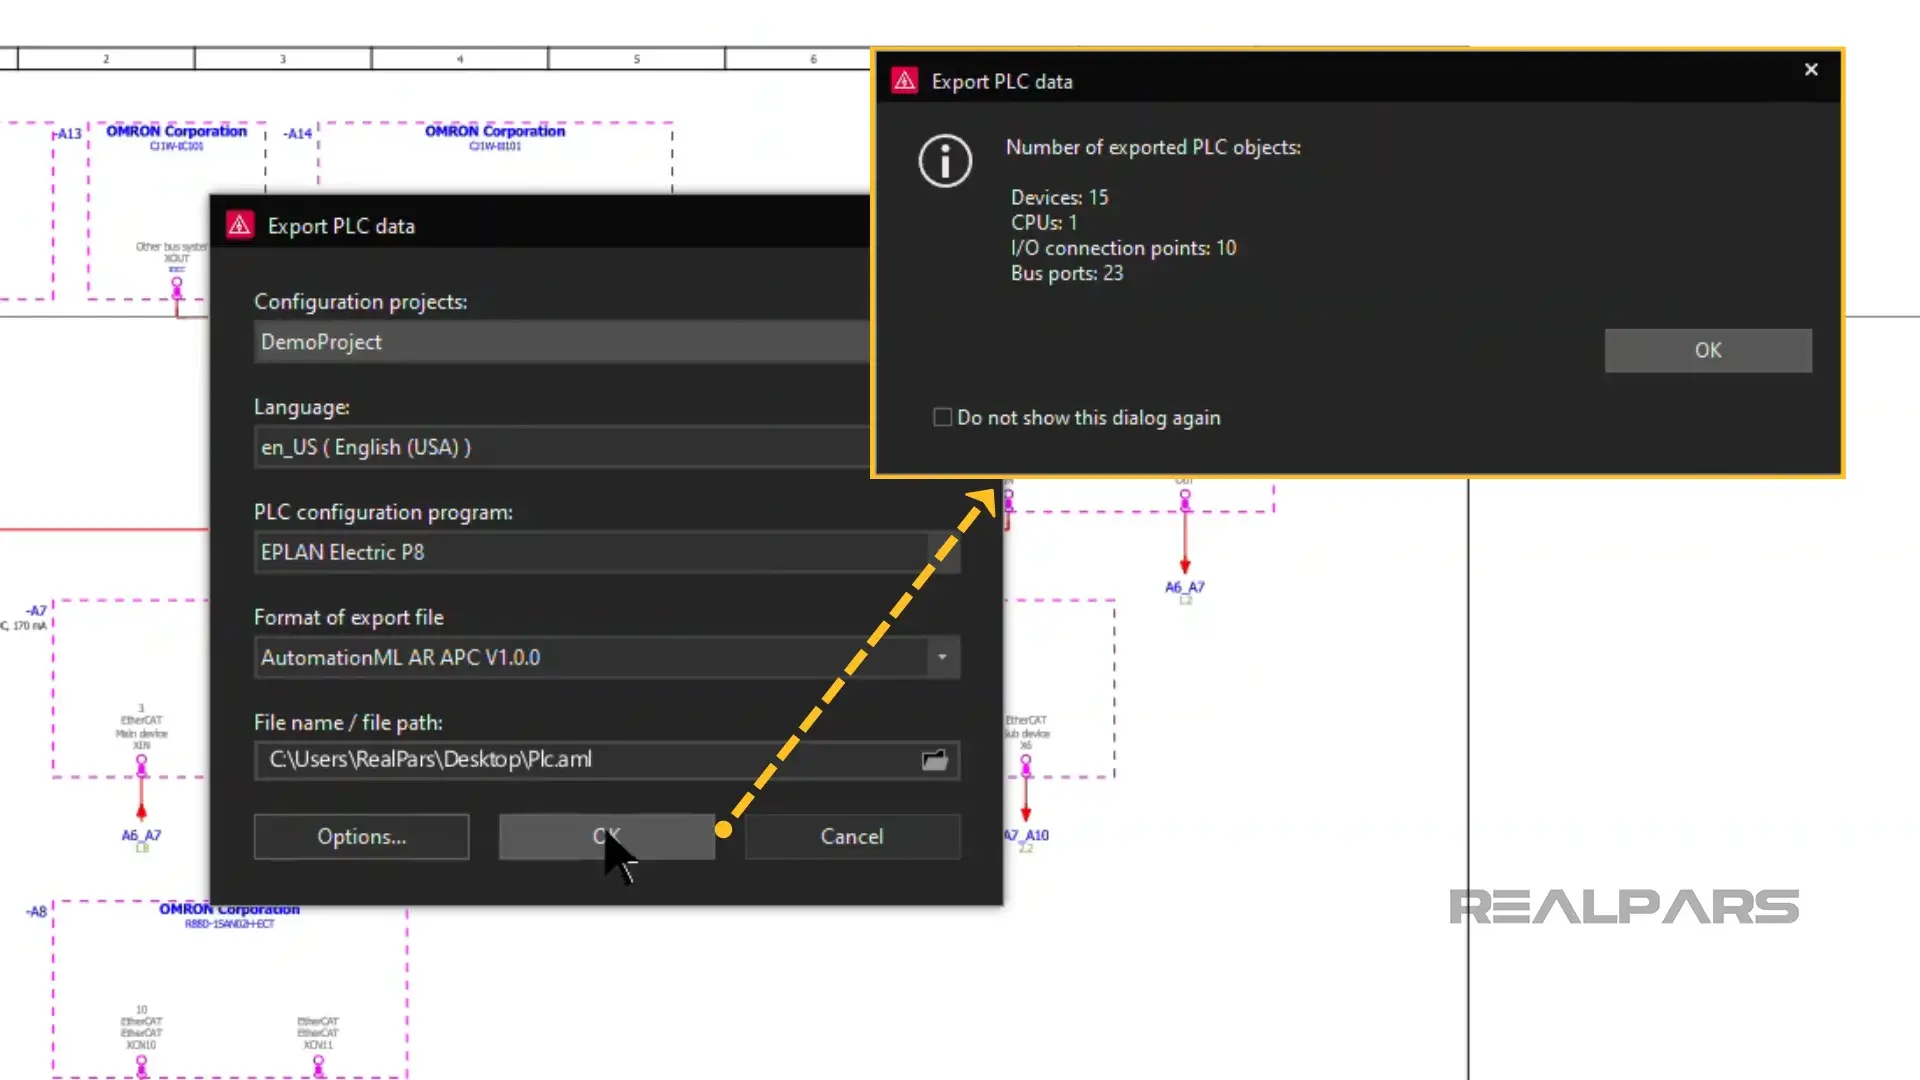
And, when we click on OK one more time, the Plc.aml file is created and saved on the Desktop.
And that’s it! The Plc.aml file is ready to be imported into Sysmac Studio.
Importing the AML file into Sysmac Studio
Alright… let’s import the Plc.aml file into Sysmac Studio.
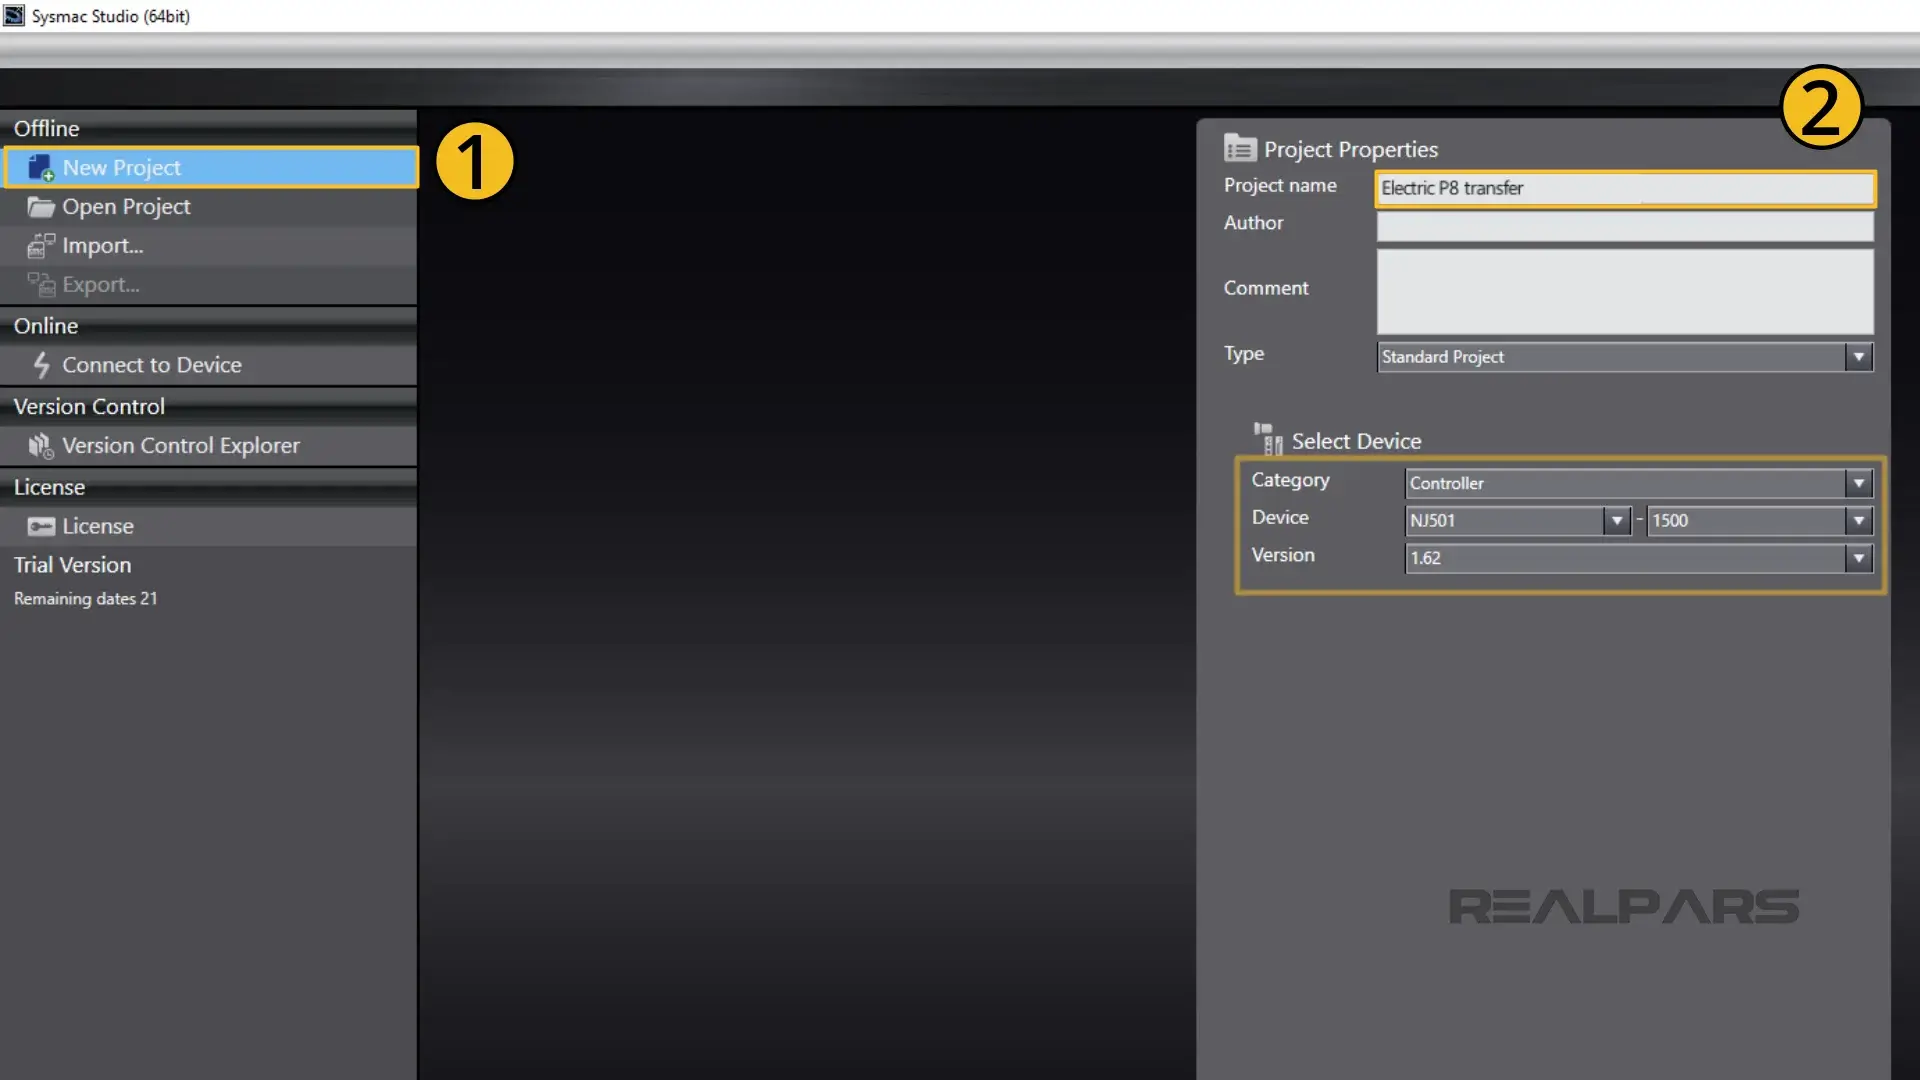
After we start Sysmac Studio, we create a New Project called Electric P8 transfer.
We’re good to go with the default Controller selection because it matches the Controller configured in the EPLAN Electric P8 project.
We’re ready to import the plc.aml file.
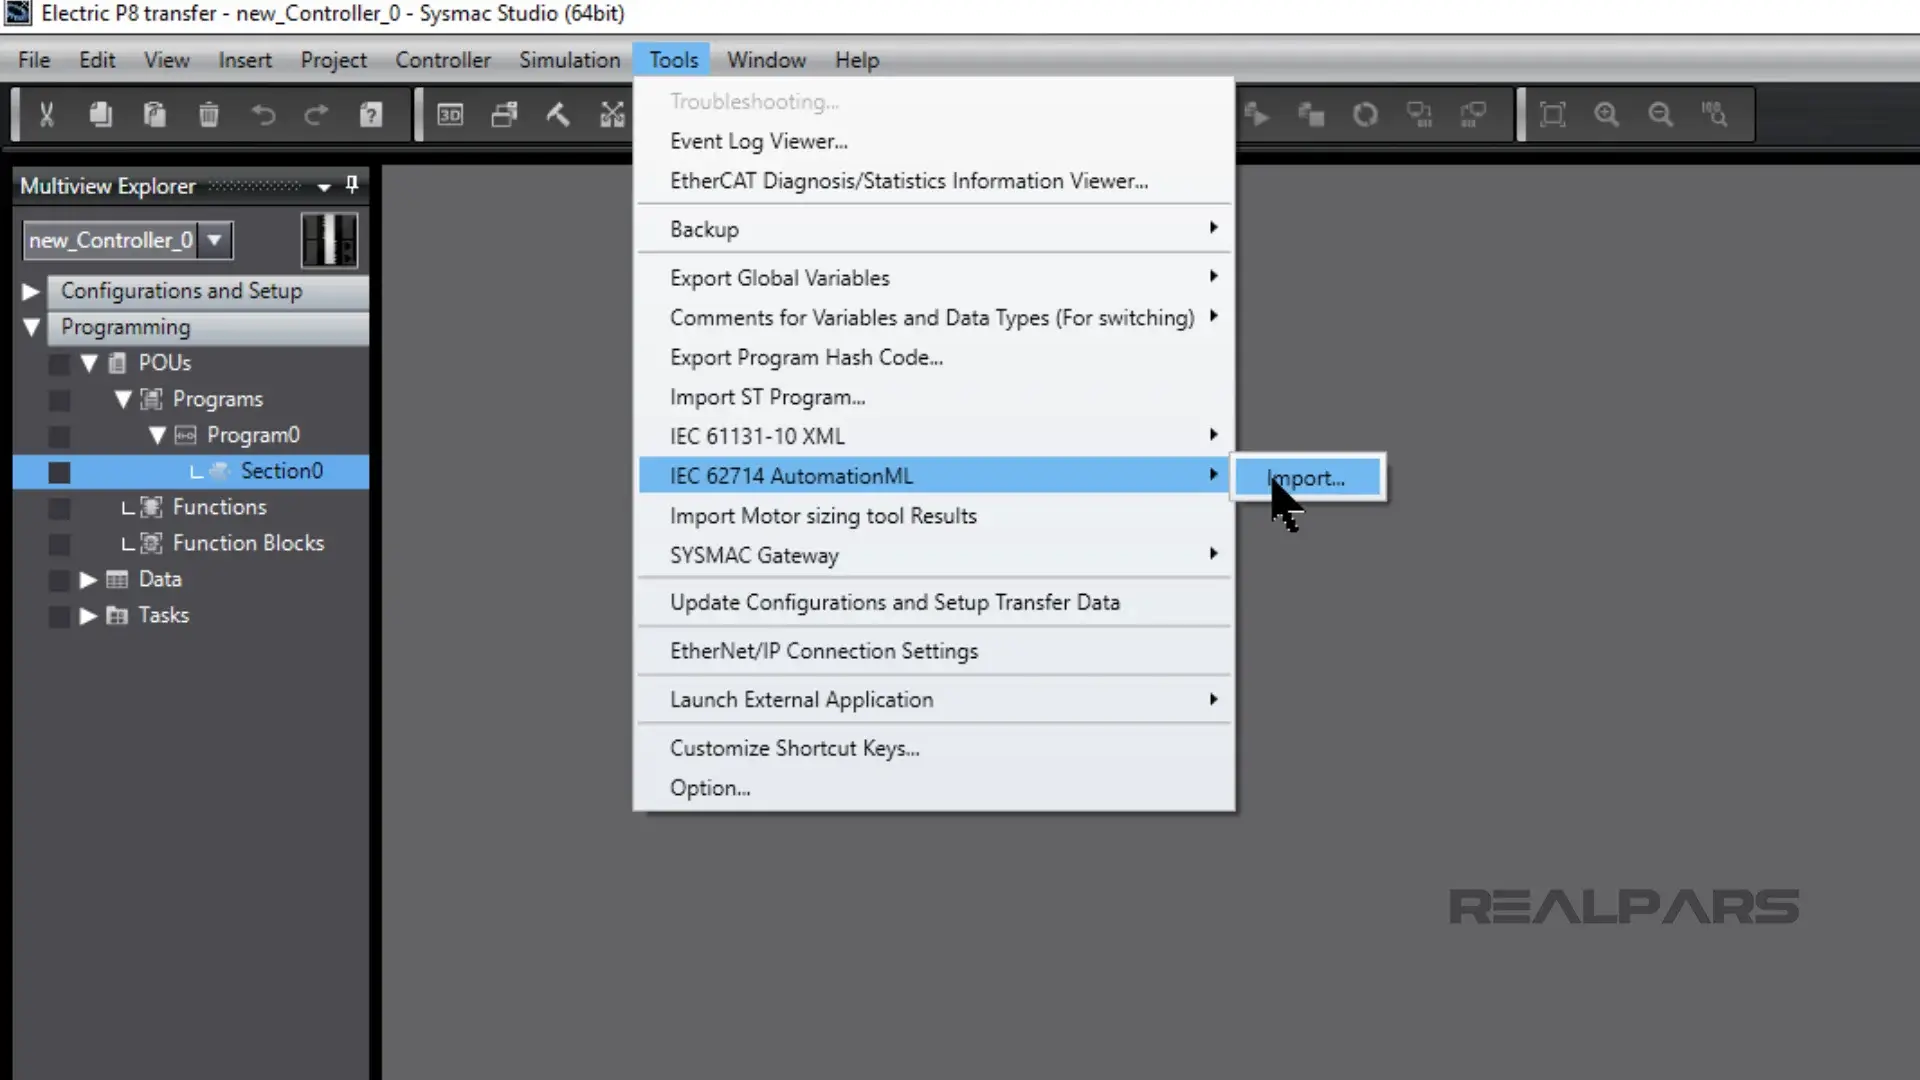
We click on Tools on the Toolbar.
In the dropdown window, we hover the pointer over IEC 62714 AutomationML and Click on Import.
We’ll go to the desktop because that’s where we’ve saved the plc.aml file.
We choose plc.aml and click on Open.
And then click on Execute.
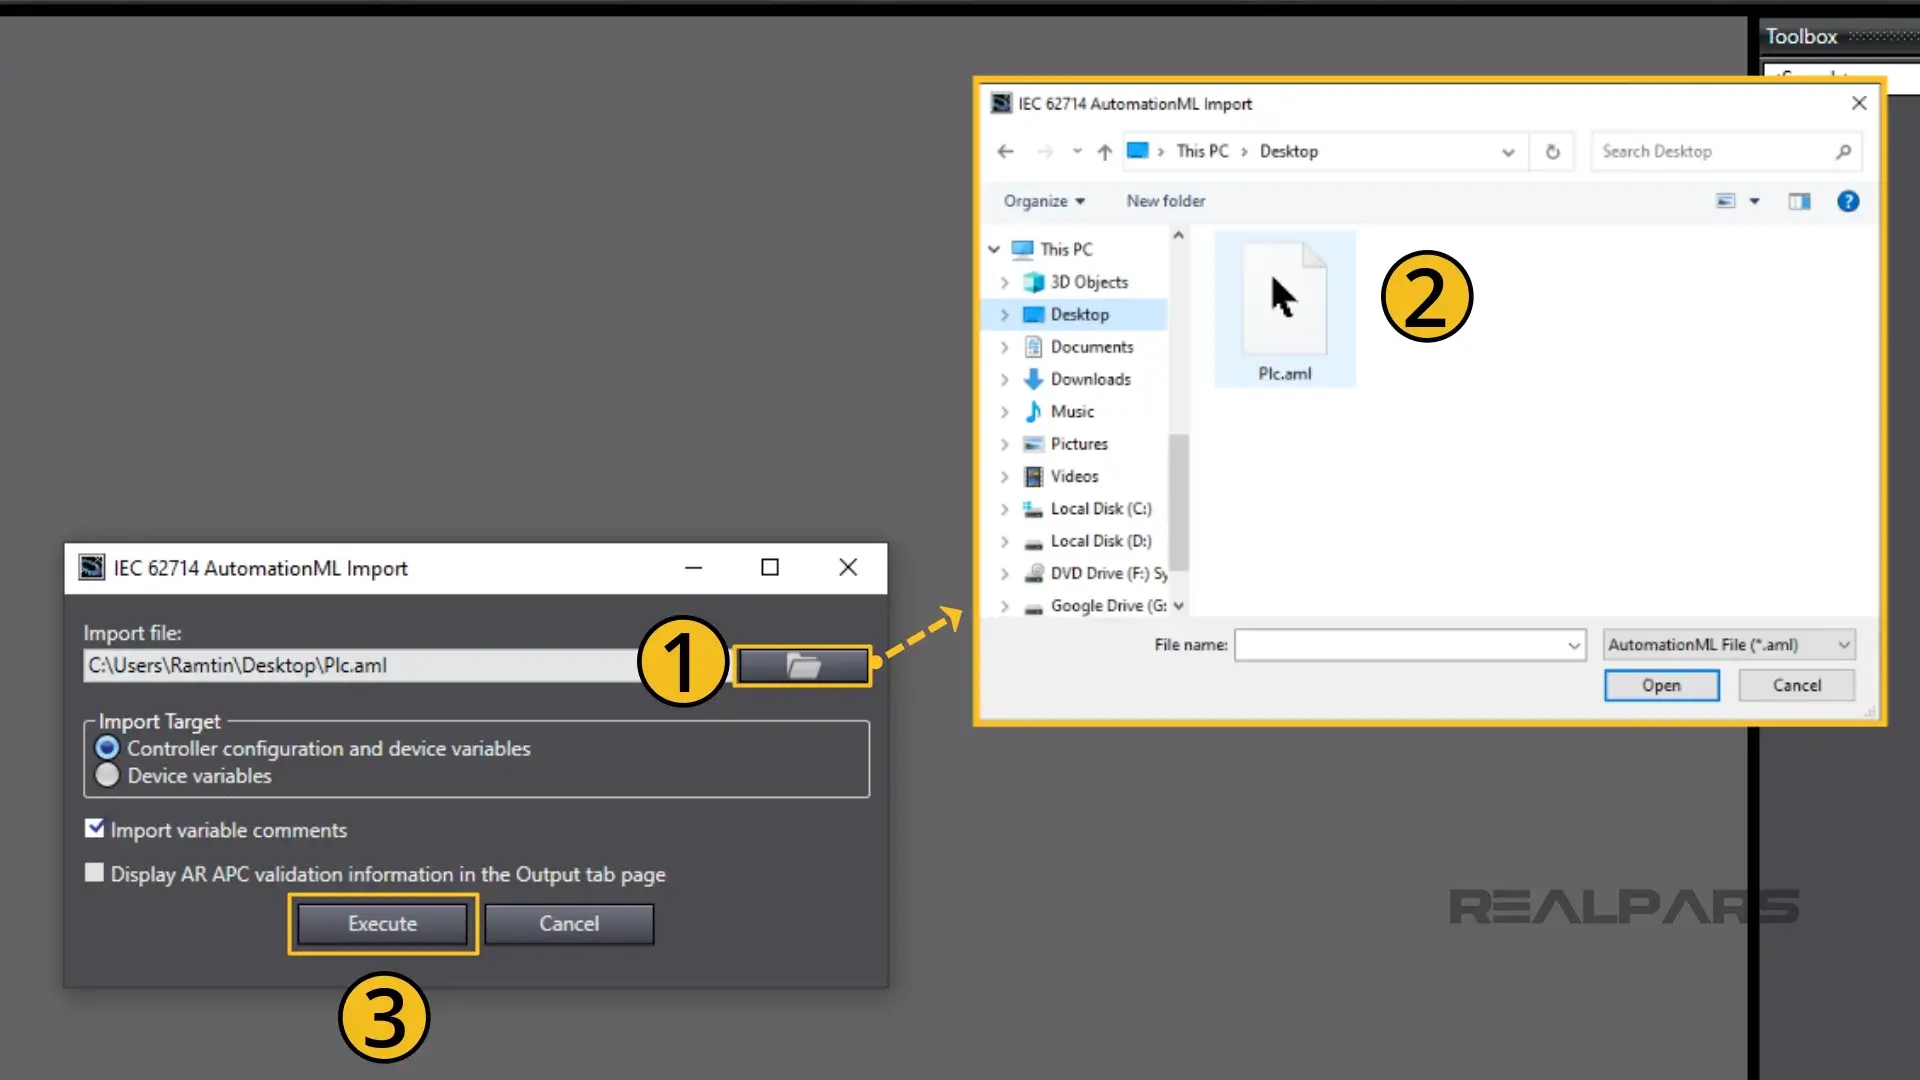
The plc.aml file starts to import into Sysmac Studio.
And that’s it! It’s that simple and quick.
Thanks to AML Import function, the electrical CAD data will be automatically reflected in unit and network configurations, signal lines, variables, and settings.
Hardware and network configuration overview
Ok… let’s have a peek at what was imported from Electric P8.
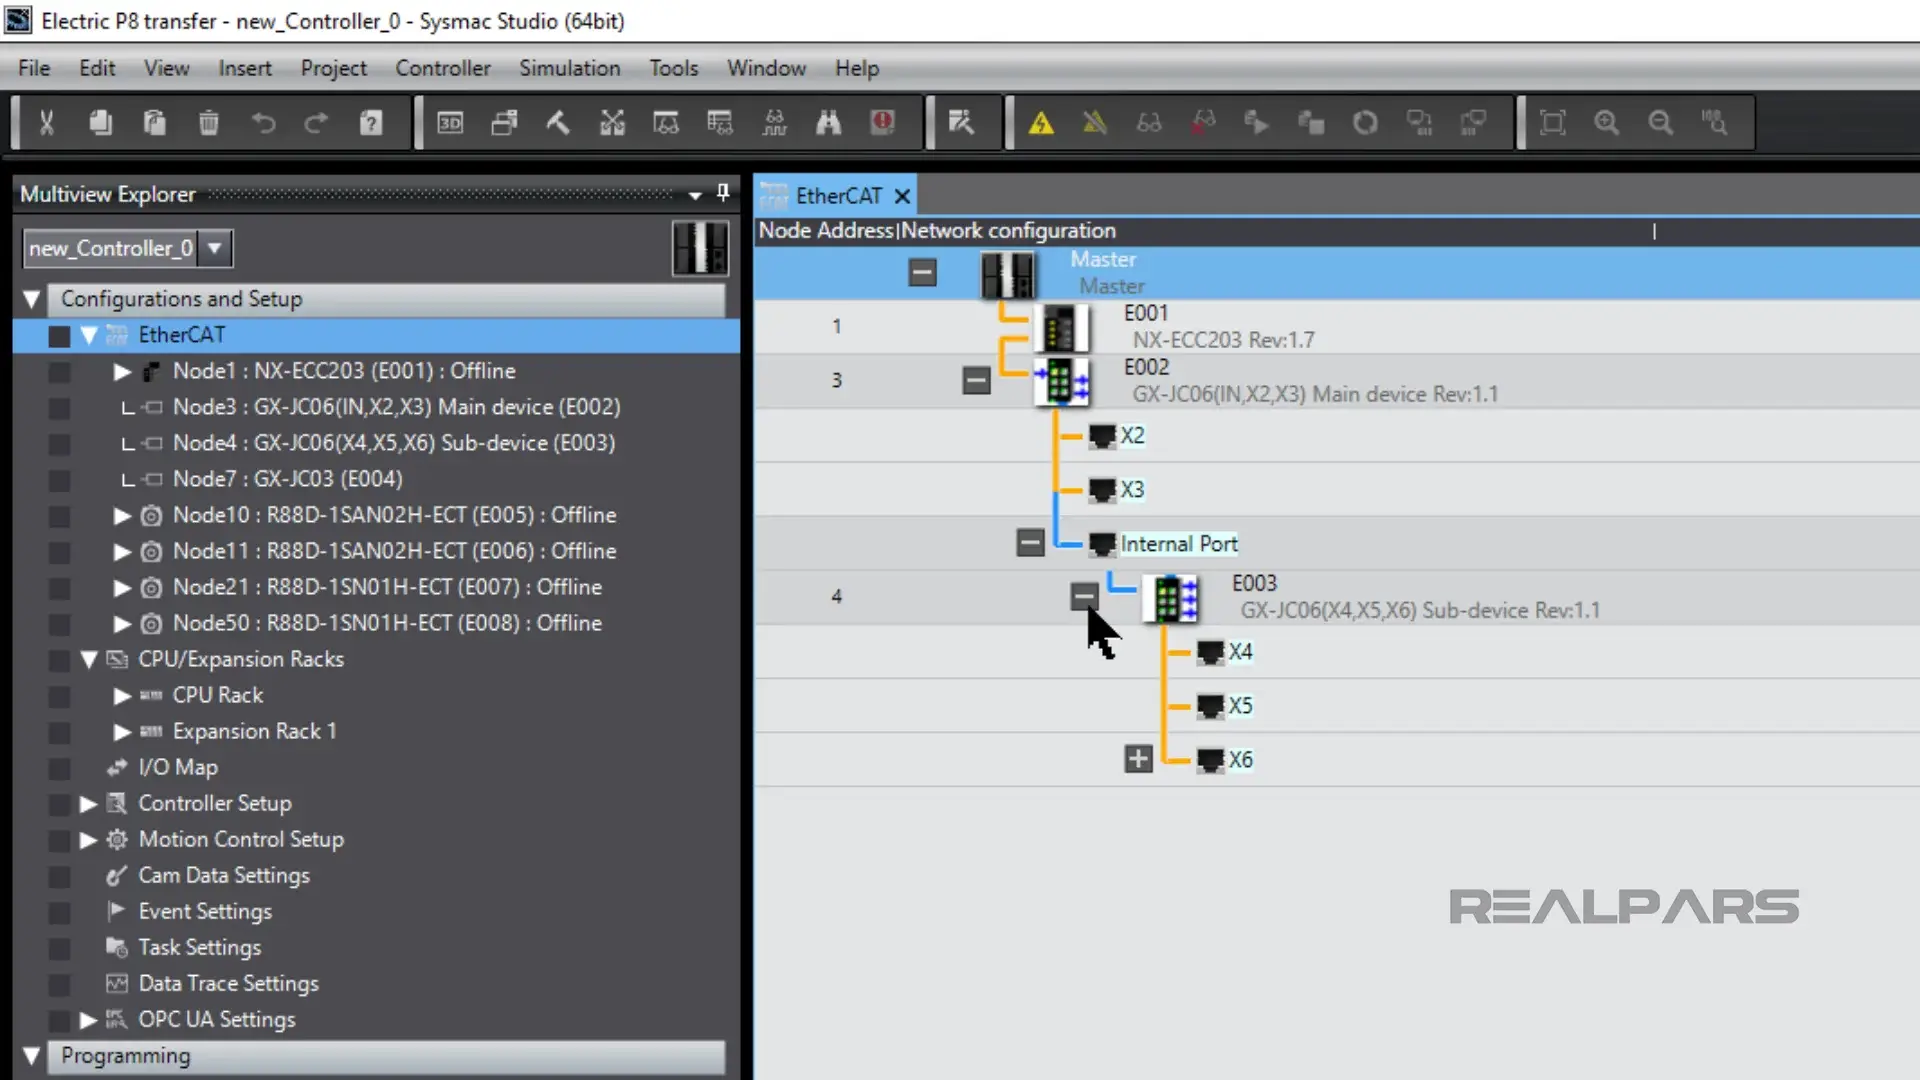
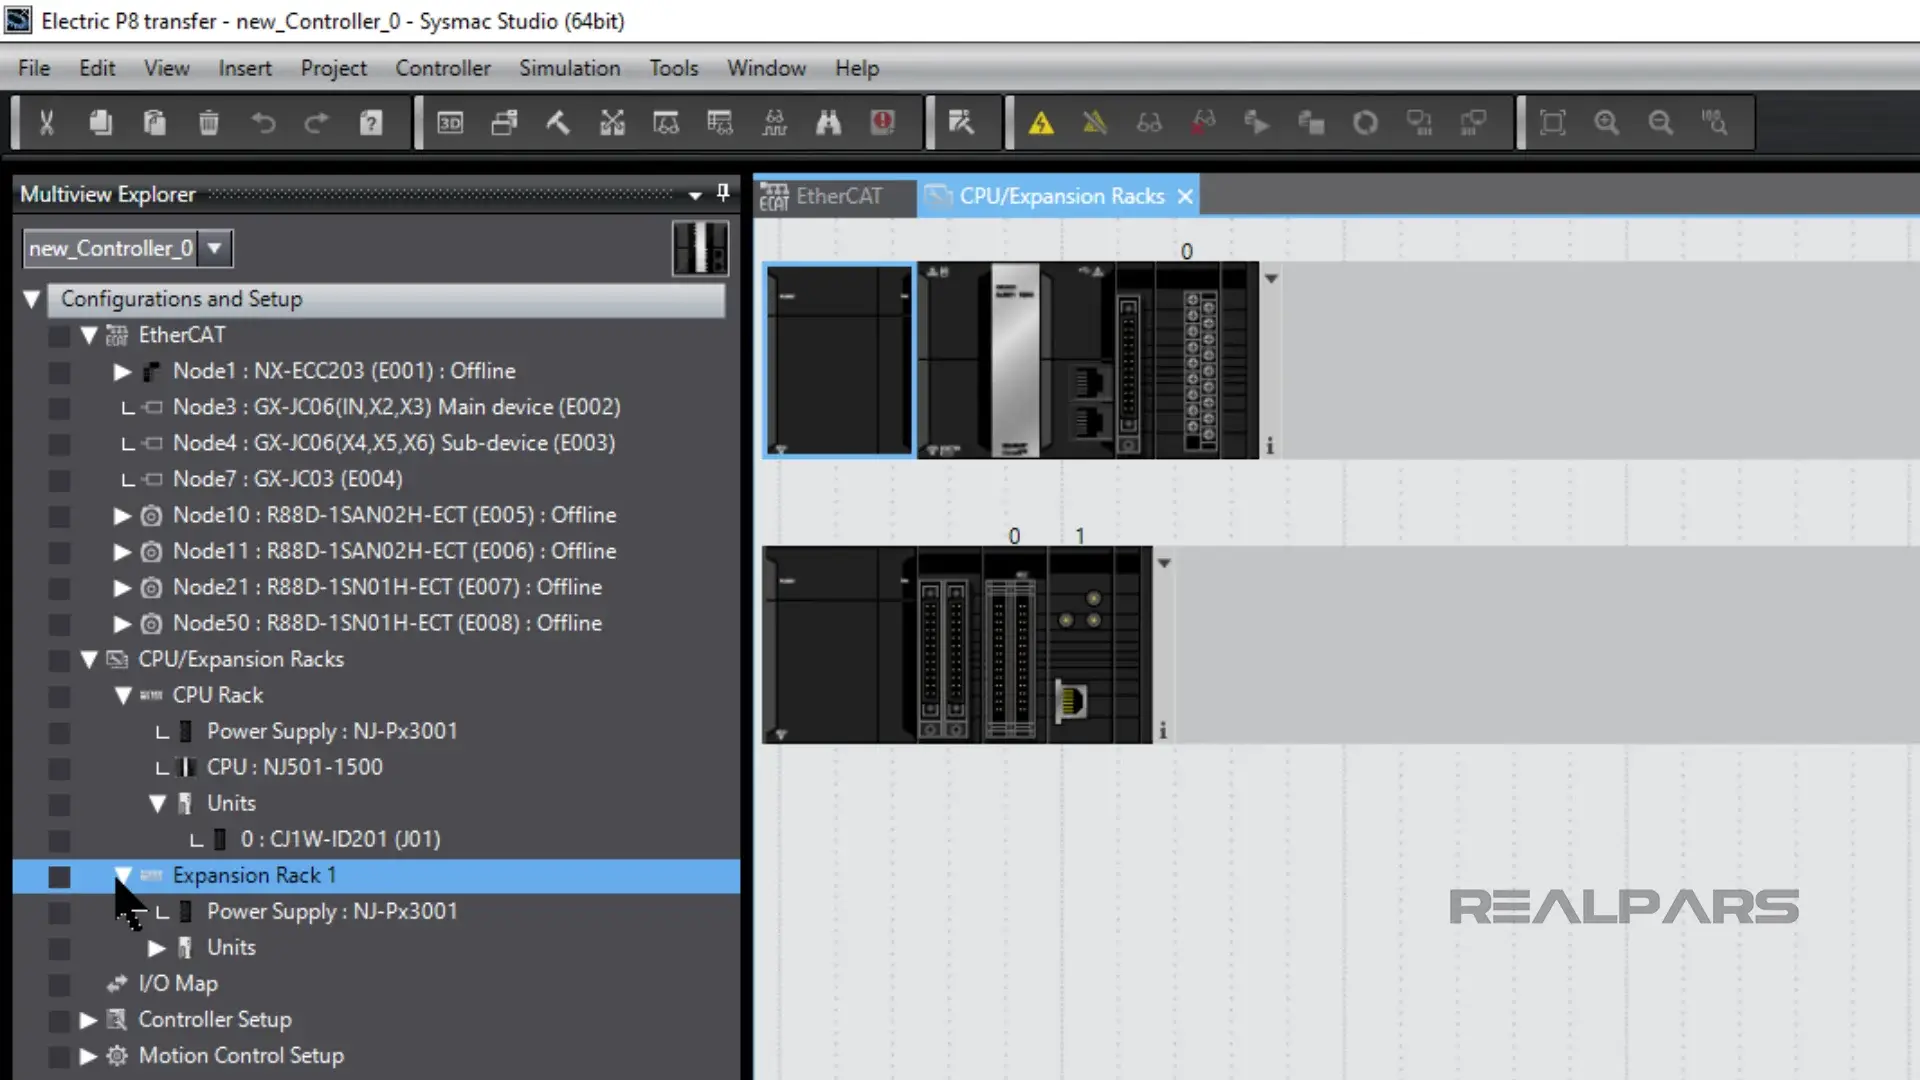
At first glance, we can see the entire hardware and network configuration including the EtherCAT network, the CPU Rack, and the Expansion Rack.
Drilling down into the Configuration, we can see the entire EtherCAT network.
Drilling down into the EtherCAT network reveals the Node 1 Ethercat Coupler and connected I/O modules. Remember, everything here was created in Electric P8!
Drilling down further shows us the CPU Rack and Expansion Rack and the modules in each.
As we mentioned earlier, variables created in Electric P8 as well as I/O mapping are imported into Sysmac Studio.
For example, all the variables for the NX-ID3317 module assigned and mapped in Electric P8 are in Sysmac Studio.
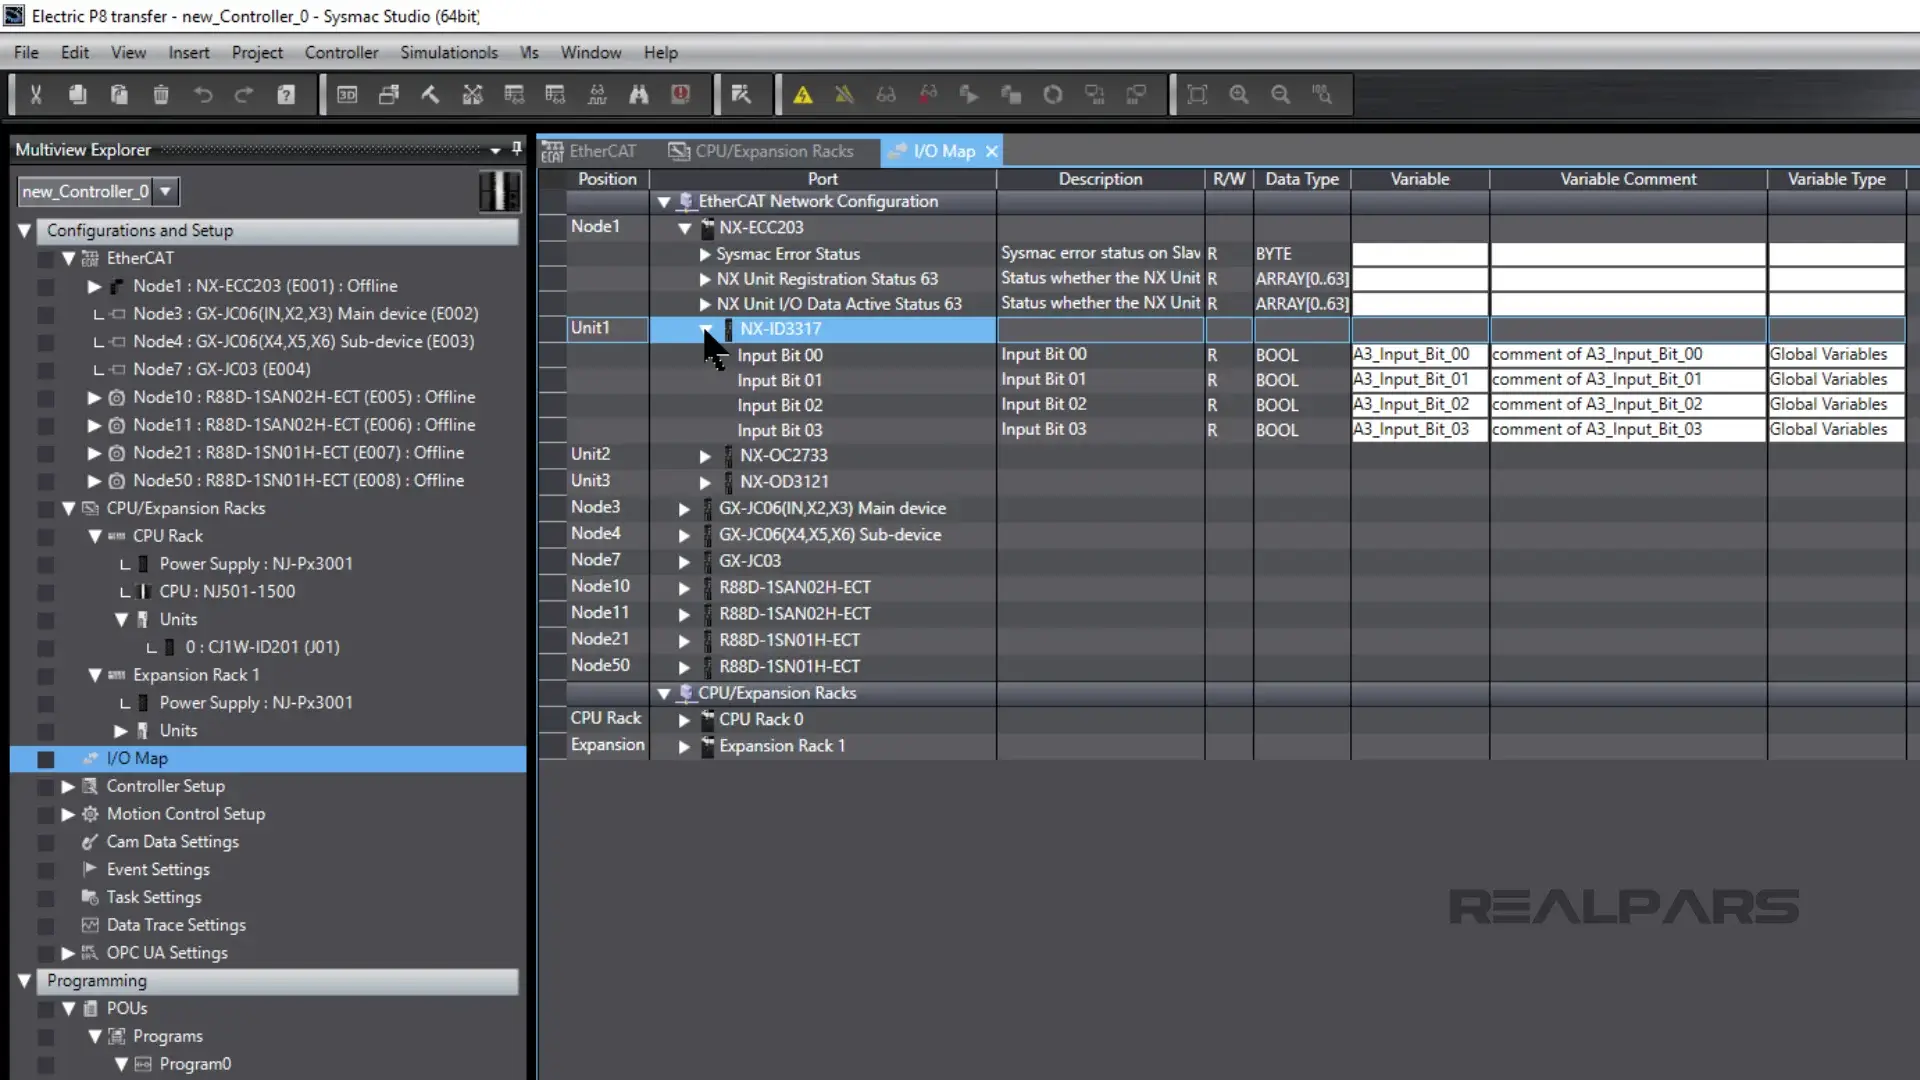
It’s easy to assign variables in an IEC 61131-3 program now as the variables were created in Electric P8 and imported into Sysmac Studio.
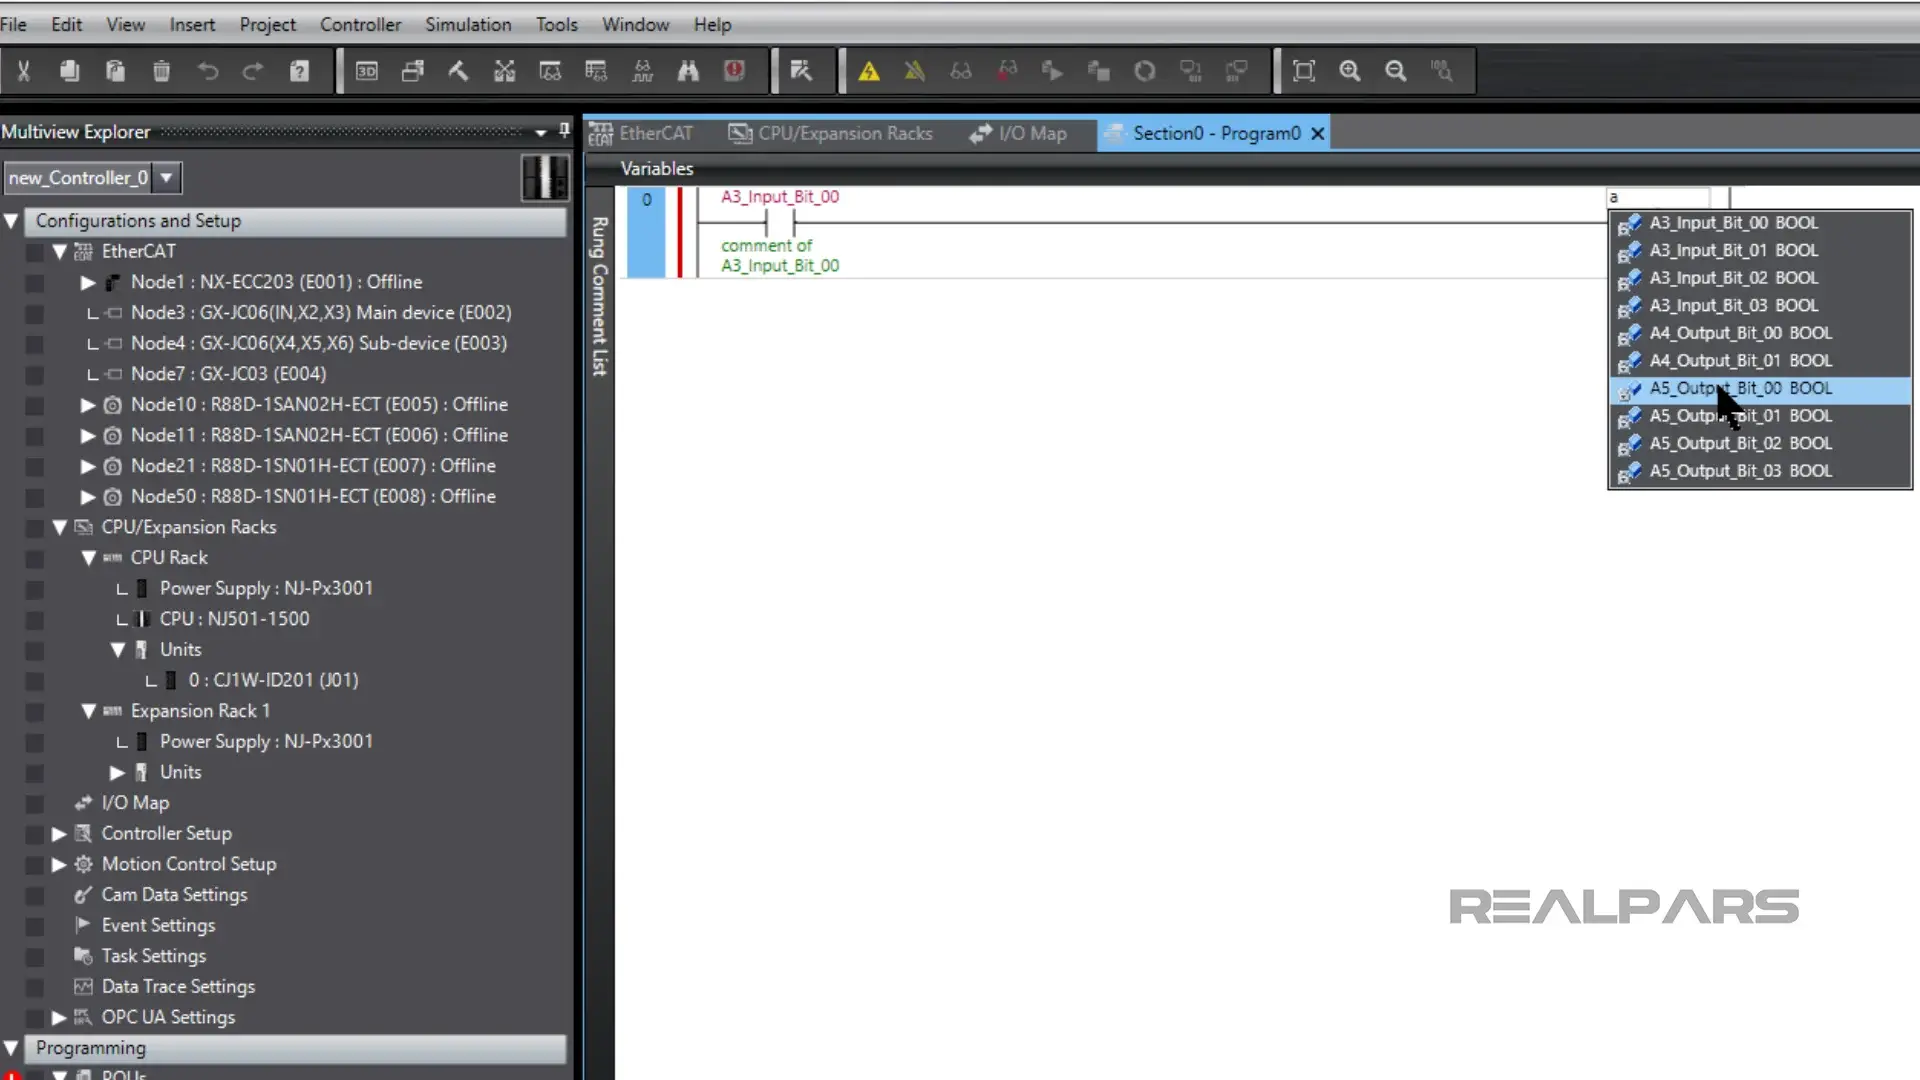
We’ll assign variables in a simple Ladder diagram program to illustrate.
When we assign the variables in the Ladder Diagram, we can choose from the variables created and imported from Electric P8.
Summary
Okay… let’s summarize what we’ve discussed and what we’ve demonstrated in this article.
We introduced you to EPLAN Electric P8 and OMRON Sysmac Studio and we demonstrated how they work together seamlessly.
We showed you how EPLAN Electric P8 circuit diagrams can be imported to Sysmac Studio.
And we demonstrated how an AML file is created in EPLAN Electric P8 and how it is imported into Sysmac Studio.
Would you like to download the Sysmac Studio Trial version?
Open the webpage OMRON License Portal and click on New Registration.
After completing the New Registration Page, a confirmation email will be sent to you. Login once again after you confirm your account details.
Choose Sysmac Studio from the Download List.
The downloaded installer file will assist you in the Sysmac Studio installation process.
If you’re finding this content valuable and wish to gain a more comprehensive understanding of Omron Controllers, consider signing up for our free course Introduction to Omron NX and NJ PLCs.
Frequently asked questions
Learn from Industry Experts
With a 7-day trial, then €35/month